background image

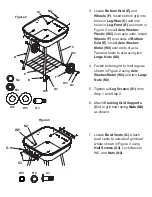
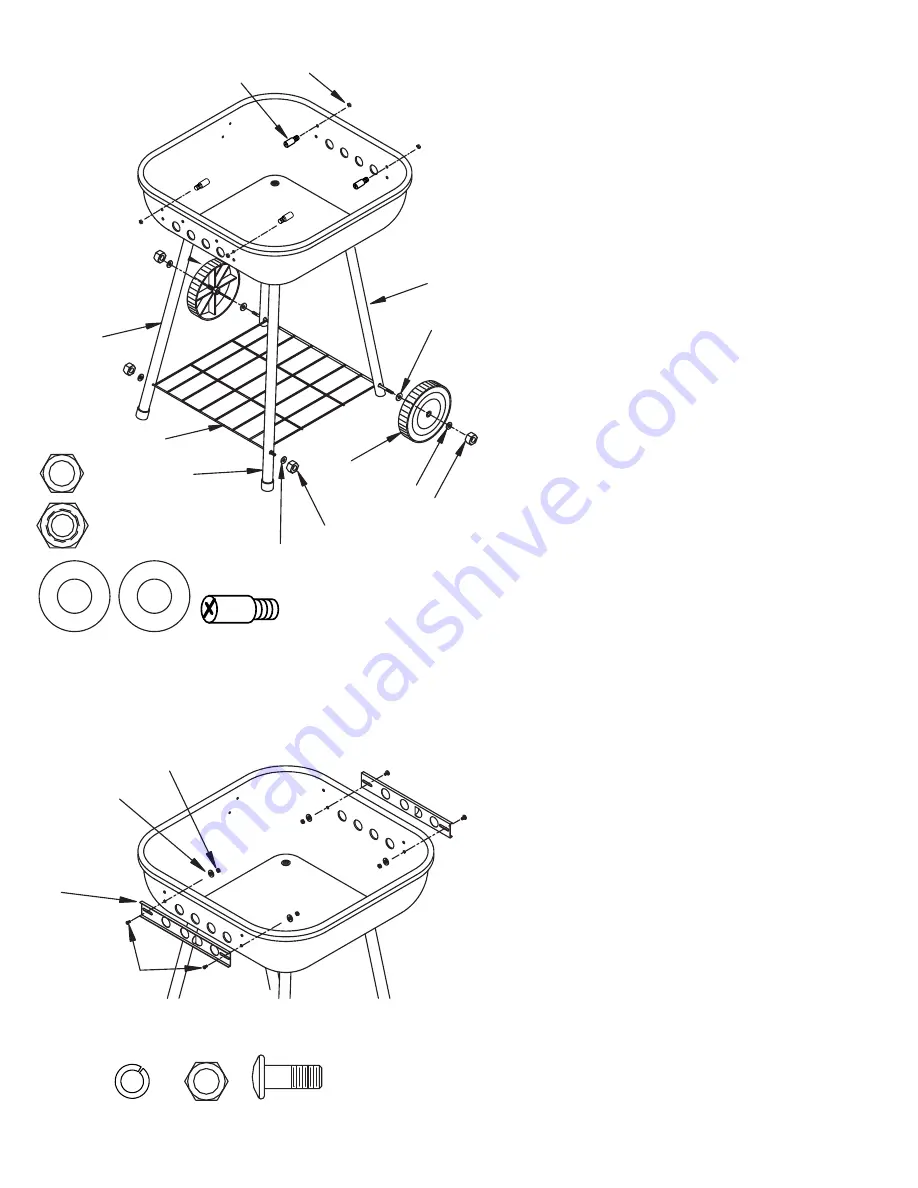
Figure 2

Figure 3

N2 

W5

S3 

S3 

W3 

N3 

W3 

G1

N3  

W2 

N2 

W3 

W2 

N3 

N2 

G1

N2 

W5

3.  Locate Bottom Grid (E) and 

Wheels (F). Insert bottom grid into 

holes in Leg-Rear (C) and into 

holes in Leg-Front (B) as shown in 

Figure 2. Install Axle Washer-

Plastic (W2) over axle ends. Install 

Wheels (F) over ends of Bottom 

Grid (E). Install Axle Washer-

Metal (W3) over ends of axle. 

Fasten wheels to axle using two 

Large Nuts (N3).

4.  Fasten bottom grid to front legs as 

shown in Figure 2 using Axle 

Washer-Metal (W3) and two Large 

Nuts (N3).

5.  Tighten all Leg Screws (S1) from 

Step 1 and Step 2.

6.  Attach Cooking Grid Supports 

(G1) to grill bowl

 using Nuts (N2) 

as shown.

7.  Locate Bowl Vents (G). Attach 

bowl vents to outside of grill bowl 

where shown in Figure 3 using 

Half Screws (S3), Lock Washer 

W5, and Nuts (N2)

Summary of Contents for 18218

Page 1: ...ers are tight Do not modify grill Check to make sure the air vents are free of debris and ash before lighting charcoal and during use This grill should be thoroughly clean and inspected on a regular basis Do not place charcoal briquettes wood or lump charcoal directly into bottom of grill Place only on charcoal grid Do not use gasoline kerosene or alcohol for lighting charcoal Only use starter flu...

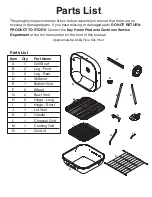
Page 2: ...the Kay Home Products Customer Service Department at the toll free number on the front of this manual Approximate AssemblyTime One Hour Parts List Item Qty Part Name A 1 Grill Bowl B 2 Leg Front C 2 Leg Rear D 4 Stiffener E 1 Bottom Grid F 2 Wheel G 2 Bowl Vent H 2 Hinge Long I 2 Hinge Short J 1 Lid Vent K 2 Handle L 1 Charcoal Grid M 1 Cooking Grid N 1 Grill Lid N B C D E F G H I K L M A J ...

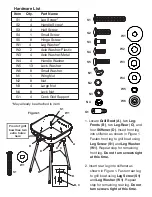
Page 3: ...leg into stiffener as shown in Figure 1 Fasten rear leg to grill bowl using Leg Screw S1 and Leg Washer W1 Repeat step for remaining rear leg Do not turn screws tight at this time Hardware List Item Qty Part Name S1 4 Leg Screw S2 4 Handle Screw S3 4 Half Screw W1 4 Leg Washer W2 2 Axle Washer Plastic W3 4 Axle Washer Metal W4 4 Handle Washer W5 13 Lock Washer W6 8 Small Washer N1 1 Wing Nut N2 8 ...

Page 4: ...er ends of Bottom Grid E Install Axle Washer Metal W3 over ends of axle Fasten wheels to axle using two Large Nuts N3 4 Fasten bottom grid to front legs as shown in Figure 2 using Axle Washer Metal W3 and two Large Nuts N3 5 Tighten all Leg Screws S1 from Step 1 and Step 2 6 Attach Cooking Grid Supports G1 to grill bowl using Nuts N2 as shown 7 Locate Bowl Vents G Attach bowl vents to outside of g...

Page 5: ...Grill Lid N to grill as shown using Half Screws S5 Small Washers W6 Lock Nuts N4 Nuts must not be overtight in order to allow grill lid to open and close freely 9 Locate Lid Vent J Attach lid vent to Grill Lid N as shown in Figure 5 using Small Screw S4 Lock Washer W5 and Wing Nut N1 10 Locate Handles K Attach handles to Grill Lid N and Grill Bowl A as shown in Figure 5 using Handle Screws S2 and ...

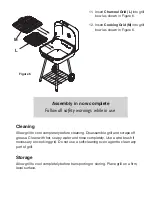
Page 6: ...hot soapy water and rinse completely Use a wire brush if necessary on cooking grid Do not use a self cleaning oven agent to clean any part of grill Storage Allow grill to cool completely before transporting or storing Place grill on a firm level surface M L 11 Insert Charcoal Grid L into grill bowl as shown in Figure 6 12 Insert Cooking Grid M into grill bowl as shown in Figure 6 ...

Reviews: