High Speed Camera User Guide
18
correct way of installing and removing a QSFP+ transceiver, as correct operation can protect the
module from being damaged and ensure its stable performance.
Before removing or installing a QSFP+ module, please follow the precautions and installation
instructions.
Precautions
1.
Use an ESD-preventive wrist or ankle strap and follow its instructions for use.
2.
Make sure there is no dust or any other foreign matter inside the QSFP+ module, or blocking
any of the connectors.
3.
Clean the optic surfaces of the fiber cables before plugging them into the optical ports of a
QSFP+ module.
4.
Removing and inserting a module can shorten its useful life, so you should not remove and
insert the module any more often than is absolutely necessary.
5.
Insert the clean dust covers into the module after the cables are removed. Do not remove the
dust plug until you are ready to attach the network interface cable.
6.
Do not install or remove the QSFP+ module with fiber-optic cables attached to it because of
the potential of damaging the cable, the cable connector, or the optical interfaces in the
module.
7.
Disconnect all cables before removing or installing a module.
8.
Place the removed module on an antistatic mat or a static shielding bag if you plan to return
it to the factory.
9.
Protect the line card by inserting clean module cage covers into the optical module cage when
there is no module installed.
10.
Keep the protective dust plugs installed in the unplugged fiber-optic cable connectors and in
the transceiver optical bores until you are ready to make a connection.
Installing the QSFP+ Module
In order to install the QSFP+ module, follow these steps:
1.
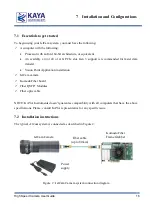
The JetCam and the Komodo Fiber Frame Grabber supporting the following
QSFP+ modules:
KY-QSFP-1.4 – MTP/MPO single mode, up to 1.4km over single mode fiber cable
KY-QSFP-3M – MTP/MPO multi-mode, up to 300m over multi-mode fiber cable
Installation and Configuration

