
C4 and C4C KAYE CORNER CHAIRS
(effective 2/26/03)
These are the user instructions for the C4 and
C4C Kaye Corner Chairs. All persons who set-up or
adjust the unit should first read these entire
instructions. Please store these instructions for future
reference.
USE
The Kaye Corner Chairs are designed for
children who need support of the head, trunk, and
pelvis in order to develop an upright sitting posture
and to align the head and trunk.
SIZES AND MODELS
The corner chairs come in two sizes: the
smaller C4 and larger C5.
Optional casters can be added to both the C4
and C5. With casters, the C4 becomes a C4C, and
the C5 becomes a C5C.
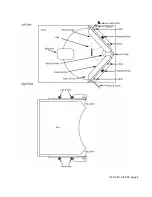
CORNER CHAIR IDENTIFICATION, AND SIZE
AND WEIGHT LIMITS
The model number is located on the warning
label.
The C4 or C4C is appropriate for users from 8
months to 4 years old, up to 39 inches or 99
centimeters tall, or who weigh up to 40 pounds or 18
kilograms.
BOX CONTENTS
The following should be included in the
shipping box:
1 ea. Chair Assembly;
2 ea. Head Cushions; and
1 ea. Tray Assembly.
If you ordered the chair with optional casters,
the following should be included in the inner box:
4 ea. Casters;
16 ea. Bolts; and
16 ea. Lock Washers.
CASTER ATTACHMENT AND USE
Attach, lock, and unlock the optional casters
as follows:
1. Place a lock washer on each of the 16 bolts.
2. Turn the corner chair on its side so that you have
access to the underside of the base.
3. Align the holes in each caster plate with the holes
in each corner of the base.
4. Secure each caster in place with four of the bolts
and washers, and securely tighten the bolts.
5. To lock the casters so that they will not roll, step
on the metal brake that protrudes from each caster.
Once this brake is rotated fully downward, it will
prevent the wheel from rolling.
6. To unlock the casters, rotate the brakes upward.
7. The casters should be locked whenever the
chair is not being intentionally moved.
HEAD CUSHION ATTACHMENT AND
ADJUSTMENT
Position the head cushions to help keep the
user’s head aligned.
On the back of each chair side, there are two
black knobs near the top edge. Use these knobs to
secure the head cushions in place as follows:
1. Remove the knobs and washers to expose the
protruding bolts.
2. Install each head cushion assembly so that the
two bolts protrude through the slot in that assembly.
As you install the assembly, orient the cushion
towards the chair seat.
3. Reinstall a washer and black knob onto each bolt.
4. Tighten the knobs.
5. To adjust the height of the head cushion, loosen
the knobs, reposition the cushion, and re-tighten the
knobs.
TRAY INSTALLATION
Install the tray assembly as follows:
1. On the outside of each tray side is a block with a
barrel bolt. To install the tray, rotate the barrel bolt
latches upward and then outward so that the barrel
bolts point towards the outside of the tray.
2. On the inside of the tray sides there are a few
small, wooden blocks. Position the tray assembly on
the front of the chair so that a set of these blocks
Summary of Contents for C4C
Page 4: ...C4 C4C 2 26 03 page 4...