
KAYE POSTURE SYSTEM, MODELS S1AO AND S2AO
(effective 10/15/02)
These are the user instructions for the Kaye
Posture System. All people who set-up, adjust, and
use the unit should first read these entire instructions.
Please store these instructions for future reference.
USE
These posture systems are designed to be
used with non-folding Kaye Adjustable Benches. The
posture system, when used with the bench, can
assist in positioning the user’s pelvis, legs, and lower
body.
MODELS
The S1AO and S2AO posture systems differ
only by the block which attaches them to the bench.
The S1AO fits the S1A and TSS benches.
The S2AO fits the S2A, S5A, and TSL
benches.
SIZE AND WEIGHT LIMITS
The posture systems are designed to fit users
who have a hip width from 5 to 11 inches or from 13
to 28 centimeters, who are under 13 years old, and
who weigh no more than 55 pounds or 25 kilograms.
BOX CONTENTS
The following should be included in the
shipping box:
1 ea. Back Support Assembly
1 ea. Knee Stop Assembly
1 ea. Attachment Block
2 ea. Short Round Head Screws
2 ea. Long Hex Head Screws
2 ea. Bent Bolts with Knobs
4 ea. Washers
4 ea. T-nuts
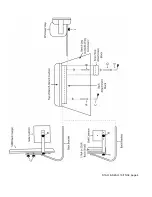
BENCH PREPARATION
New benches are predrilled with two pairs of
attachment holes (Figure 1 shows these holes with
the description “DRILL THROUGH THESE TWO
HOLES”). If your bench is predrilled, skip to the next
section.
If have an older bench that is not predrilled for
the posture system, you will have to drill those holes.
This requires a ruler, drill, 5/16” drill bit, and clamp.
Refer to figure 1 and prepare the older bench
as follows:
1. Remove the cushion from the bench. To do this,
remove the two screws on the underside of the
bench.
2. Center the block on the underside of the bench
and clamp in it place.
3. Use the four holes in the corners of the block as
guides to drill four 5/16” diameter holes in the bench.
4. Remove the block.
5. From the top of the bench (the side that the
cushion covers), hammer T nuts into the four holes.
The nuts must be flush and straight.
6. Reinstall the cushion.
INSTALLATION
This will require a phillips screw driver and a
7/16” wrench.
Refer to the figures 1 and 2 and attach the
posture system as follows:
1. Align the holes in the corners of the attachment
block with the holes on the underside of the bench.
2. Place a washer on each of the two shorter
screws. Use these to secure the shorter end of the
block.
3. Place a washer on each of the two longer screws.
Use these to secure the longer end of the block.
4. Turn the bench upright.
5. Install the knee stop into the end of the block that
has two slots. Slide the aluminum bar into the
lower
slot and use a bent bolt to secure this in place.
6. Install the back support into the end of the block
that has one slot. Slide the aluminum bar into that slot
and use a bent bolt to secure this in place.
BACK SUPPORT DEPTH ADJUSTMENT
Adjust the back support depth to allow about
2/3 of the thigh to rest on the seat cushion.
Refer to figure 2 and adjust the depth of the
back support as follows:
Summary of Contents for S1AO
Page 4: ...S1AO S2AO 10 15 02 page 4...


