background image


Validation 


Kaye ValProbe

®

 RT


User Manual 


MXXX-EN Rev. 1.0


May 2020


Summary of Contents for ValProbe RT

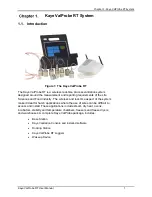
Page 1: ...Validation Kaye ValProbe RT User Manual MXXX EN Rev 1 0 May 2020 ...

Page 2: ... No content intended for this page ...

Page 3: ... ValProbe RT Process Monitoring and Validation System User Manual M5XXX EN Rev 1 0 May 2020 Copyright 2020 Amphenol Thermometrics Inc 967 Windfall Road St Marys PA 15857 3333 USA Web www kayeinstruments com ...

Page 4: ... No content intended for this page ...

Page 5: ... 2 2 Data Collection 14 2 3 Logger Battery 15 2 3 1 Battery Replacement 16 2 4 Kaye RF ValProbe RT Base Station 20 2 4 1 Base Station Overview 20 2 4 2 Base Station IRTD Bath Connections 21 2 4 3 Base Station Battery Backup 21 2 4 4 Base Station LED Indications 22 2 4 5 Base Station Wakeup Magnet 24 2 4 6 Wakeup Device 24 2 4 7 Kayetenna Extended Antenna Cable 25 2 5 ValProbe RT Console Docking St...

Page 6: ...cies 44 4 7 Handling Data Files 45 4 8 Hardware Maintenance 50 4 9 Online Help 50 Defining Equipment 51 5 1 Adding New Equipment 52 5 2 The Equipment Hub 53 5 3 Checking Details for Existing Equipment 54 5 4 Calibration Reminder 55 Defining Assets 56 6 1 Asset Details Screen 57 6 2 New Asset Screen 59 Defining Study Setups 61 7 1 Create a Setup File 62 7 2 Modify an Existing Setup 62 7 3 Define Se...

Page 7: ...udy 84 9 1 Introduction 84 9 2 Load a Setup 85 9 2 1 Select a Setup File 85 9 3 Viewing the Active Qualification Study 86 9 4 Graph Real Time Sensor Readings and Calculations 87 Sensor Verification 88 10 1 Introduction and Overview 88 10 1 1 Defining Verification Strategy and Criteria 89 10 1 2 Selecting the Proper Calibration Bath Uncertainty 89 10 2 Creating a Verification Setup 91 10 3 Loading ...

Page 8: ...rs Screen 129 11 10 Report Selection 130 11 11 Grouping Sensors 131 Appendix A Specifications 135 A 1 Kaye ValProbe RT System 135 A 1 1 List of Certified Countries 135 A 1 2 Regulatory Compliance 135 A 1 3 RF System Operating Frequency and Modulation 135 A 1 4 RF Channels 135 A 1 5 RF Network Topology and PAN ID Network ID 135 A 1 6 Antenna Diversity 135 A 1 7 Data Rate and Data Encryption 135 A 1...

Page 9: ... 8 Ethernet Communication Port 136 A 2 9 Reset Switch to Reload Default Factory Settings 136 A 2 10 Wakeup Magnet 136 A 2 11 Batteries 136 A 2 12 Unit Dimensions 136 A 2 13 Enclosure Material 137 A 2 14 Environmental Ratings 137 A 3 Kaye ValProbe RT Logger 137 A 3 1 Installation Category 137 A 3 2 Overvoltage Category and Electrical Safety Protection Class 137 A 3 3 Magnetic Switch 137 A 3 4 LED I...

Page 10: ... 6 1 Measurement Accuracy 139 Appendix B Regulatory Compliance and Agency Approvals 140 B 1 Electrical Safety Approvals 140 B 1 1 European Safety Certification 140 B 1 2 UL USA Safety Certification 140 B 1 3 Canada Safety Certification 140 B 1 4 IEC and CB Scheme Certification 141 B 2 Radio and EMC Certification Approvals 141 B 2 1 USA FCC and Canada ISED 141 B 2 2 European Radio and EMC Certifica...

Page 11: ...tation Label 145 B 9 2 Kaye ValProbe RT Logger Label 145 Appendix C Environnemental Compliance 146 C 1 Waste Electrical and Electronic Equipment WEEE Directive 146 C 2 Battery Disposal 146 C 2 1 What do the Markings Mean 147 C 2 2 The Risks and Your Role in Reducing Them 147 Appendix D Warranty and Returns 148 Appendix E Service Information 149 ...

Page 12: ......

Page 13: ...rovides an overview of the ValProbe RT system Chapter 2 explains the ValProbe RT hardware and provides instructions to connect the system Chapter 3 provides instructions for creating user accounts Chapter 4 provides instructions for entering Kaye equipment into the system Chapter 5 provides instructions for entering assets into the system Chapter 6 provides instructions for creating setups Chapter...

Page 14: ...e Life Sciences and Food industry The wireless and real time aspect of the system make it ideal for harsh applications where the use of wires can be difficult to access and install These applications include steam dry heat ovens incubators stability and temperature chambers freezers and freeze dryers and warehouses A complete Kaye ValProbe package includes Base Station Kaye Validation Console and ...

Page 15: ...na diversity to provide optimum RF signal strength and reliability The Loggers are battery powered using a 3 6V AA Lithium Thionyl Chloride battery Dependent on model type the loggers can collect temperature and pressure data from 85C to 140 C Up to 25 Loggers and 50 sensors can be connected to a Base Station The Loggers store the data in their internal memory based on a user defined sampling rate...

Page 16: ...ns create reports store Validation studies and provide real time display All commands and action generated at the Console are transmitted to the Base Station and then broadcast via RF from the Base Station to the Loggers 1 3 Unpacking Unpack the Kaye ValProbe RT Loggers Base Stations Kaye Validation Console and accessories carefully and inspect them for any damage that may have occurred during shi...

Page 17: ...ble battery may cause over heating and explosion 1 4 Safety Information Use this instrument as specified in this Manual Protection provided by the equipment may be impaired if the equipment is used in a manner not specified by Kaye Do not use this equipment in environments other than those listed in the Manual CAUTION Use ONLY Kaye 200 166 3 7 V lithium secondary rechargeable batteries Using any o...

Page 18: ... example they can be immersed in cleaning fluid or detergents or used in harsh environments They can store the study setup and up to 100 000 pressure samples and 100 000 temperature samples with variable stop start conditions in non volatile memory WARNING Substitution of components may damage the logger Do not heat the Temperature Logger above 140 C Do not heat the Pressure Temperature Logger abo...

Page 19: ...ye ValProbe RT Single Bendable Temperature Logger XCBVP L G RT 3 Kaye ValProbe RT Dual Bendable Temperature Logger XCDBVP La Lb G RT 4 Kaye ValProbe RT Single Flexible Temperature Logger XCFVP L RT 5 Kaye ValProbe RT Dual Flexible Temperature Logger XCDFVP L RT 6 Kaye ValProbe RT Five Channel Flexible Temperature Logger XC5FVP L RT 7 Kaye ValProbe RT Surface Temperature Logger X2534 RT 8 Kaye ValP...

Page 20: ...available in different probe configurations see Figures below Single Type Loggers Figure 6 Rigid Figure 7 Flexible Figure 8 Bendable Figure 9 Surface Two and Multiples Type Loggers Figure 10 Dual Flexible Figure 11 Dual Bendable Figure 12 Five Flexible The ValProbe RT Logger is a temperature logger that provides a single solution for a variety of applications such as steam dry heat ovens incubator...

Page 21: ...er Manual 8 Rigid Temperature RT Loggers The Rigid Temperature RT Loggers have a temperature range from 85 C to 140 C They are a single sensor only with a sensor length of 1 5 3 6 or 9 and have a diameter of 3mm 0 118 Figure 13 Rigid Temperature RT Loggers ...

Page 22: ...To prevent breaking and or stress on the inner conductors of the bendable Temperature Logger probe the following guidelines should be followed Do not bend past the minimum bending radius is 2x the diameter of the probe To ensure that the limit is not exceeded Kaye recommends bending the probe around a cylinder with a diameter of the logger diameter Avoid repeated bending of the probe at the same p...

Page 23: ...The length of the sensor is 40 with a sensor tip diameter of 2 4mm and tip length of 25mm 0 98 Figure 16 Flexible Temperature RT Loggers Surface Temperature RT Loggers Surface Temperature RT Loggers are ultra flat surface sensors with a temperature range of 85 to 140 C These sensors are optimized to be used for Shelf mapping for Freeze Dryers The flat surface diameter of the sensor is 32mm Figure ...

Page 24: ...o 5 Bar absolute using a strain gage pressure sensor and temperature from 0 C to 140 C using a precision Platinum RTD element Figure 18 Pressure Temperature Logger CAUTION Do not insert objects into the top of the Pressure Logger This can damage the diaphragm in the Logger invalidating the pressure readings Note Clean the Pressure Logger with an alcohol rinse and then airdry ...

Page 25: ...ting a Logger into an Insulating Canister For dual and single bendable Loggers only unscrew the protective housing cap from the Logger Remove the cap by pressing down on the cap and turning it counterclockwise until the clips are free from the tabs Place the PEEK cylinder over the bendable Temperature Logger probe and slide it to the base of the Logger Place the Logger and PEEK cylinder into the c...

Page 26: ...ime indicated in the table the Logger base may be subjected to temperatures greater than 140 C which can damage the Lithium Thionyl Chloride battery This may result in a leakage of electrolyte WARNING In the event the Logger base has been subjected to temperatures above 140 C safety glasses and protective gloves should be worn before attempting to service the Logger to avoid electrolyte contact wi...

Page 27: ...hen the Logger stops collecting any further data Data stored in the Logger is stored in non volatile memory and is retained until a new Qualification or Verification is loaded Loggers can be programmed to start data collection manually when the Qualification is started or based on Time of Day and programmed to stop collection manually or based on cycle time Table 4 Qualification Start Stop Conditi...

Page 28: ...r by up to 10 Refer to the battery life tables in the Kaye ValProbe RT online help for the best approximation of the number of runtime hours you can expect from the battery at different sample rates and temperatures The Kaye ValProbe RT software tracks each Logger s battery life to within 10 of a potential low voltage occurrence to help prevent interrupted or incomplete studies When determining th...

Page 29: ...o 49 in Orange and 50 to 100 in Green Battery replacement is a three step process involving Removing the Existing O ring and Battery Installing the Replacement O ring and Battery Resetting the Battery Odometer Open the Logger and Remove the Existing O ring and Battery WARNING To ensure that the Logger maintains its waterproof and pressure tight seal a thin coat of grease was applied to the O ring ...

Page 30: ...pply the grease to all surfaces of the O ring ensuring not to cut or scratch the O ring Figure 23 Apply Grease and Replace O ring Slide the O ring over the tip end of the probe and into the O ring groove Do not stretch or deform the O ring and avoid contact with the threads to prevent nicking and or cutting the O ring With the new O ring in place insert the pre conditioned battery into the battery...

Page 31: ... and hand tighten until the cup O ring is no longer visible Clean the exterior of the Logger with a soft cloth to remove any excess lubricant Reset the Battery Odometer When you change the battery in a Logger you must also reset the battery odometer to 100 for the program to calculate the life of the new battery Reset Battery Life Start the ValProbe RT software Navigate to the Hardware Discover ti...

Page 32: ... the lower left dropdown in the Logger Reset screen and press Battery Reset Figure 27 Logger Battery Reset Select OK when prompted to continue the battery reset and then enter your user credentials Figure 28 Logger Battery Reset Prompt When all Logger battery resets are complete ensure that their status displays Success in the Status column ...

Page 33: ...er is 450 ft 150 meters Figure 29 RF ValProbe RT Base Station CAUTION Use only the Kaye power supply Kaye 201 3006 provided with your ValProbe RT The use of non factory power supplies may damage the equipment and will void your warranty Base Station Power Communications Connection The Base Station also provides an Ethernet connection at the base of the unit for communications from the Base Station...

Page 34: ...ckup for up to 60 minutes The Base Station is powered by two 3 7V AA size rechargeable Lithium batteries The Base Station has a built in charger so batteries will be charged automatically when there is a main supply available to the base station To replace the batteries first shut off the base station using ON OFF switch Then open the sliding panel on the back of the base station and replace the b...

Page 35: ...dware Kaye ValProbe RT User Manual 22 Base Station LED Indications The Base Station LED panel provides multi colored status indications of item such as Figure 33 Base Station Status Panel Figure 34 Base Station LED Indication Chart ...

Page 36: ...r a battery issue STUDY STATUS LED GREEN indicates that a study is in progress GREEN blinking indicates that a data transfer is in progress to USB storage RED blinking indicates a data transfer error to the USB storage BLUE indicates that a firmware upgrade is in progress or the study stopped BLUE blinking indicates that RF data retrieval is in progress COMMUNICATION LED GREEN indicates that the c...

Page 37: ... mode there is inactivation of communication for 15 min Keep any magnetic sensitive devices away from the Base Station Figure 35 Wakeup Magnet Wakeup Device Figure 36 Wakeup Device for Logger The Wakeup device is a plastic enclosure with a permanent magnet inside It helps to wake Loggers from Sleep mode The powerful neodymium magnet is located exactly behind the Kaye logo Keep the Wakeup device aw...

Page 38: ...ggers are designed with a feature called Antenna diversity Antenna diversity utilizes two separate antennas that look for the best signal strength across two planes to maximize distance signal strength and reliability For some extremely difficult applications such as large autoclaves with thick walls where communications could be difficult Kaye offers an optional two meter antenna cable Kayetenna ...

Page 39: ...ll related ValProbe RT software and documents such as the User Manual and SOP Additional features include IP54 rated water dust and splash resistant Durable Gorilla Glass Rubberized for shock dampening Hot swappable battery six hours On board camera for generation of sensor overlay pictures The ValProbe RT System also includes a portable docking station for easy access and viewing The docking mech...

Page 40: ...It also provides real time display data storage and a powerful reporting tool for post analysis of Qualification data The ValProbe RT software contains features to perform the following validation tasks Create Assets Create Setups Run Qualification Studies Perform Sensor Verification Create Qualification Reports and Graphs Storage of Validation files Sync In Sync Out and Archive of Data User Permi...

Page 41: ...ed with a Static IP address of 192 168 99 50 The Console Ethernet adapter setting is set for a Static IP address of 192 168 99 55 To connect via direct connection and verify system connectivity do the following Attach the supplied cross linked Ethernet cable to the Ethernet connector located at the base of the Base Station to the Ethernet connector located on the Docking Station Figure 41 Base Sta...

Page 42: ...en established a blue tile signifying the Base Station appears with an IP Address 192 168 88 50 Note If the Base Station s blue tile does not appear with the IP 192 168 99 50 proceed to Section 3 3 for instructions to reset the Base Station and then return and repeat Steps 5 7 If the problem persists contact technical support 8 Press the Base Station tile and then press Configure to open the BaseS...

Page 43: ...onnect mode b The RF Channel Settings Pan ID and RF Channel are for service use only and should not be adjusted The Region dropdown permits selection between US or EU Europe This changes the licensed RF strength and should be set accordingly c Use the Base Station settings to customize the System Name and Location in the blue Base Station tile d The Set Base Station to Idle button resets the Base ...

Page 44: ...m Direct Ethernet connection via Static IP to a network connection via DHCP perform the following steps 1 First change the Base Station settings and connect the system via Direct Connection following Steps1 8 in Section 3 1 2 In the Base Station Setup window make any necessary changes to the RF Channel Settings and Base Station Settings a The RF Channel Settings of the Pan ID and RF Channel are fo...

Page 45: ...iscover the Base Station The Base Station is not found because the Console IP settings need to be changed and an Ethernet cable needs to be connected from the Base Station to the network connected Console 5 To change the Console IP settings perform the following a In the taskbar select Start Settings b Select Network Internet Ethernet Change Adapter Options c Right Click Ethernet Properties Figure...

Page 46: ...he network assigned IP address Note The discovery function can only detect Base Stations in the same IP segment and the same subnet as the computer If the Base Station is not in the same sub segment or configured to another subnet mask you must manually add the IP using the Add button If the Base Station discovery was unsuccessful contact Kaye support or your company IT department WARNING If a Bas...

Page 47: ...he same as initial power ON all LED RED GREEN BLUE and the Power LED blinks When the Power LED is no longer blinking but consistently lit you can reconnect to the Base Station using the software At the completion of the Base Station reset the following settings below are set and any connected Loggers are set to idle DEFAULT FACTORY SETTINGS Base Station mode IDLE Ethernet mode STATIC IP ADDRESS 19...

Page 48: ...eted when you exit the Password Maintenance utility You can then use your own account to perform all system administration tasks On the Admin tile the System Administrator has access to the preferences policies user management firmware upgrades and auto sync configuration In this Chapter you Start the program and log in to the Password Maintenance utility using the default System Administrator acc...

Page 49: ... the User Management screen opens For the first new user the New User window opens automatically For additional system administrators press New User Note Red asterisks fields are mandatory User IDs are unique and the passwords must follow the default rules for passwords minimum of six characters Enter a User ID in the User ID textbox Note A User ID can use any combination of numbers and characters...

Page 50: ...e built in camera After completing the system administrator user setup the system logs you out To proceed open the software and log back in with your new account information When logged in for the first time you will see the ValProbe RT s Main Screen where you can create new user accounts set preferences and policies discover new hardware add remove view assets and equipment and display an audit t...

Page 51: ...nistrator account On the Main screen press the Admin panel to open the Admin Settings window on the Preferences tab From the Admin Settings window press User Management On the User Management screen press New User and enter your name in the Name textbox This username appears in the active user list Figure 52 User Management Screen Enter a new System Administrator User ID any combination of numbers...

Page 52: ...in To create a user account From the Admin menu press User Management and then press New User The New User screen becomes active Enter a new username in the Name textbox Note User IDs must be unique Once a User ID has been used it cannot be used again Enter the new account s user identification in the User ID textbox The user ID can be any combination of numbers and characters The user ID and pass...

Page 53: ... the temporary password when logging in for the first time Set the default Designation by pressing the entry on the drop down list Select any permissions to give to the user Some examples of permissions include Creating setups Running studies Viewing or editing reports Press Save and the username appears in the user list ...

Page 54: ...strator can re enable the user account by unchecking Disabled User Account Deleted User Press Delete at the bottom of the screen if a user s account is no longer required an Administrator can delete the account To prevent discrepancies in the audit trail the deleted user s ID is blocked for further usage The deleted user is removed from the user list but the user information remains accessible via...

Page 55: ...be maintained If administrator access is no longer possible Kaye can provide one time Emergency access with the sole purpose of modifying an Administrator account For this procedure direct support from Kaye service is required At the login screen enter Ctrl e into the password field to start the emergency login Please contact Kaye Support directly to receive required information Emergency access i...

Page 56: ...calculations If you are selecting Other enter the value of 1 Atmosphere in the absolute pressure units you are using Alternative Machine ID If required enter an alternate machine identification number which appears in the audit trail as additional identification Allow Users to change Lethality Use the drop down to decide if the user should be able to change lethality Yes or No IRTD Stability Thres...

Page 57: ...80 days The password expiration date set here is displayed at login when there are five days or less before password expiration Expired passwords can no longer be used as new passwords Disable user accounts after three unsuccessful login attempts Disable user accounts after a certain amount of unsuccessful login attempts Check the checkbox to enable and set the amount of consecutive unsuccessful l...

Page 58: ...version depending on the modified date for users and assets If two items have the same name but different dates reports study files both are retained Sync operations are started from the File Management tile on the Main screen When starting a sync operation the software asks for the sync folder location Sync Out The Sync out function is used to copy the data content of the console to another file ...

Page 59: ...ore data of a backup generated with the Sync out or Archive function Like in the sync out function the user can select which data and which assets are copied to the console In addition to the Data selection there s a date filter to prevent old data to be copied to the console The date filter specifies a time frame with simple drop down selection Figure 56 Sync In ...

Page 60: ...console Therefore in addition to the Sync out function there is an archive date All files that are older than the specified date is moved Like in Sync out the assets can be selected individually If you select a folder with existing sync data as target the copied data is merged with the existing console data Note It is recommended to use a separate folder for archived data otherwise the data syncs ...

Page 61: ...ready in the system the software will now create a new asset and setup file from the information stored in the study file Note If a Study file of an already existing asset is selected it will merge the study file with existing files into the asset without duplicates Figure 58 ValProbe RT Convert Using Mapped Drives for Synchronization The synchronization function can be used to share data via a ma...

Page 62: ... the domain user format is accepted as well Figure 60 Mapped Drive Login Credentials The security setup to access a shared folder is dependent on your network environment There are several scenarios The folder can be accessed without any restriction If so enter a random user and password as empty fields are not accepted The random user and password are not used and discarded If the folder has user...

Page 63: ...s option to upgrade the Logger firmware and press OK Logger Battery Reset Select this option to reset he Logger batter and press OK 4 9 Online Help For online help you need to swipe from the bottom or top edge for the app commands There are two icons with a question mark labeled as Windows Help and Help Windows Help displays the help screen of the operating system Help displays context specific he...

Page 64: ...t database that is identified by serial number manufacturing calibration information and an optional picture Calibration reminders set by a calibration reminder setting inside the system s preferences and the calibration due date An Initiate Verification button to verify the specific equipment based on temperature Study files searching by the location that certain Kaye equipment were used To searc...

Page 65: ...een Enter details for each new piece of equipment separately Use the textboxes and drop down menus to enter the following Serial No Model Number Asset Name Equipment Type Manufacturing Cal Date Not editable An image An equipment image will be auto populated by the equipment type However a different image may be uploaded from a bmp jpeg or taken directly with the built in camera Press Save to save ...

Page 66: ...uipment Hub screen lists all added equipment for that particular type The following information is displayed in each equipment tile Serial No Type Mfg Cal Date Mfg Calibration Due Date Last Verification Date In the top right corner of the screen is a Filter button where you can filter the equipment by serial no type Mfg calibration date latest Mfg calibration due date and verification date using t...

Page 67: ... edited A different image may be uploaded from a bmp jpeg or taken directly with the built in camera Inside the middle of the screen all study files associated with this equipment are displayed along with a Trash Bin icon to delete the study file and a Print icon to print the study data You can use the Copy to Drive button to copy your study files to an additional drive To delete the selected equi...

Page 68: ...ge 44 When the equipment calibration due date is within the calibration warning message timeframe the software reminds the operator when Inside the Equipment tile on the Main screen a number corresponding to the number of equipment due for calibration displays Opening Equipment the tiles for any equipment due for calibration are enlarged in light blue and display the calibration due date directly ...

Page 69: ...o open the Assets hub press the Assets tile on the Main Menu The Assets Hub appears as Figure 65 below Figure 65 Assets Hub The Asset Hub lists the various assets validated by your ValProbe RT system On the top text line you can press each category to display the assets by Type sterilizer dry heat oven controlled temperature etc up to 20 user designated types Manufacturer Location The asset tiles ...

Page 70: ...idation as manually entered in the Edit Asset screen At the upper right tiles list the following categories associated with the selected asset Setups Qualifications Reports Documents The number on each tile represents the number of available files under this specific tile Select a tile and the lower right window displays the list of related data For setups the panel displays the latest setup files...

Page 71: ...rstly select a setup to activate the initiation buttons Pressing this button starts a qualification The Hardware Discovery screen displays and the setup is transferred to the selected ValProbe RT Inside the Equipment tile a list all available calibration study files including the setup name date run number and comments After selecting a study file you can open the report tool and create a report L...

Page 72: ...ew Asset Screen To enter a new asset into the ValProbe RT system go to the Asset Hub screen and press the Plus icon The New Asset screen opens Figure 68 New Asset Screen Enter each new asset details separately use the textboxes and drop down menus to enter Name Asset names must be unique Before synchronizing several asset data sets it is recommended to ensure there are no duplicate asset names uti...

Page 73: ... model number of the asset This field is optional Size Specifies the volume of the asset in cubic units In the drop down it is possible to select the appropriate units or enter custom units This field is optional Last Validated Specifies the date of the last validation of the asset This field is optional Validation frequency Specify the required validation frequency This field is optional At the r...

Page 74: ... established by your System Administrator in the Admin menu User Management tab The setup is accessed from the Asset Details screen through the Setup pane When creating a setup Define the sensors you are going to use in the study Assign sensors to groups and generate a wiring diagram Specify calculations and define group events to be monitored during the qualification study Specify start and stop ...

Page 75: ...en To create a setup file From the Asset Details screen press Setups In the Setup Pane Hub press New to enter the Study Details screen You can now define sensors assign sensors to calculation groups specify the qualification cycle and save your setup 7 2 Modify an Existing Setup Setup files for a specific asset are listed on the Setup screen To modify an existing setup file From the Setup Hub scre...

Page 76: ...boxes or drop down lists to enter Setup Name No number of Max Sensors Asset ID SOP Standard Operating Procedure Protocol Number Load Description Comments Note The Setup name and number of sensors fields are mandatory The Setup Name and Comment fields accept alphanumeric characters and spaces the Load Description and SOP fields can also include special characters spaces _ and When all asset data is...

Page 77: ...cate that they have not been selected To select a sensor tile click each tile the tile turns to dark blue and a selection icon in the upper right corner appears You can also select a series of sensors in the Configure Sensors pane on the right Select a range of sensors press Select and those sensors all appear as selected on the left pane To deselect a sensor select a sensor with a selection icon ...

Page 78: ... your qualification study is complete grouping allows you to customize your reports Use the following guidelines when defining groups There must be at least one group defined in a setup Each group must have a unique name Groups should be homogeneous similar sensor types since calculations are performed on all the sensors You can assign a sensor to more than one group to relate the sensor s output ...

Page 79: ... orange checkbox Press the New Group button and the Group Name textbox appears on the screen The Group Name textbox accepts characters that can be upper and lower case numeric special characters like hyphen underscore slashes forward and backward and blanks Enter a name and toggle the Save button to save the group This screen also offers the following options Delete permits deletion of a group of ...

Page 80: ...taken by pressing the camera icon through the device camera Sensor tags can be moved via drag and drop to the position reflecting the desired or actual position on the asset Wiring diagrams can be exported to a pdf using the Printer button For every group it is possible to select a picture and a sensor position then save it together with the setup The wiring diagram can be printed from the Wiring ...

Page 81: ...the qualification study Calculations include lethality saturation pressure of steam and saturation temperature of steam calculations The Statistical Calculations are all preselected by default and are calculated Note If lethality is selected in the setup the report tool requires the definition of an exposure cycle as mandatory It is also possible to define events to monitor during the study These ...

Page 82: ...tion Parameters screen From this screen you specify Qualification start stop conditions used to start and stop the qualification cycle manually or automatically Data storage options the rates at which data is written to the memory of the Logger during a qualification run There are three options Sampling Rate RF Transmission Rate and RF Threshold When you have finished press Review to check your en...

Page 83: ...een provides following actions Copy as New Setup copy the current setup as a new setup and save it under a different name Create Setup Report creates a setup report as pdf file for saving and printing This screen also displays the following sections each with an Edit icon to permit rapid changes Asset Details Sensor Details Calculation Groups Report Header Qualification Parameters Press Save to sa...

Page 84: ...ware to open the Select Base Station window Figure 79 Main Menu with Hardware Discover Tile Pressing Discover BS searches the connected Networks LAN or Wi Fi for available Base Stations They are listed with blue tiles displaying a serial number and IP address The tile for the currently selected Base Station has an orange triangle in the upper right corner To connect to a network connected Base Sta...

Page 85: ...on select a Base Station and press Configure The connection needs to be established by docking recommended or Ethernet Enter all necessary information and press Ok to transfer the information to the Validator The Validator uses this information to connect to the specified Wi Fi network and becomes available with the Discover button Please see Section 3 1 Setting Up the Base Station for detailed in...

Page 86: ... is running and the data collection structure sensor and groups definition are following the last transferred setup to transfer a setup you need to start a study If the ValProbe RT is in monitoring status you can switch between List and Graph View to see live data Figure 82 Monitoring in List View Figure 83 Monitoring in Graph View ...

Page 87: ... change the current setup parameters by pressing the Setup button Displayed below the buttons is a timestamp of the ValProbe RT clock not the console time that can be displayed with a swipe from right to left On startup the timestamp of the ValProbe RT is synchronized with the Console time Live Data during Qualification If the ValProbe RT is in Qualification mode the live screen displays groups as...

Page 88: ...he sixth and seventh columns are available if lethality is defined in the setup and displays the ALeth and ILeth values respectively for accumulating lethality The calculation of the displayed value follows the definition for the lethality calculation in the setup The Message Windows and button control can be switched aside with the small light blue arrow button between to have more area to displa...

Page 89: ...e touch screen control For easier operation it is possible to zoom only X or Y axis by selection The Y axis can be scaled manually by entering a min and max values and reset anytime to automatic scaling again For better visualization of the process specification two limit lines can be set Inside the graph the current max and min value is highlighted with red and blue line color respectively and th...

Page 90: ...cal data The zoom allows to zoom and navigate inside the displayed chunk The groups selection works like in real time view only the selected group and corresponding calculations are displayed The manual scale button is extended to the scale the X axis to set the displayed time You can directly display a data chunk by selecting it A line in the Graph can be used to navigate to any timestamp in the ...

Page 91: ...Chapter 8 Viewing Live Data Kaye ValProbe RT User Manual 78 Figure 86 Historical Data in Graph View Pressing List view switches back to a table view of sensor readings ...

Page 92: ...defined in the Group configuration in the setup You can take pictures using the built in camera or add an existing picture and position the sensor tags via drag drop The real time values are displayed inside the tags By activating Sensor Value in Table the live reading values is also shown in parallel in a table with sensor label and description Figure 87 Qualification Study in Layout View with Va...

Page 93: ...ility Criteria An IRTD temperature setpoint in Celsius textbox and a textbox for the length stability in minutes at that setpoint and a textbox for an additional time in minutes at stability Stability Status Time of Stability a textbox displaying the time of stability when reached Stability displays the current stability data if red stability has not been reached if green stability has been reache...

Page 94: ... Figure 89 Calibration in Graph View Screen Figure 90 Verification Parameter Screen By pressing Initiate Verification the Verification parameters as defined in the setup can be reviewed it is possible to edit the parameters before the start of the verification ...

Page 95: ... includes the Validator serial number the date the Validator was last calibrated the setup that is currently loaded into the Validator and the version number of the Validator firmware For each Logger the Logger serial number Logger type and the Logger calibration date are displayed Select the temperature reference graphic to view the model and version Note The current temperature reading of the re...

Page 96: ...dy Files In monitoring mode not while a study is running it is possible to access the ValProbe RT and review the study files stored in the machine s memory Press Access Study Files in the hardware screen to display a table of the last ten studies The table displays the name of the setup together with study type and date as well as the user who started the study Select the files to delete the files...

Page 97: ...de enough time approximately 60 minutes to perform an orderly shutdown of the system When the Kaye ValProbe RT detects that the AC power has failed and the system is running from battery it displays an indication on the front panel LED Note In the event of power glitches or short term drops in supply voltage brownouts there is a remote chance that the Kaye ValProbe RT will fail to fall back to its...

Page 98: ...un number counts automatically but it is editable if required Pressing Ok opens the Select Base Station screen Figure 92 Select Base Station Select the Base Station to run the study Then press Discover a screen displaying all ValProbe RT s available opens By default this screen highlights the ValProbe RT that was last used with the Console It is possible to connect the ValProbe RT in either of thr...

Page 99: ...een The resolution of sensor readings and calculation results are dependent on the lowest resolution in the group Open under range over range or failed sensors are not allowed to participate in calculations or events Each box lists the group name sensor serial number sensor label and associated measurand temperature pressure etc Also listed are battery life RF strength and accumulated lethality if...

Page 100: ...n for each group the corresponding graph is displayed The Setup button displays the Setup review page that contains all parameters for Qualification Calibration and Verification The page is similar to the setup review displayed on the last step of the setup creation wizard Located next to Setup is the Hardware button Figure 95 Hardware Screen On the Hardware screen all available hardware connected...

Page 101: ...nd uniformity to meet your needs see Section 10 1 2 Principle of Operation When you start the Verification the ValProbe RT loggers begins to collect data every ten seconds to its internal memory for the duration of all defined setpoints At the same time measurements from the IRTD are collected every ten seconds by the Base Station The Base Station uses the IRTD data along with the specified criter...

Page 102: ...a At the end of the Qualification a Post Verification can be performed to ensure the Loggers and sensors are still within defined criteria 0 5 C Regulatory requirements while defining the need to ensure sensors used for Qualification studies should be calibrated and then verified do not set any frequency guidelines other than at least once a year The determination of whether to verify for every ru...

Page 103: ...d baths or Kaye Dry Blocks can be utilized as they provide adequate uncertainty as compared to the criteria Table 7 Recommended Temperature Dry Blocks Model Bath Uncertainty IRTD Uncertainty Maximum Total Uncertainty LTR 150 30 C to 150 C Dry Block 0 10 C 0 025 C 0 125 C LTR 40 140 40 C to 150 C Dry Block 0 10 C 0 025 C 0 125 C LTR 90 90 C to 140 C Dry Block 0 15 C 0 025 C 0 175 C HTR 420 30 C to ...

Page 104: ...he Verification Setup navigate to the Main screen and then select Equipment and enter your ID and Password Figure 96 Select the Equipment Tile Verifications are configured and initiated via the Equipment tile Select Initiate Verification to navigate to the Verification setup screen Figure 97 Initiate Verification Enter your User credentials when prompted Figure 98 Enter User Credentials ...

Page 105: ...at stability to ensure sensors loggers and references are stable SOP protocol numbers or other information Figure 100 Setup Temperature Verification To enter additional Setpoints or delete setpoints click on the appropriate icon Once all setpoints and criteria are entered save the Verification Setup under a specific name If desired setup printing is available by selecting the Printer icon To delet...

Page 106: ...ase station only a manual calibration can be performed A fully automated calibration is only possible if a KAYE IRTD and a KAYE calibration bath is connected to the Base Station Please ensure that the correct port is used for each instrument Figure 101 Connecting a Bath to the Base Station To load a setup From the Main Menu navigate to the Equipment Setup Temperature Verification and select a setu...

Page 107: ...tion is connected select loggers to be verified on the Select Loggers screen Figure 104 Select Loggers If there are no Loggers listed on the screen you may need to wake up the loggers using the magnetic Wake Up device or by passing them over status panel of the Base Station Once all woken Loggers appear on screen select the desired Loggers to be verified individually or all at once by clicking Sel...

Page 108: ... then press Program Loggers Figure 106 Loggers Listed On the Program Loggers screen the Base Station receives the Verification Setup information and sends it via RF to the previously selected Loggers The programming of the Loggers will be completed when all three status icons have turned green Wait until completed and the Initiate Verification blinks yellow and press Initiate Verification Figure 1...

Page 109: ...no longer received The verification study will not be affected as the data is stored in the Loggers and can be read out after the study is finished Press Start on the Temperature Verification screen to start a Verification study When you start a Verification the Kaye ValProbe RT software detects whether a Kaye temperature reference and an IRTD are connected Both are required for a fully automatic ...

Page 110: ...erature for the IRTD is fixed at 0 012 C if all temperature setpoints are equal to or greater than 0 C If any temperature setpoint is less than 0 C it is possible to change the IRTD stability value manually in your setup The stability calculation begins once the temperature reference is within five degrees of the setpoint Sensor and IRTD readings are displayed on the Data screen To achieve stabili...

Page 111: ...on Figure 112 below displays the readout process of the loggers Figure 112 Read Loggers Screen On the Verification Results screen perform the following Press Save Study to save the Study to the Console Press Update Loggers to update the last Verification date stored in the Logger firmware Figure 113 Calibration Result Screen ...

Page 112: ... selected verified sensors Change various criteria in the textboxes When completed with the Verification Results select Exit 10 6 Reasons for Verification Failure Verification may fail for some sensors due to one of the following reasons Failed criteria of allowed Logger deviation Failed Verification due to unstable IRTD and Loggers Logger failed stability criteria and cannot be evaluated Time of ...

Page 113: ...lines Available reports include o Setup reports o Detailed reports o Summary reports o Graph reports o Audit Trail o CSV Export Excel o Pass Fail Criteria reports All reports are created from raw encrypted study files generated during the validation processes Raw file content cannot be modified or tampered with All qualification reports are arranged in groups A user can select which groups and cal...

Page 114: ...or grouping Any defined overlay screens with sensor placement Defined calculations and parameters Data sample rate transmission rate and Transmission active inactive criteria Start Stop conditions The header provides general information about a Setup including Company name Date setup report printed Setup name Created by Created date time Asset name Asset ID SOP User comments The signature fields i...

Page 115: ...i e storing data every ten seconds but printing once a minute and minimizing the number of pages printed The main report header provides traceability information for the study including Company name Date printed username Study name Created by Created date time Study started by with date and time Asset name Asset ID Serial number User comments Reporting Software Firmware and Software versions The r...

Page 116: ...les The Temperature Data Table include a listing of each sensor in the Group the Min Max Avg Lethality and Max Min values for each cycle defined in the study i e Heat up Exposure Cooldown Temperature Summary data tables include at the bottom of the page a data summary for each cycle for all sensors in the group Table calculations include Cycle start time and date Cycle duration Min of Min Sensor I...

Page 117: ...dy Utilizing the Select Group drop down at the top right of the screen you can select different type of sensors or groups to display A Cycle drop down also allows you to select defined Cycles for graphing The graph screen can be maximized to full screen or minimized as displayed above by utilizing the or to the right of the graph The pane to the right allows users to graph data based on different ...

Page 118: ...sors selected in the Edit Sensors screen Red horizontal lines on the graph display the base temperature Tb entered during the study setup and the base temperature 3 K The text at the bottom of the graph displays if the data passed or failed three conditions All measured temperatures and the calculated saturation temperature are within the specified sterilization temperature band Each measured temp...

Page 119: ... graph Important Excluded sensors from any graph reports are not included in the calculation graphs Groups with only one sensor have no statistical calculations available and the checkboxes are grayed out The Lethality calculation is only available if lethality has been defined for the study The saturation pressure calculation is only available if the study includes at least one temperature sensor...

Page 120: ...itching the next calculation graphs Edit Limit Labels The Edit Limit Labels screen displays upper and lower limits on the graph Available sensor types depend on the sensor type for the graph To add limit lines to a graph enter an upper and or lower limit value or Avg s and label These display as horizontal lines at the selected measurement points You can also select the line color thickness and li...

Page 121: ... be deleted and or modified Actions which are captured include User actions requiring a login with a User ID and Password Automated system actions or events Any additional actions deemed critical to the history of the data or Qualification files To access the Audit Trail navigate to the ValProbe RT Software Main screen and select Audit Figure 119 Audit Trail The Audit Trail contains a complete his...

Page 122: ...d of generating an Audit Trail tied to a Qualification Study Figure 120 Audit Trail For a more detailed review and report capability the user can go to Audit from the Main Menu There the user can do a more detailed search over the complete history using the filters in each column When the Audit Trail is filtered and printed the header of the report lists all filters that have been applied along wi...

Page 123: ...wishing to import their data into Excel for further analysis or graphing The file is automatically divided into numerous tabs which provide detail Qualification data The tabs consist of General Information Sensor Definitions Temperature Data Temperature Statistical Temperature Lethality Pressure Data Saturation P T Messages and Comments Figure 121 Spreadsheet Report ...

Page 124: ...by the user in the Setup report The Setup defines the following Number and type of sensors included i e temperature pressure Grouping of sensors Distribution Penetration Shelf 1 Shelf 2 etc Calculations Statistical Lethality Saturation etc Events triggering Start and Stop of Qualification Start and Stop of Exposure Any additional events based of defined process conditions Sample Storage Rate of da...

Page 125: ...ation calculations look at the data samples and interval of time between two samples and accumulate them over the duration of the cycle Typical calculations include Lethality Cycle and Time above below Process Temp For Lethality the system measures the temperature and calculates the instantaneous lethality for each data sample The calculation then factors in the interval times between data samples...

Page 126: ... limited to similar asset types or selected from all available asset types For each template the user can define the selected cycle the process temperature and the selected criteria they want applied and analyzed Figure 123 Define Select Template Screen The template definition screen offers a total of up to 16 different criteria to select from The criteria are based on years of experience as well ...

Page 127: ...above or below the criteria For example if the Process Temperature is 121 C and you enter a max value of 2 and min value of 2 the application checks whether all the sensor values are within 123 121 2 and 119 121 2 The criterion only Passes if all sensor readings are equal to or within the range of 119 C to 123 C Temperature Fluctuation Max Min per Sensor The Temperature Fluctuation Max Min per Sen...

Page 128: ...mum temp for all timestamps during the cycle The criterion Passes if all the Group Avg Min temperature timestamps are equal to or less than the defined criteria Group Max of Max Min of Min The Grp Max of Max Min of Min calculates the maximum value for all sensors in a group and all timestamps minus the minimum value for all sensors in the group for all timestamps in the cycle The criteria define t...

Page 129: ...tion T Sat T The Time of Sterilization T Sat T calculates the total time of sterilization by combining the Steam quality criterion as defined in the Edit Calculations screen along with the measured reference temperature Time is counted if the measured reference temperature is at or above the process temperature and the steam quality as defined by Temperature minus calculated Saturation Temperature...

Page 130: ...onds The criterion is Passed if the calculated Equilibrium time is equal to or less than the defined criteria Exposure Duration Holding Duration The Exposure Holding Duration calculates the total time of Exposure Hold This criterion is only displayed if the selected cycle is an exposure cycle A criterion for a minimum and a maximum time of Exposure Hold can be defined independently The minimum tim...

Page 131: ...there is a Fail additional information such as the failed Sensor ID and the timestamp of the occurrence is listed Figure 125 Pass Fail Criteria Report For each selected Group the Pass Fail Criteria Report contains a Sensor Detail section This section provides additional information for certain Pass Fail criteria on the performance of each sensor in a group The Sensor Detail lists each sensor in th...

Page 132: ...automated functionality for pass fail is intended to be used as a guide only Amphenol is not liable for any damages resulting from reliance on the pass fail criteria included in the software in making product release decisions The Kaye Report Tool users waive and release Amphenol its directors officers employees and affiliates from all liability claims or demands for any alleged loss damage or inj...

Page 133: ... Select the Qualification tile then the desired raw encrypted Qualification file and press the Generate Reports button Select the Bar Graph icon for the selected Qualification file A Select Sensor Type pop up appears requesting the measurand type to graph when defining cycles Select the appropriate sensor type and press OK to open the Mark Cycles Graph For sterilizers the option to use both temper...

Page 134: ...lecting Time Marker displays a line marker The time can be changed manually by using the dropdown from the time box or via the marker by sliding the line to the selected time and press the Checkmark Options such as the Zoom icons adding Limit Lines or Selecting the Marker Position improve the ability to accurately edit times The process can then be repeated for any necessary edits to Qual Exposure...

Page 135: ...ional Cycles Figure 131 Define Additional Cycles screen The Define Add L Cycles screen can be utilized if additional cycles beside Qual and Exposure need to be defined If no additional cycles need to be defined simply press Report Parameters at the top of the screen to proceed to the next step The system allows up to 15 additional cycles to be defined Press the button at the top right of the scree...

Page 136: ...s for the Qual Exposure screen When all additional cycles are added press the Report Parameters ribbon at the top of the screen to move to the next step of the reporting process Edit Parameters Figure 133 Define Additional Cycles Screen Inside the Edit Parameters screen the User can make any necessary changes to Groups and or Calculations prior to reporting Any changes to Groups or Calculations ar...

Page 137: ...and then select or de select appropriate sensors Any changes to groups or removal of sensors are listed inside the report Press Back to return to the previous screen Customize Calculations Screen Figure 135 Customize Calculations On the left panel select from the following list of calculations Lethality Sat P Sat T MKT and Time of Sterilization to display information for each With the desired calc...

Page 138: ...lated the Instantaneous lethality for the time stamp if the Saturation Pressure and Temperature are within defined limits set in the Time of Sterilization calculation The Time of Sterilization calculates the total time of sterilization by combining the Steam quality criterion along with the measured reference temperature Time is counted if the measured reference temperature is at or above the proc...

Page 139: ...rts for a detailed explanation of the options and tools available for graphing Standard Reports The Standard Reports screen allows the user to select which reports to generate All reports and calculations are based on the Storage Sample rate defined in the Setup Multiple reports can be selected at one time to improve efficiency All reports generated are in pdf format All pdf reports are automatica...

Page 140: ...ded and Lethality or MKT calculation Figure 140 Setup Report Content Screen Detailed Allows selection of groups and calculations Availability of a saturation calculation is dependent on whether there is a pressure sensor and temperature sensor defined in the study The calculation is selectable per group for all sensors If the calculation for all sensors is selected group selection is automatically...

Page 141: ...Messages can be selected or deselected to appear in reports Figure 144 Header Footer Options Print Rate The Print Rate applies only to the Detailed report and can be selected from the drop down to be multiple of the Storage Sample rate All calculations in the reports are based on the Storage Sample rate despite the print rate selected i e sample rate every 5 sec but print rate of 1 min This can mi...

Page 142: ...dit Parameters screen the User can make any necessary changes to Groups and or Calculations prior to reporting Any changes to Groups or Calculations are listed in the report If groups and calculations are configured correctly in the study setup there is no need to make changes Press the Next arrow to continue to the Report Selection screen ...

Page 143: ...alculations report Documents statistical calculations for defined intervals Pass failed report Analysis the data using a defined set of requirements Graph Report Graph report interface screen for generation of graph format reports from qualification studies to pdf files Generation of a Graph Report for defined groups and cycles graphical reports for statistical Lethality saturation pressure satura...

Page 144: ...the selected screens and enter a name and press Save to save the group The screen includes the following options Delete permits deletion of a sensor group Move Sensors permits moving sensors to another sensor group Delete individual sensors from a group Any changes to groups or removal of sensors is listed inside the report Press Back to return to the previous screen Standard Report Types Select e...

Page 145: ...emperature and saturation pressure calculations can be selected or deselected for all groups together in a report Availability of a saturation calculation is dependent on whether there is a pressure sensor and temperature sensor defined in the study The calculation is selectable per group for all sensors If the calculation for all sensors is selected group selection is automatically overridden Fig...

Page 146: ...ee checkboxes enable you to indicate whether these names are displayed on the First Page Last Page or All Pages Note When selecting All Pages the other checkboxes are not available If the System Messages selection checkbox is activated all system messages for study are listed at the end of the report CSV Export Report The study data can be exported to the CSV format which is an open file format th...

Page 147: ...Chapter 11 Qualification Reports Kaye ValProbe RT User Manual 134 No content intended for this page ...

Page 148: ...rk Topology and PAN ID Network ID Star network topology and PAN ID from 0 to 9999 A 1 6 Antenna Diversity For higher signal reliability and robust RF link A 1 7 Data Rate and Data Encryption 250 kbps and AES 128 supported A 1 8 RF Range Line of Sight and Outdoor Up to 150 meters A 1 9 Number of Loggers and Sensors Supported Up to 25 Loggers and 50 sensors per Base Station A 1 10 Sensor Sampling Ra...

Page 149: ...monitoring and alarms A 2 6 Bath and IRTD Interface Ports Bath port supports to interface all Kaye brand temperature baths and IRTD port to connect IRTD 400 temperature reference standard to run calibrations A 2 7 USB Port USB port to connect USB storage thumb drive device to copy last ten raw study files A 2 8 Ethernet Communication Port Ethernet RJ45 port to connect to LAN network or directly to...

Page 150: ...Overvoltage Category and Electrical Safety Protection Class Overvoltage category I and electrical safety protection Class III A 3 3 Magnetic Switch Magnetic switch to wake up a logger from shelf mode A 3 4 LED Indications On board LED for diagnosis purpose A 3 5 Calibration NVLAP accredited calibration along with user verification capability A 3 6 Real Time Clock Accuracy 15 sec per 24 hours 0 017...

Page 151: ... years A 3 14 Battery Life Battery life is affected by several factors including sample rate transmission rate temperature logger type and hours of use Individual battery capacity can vary from one battery to another by up to 10 A 4 Kaye ValProbe RT Temperature Logger A 4 1 Measurement Accuracy 0 1 C from 85 to 140 C 0 25 C from 140 to 400 C for bendable models A 4 2 Body Environmental Ratings Tem...

Page 152: ...s Temperature 40 to 140 C Temperature 40 to 360 C with canister model Humidity 0 to 100 condensing Pressure 0 to 5 bar absolute A 5 3 Number of Input Channels 1 and 2 channels A 5 4 Sensor Types and Measurement Range Rigid and flexible 40 to 140 C Bendable 40 to 400 C A 5 5 Sensor Lengths Rigid 1 5 3 6 and 9 inches Bendable 12 24 and 36 inches Flexible 12 24 and 36 inches Please contact factory fo...

Page 153: ...ments for electrical equipment for measurement control and laboratory use Part 2 30 Particular requirements for equipment having testing or measurement circuits B 1 2 UL USA Safety Certification UL 61010 1 Third Edition Safety requirements for electrical equipment for measurement control and laboratory use Part 1 General requirements UL 61010 2 030 Second Edition Safety requirements for electrical...

Page 154: ...3 5 MHz and 5725 5850 MHz 47 CFR FCC Part 2 Subpart J 2 1091 Radiofrequency radiation exposure evaluation for mobile devices 20 cm separation distance to human body Canada ISED RSS 247 Issue 2 February 2017 Digital Transmission Systems DTSs Frequency Hopping Systems FHSs and License Exempt Local Area Network LE LAN Devices Canada ISED RSS 102 Issue 5 March 2015 Radio Frequency RF Exposure Complian...

Page 155: ... LVD 2014 35 EU EN 61326 1 2013 EMC requirements for Electrical equipment for measurement control and laboratory use Part 1 General requirements EMC directive 2014 30 EU IEC 61326 1 2012 EMC requirements for Electrical equipment for measurement control and laboratory use Part 1 General requirements ISO IEC Directives Part 2 B 3 Ingress Protection for Kaye ValProbe RT Logger Kaye ValProbe RT Logger...

Page 156: ...licitly approved by the body responsible for the compliance with the requirements may void the authorization of the user to operate the device Kaye ValProbe RT Base Station FCC ID 2AJQZ VPRT BS1 Kaye ValProbe RT Logger FCC ID 2AJQZ VPRT L1 FCC 47 CFR 2 1091 RF Radiation Exposure statement This product complies with FCC 47 CFR 2 1091 Canada ISED RSS 102 and European committee for Electrotechnical s...

Page 157: ...S1 Kaye ValProbe RT Logger Canada IC 25680 VPRTL1 B 8 EU Compliance Statement This compliance statement is based on information received from material suppliers and certification testing undertaken at test house supporting documents are available and can be disclosed to the competent authority on request This marking indicates that the user should read all included documentation before use Retain ...

Page 158: ...Appendix B Regulatory Compliance and Agency Approvals Kaye ValProbe RT User Manual 145 Product Certification Labels B 9 1 Kaye ValProbe RT Base Station Label B 9 2 Kaye ValProbe RT Logger Label ...

Page 159: ...our environment and to diminish the pressure on the natural resources we encourage you to use the appropriate take back systems Those systems will reuse or recycle most of the materials of your end life equipment in a sound way The crossed out wheeled bin symbol invites you to use those systems If you need more information on the collection reuse and recycling systems please contact your local or ...

Page 160: ...r accumulators contain toxic metals that pose serious risks to human health and to the environment When required the product marking includes chemical symbols that indicate the presence toxic metals Pb for lead Hg for mercury and Cd for cadmium Cadmium poisoning can result in cancer of the lungs and prostate gland Chronic effects include kidney damage pulmonary emphysema and bone diseases such as ...

Page 161: ...ness for a particular purpose and warranties arising from course of dealing or usage or trade Return Policy If an Amphenol Advanced Sensors instrument malfunctions within the warranty period the following procedure must be completed Notify Amphenol Advanced Sensors giving full details of the problem and provide the model number and serial number of the instrument If the nature of the problem indic...

Page 162: ... 213164 China Tel 86 519 88311899 India Amphenol Interconnect India Pvt Ltd Plot no 6 Survey No 64 Software Units layout MAHAVEER TECHNO PARK Hitech City Madhapur Hyderabad Telangana 500081 India Tel 91 40 33147100 Appendix E Warranty and Disclaimer The information in this document is based on our current tests knowledge and experience Because of the effect of possible influences in an application...

Page 163: ...Kaye ValProbe RT User Manual 150 ...

Page 164: ...bration Introduction 88 Setup 93 Customize Calculations 124 Groups 123 D Default System Administrator 36 Define Setup 61 63 E Equipment Connect 82 G Group Assigning Sensors 66 Calculations 68 Creating 66 Live Data Graph 74 Understanding 65 K Kaye ValProbe Rt 1 L Live Data Viewing 71 M Manual Explanation 84 N New Asset 59 Q Qualification Study 84 ...

Page 165: ...Index Kaye ValProbe RT User Manual 152 R Real Time Graph 87 S Setup Create 62 Stability Calculate 97 Introduction 88 Stop Qualification 84 86 ...

Page 166: ... No content intended for this page ...

Page 167: ... No content intended for this page ...

Page 168: ...www kayeinstruments com 2020 Amphenol Thermometrics Inc All rights reserved Technical content subject to change without notice MXXX Rev 1 0 May 2020 ...

Reviews: