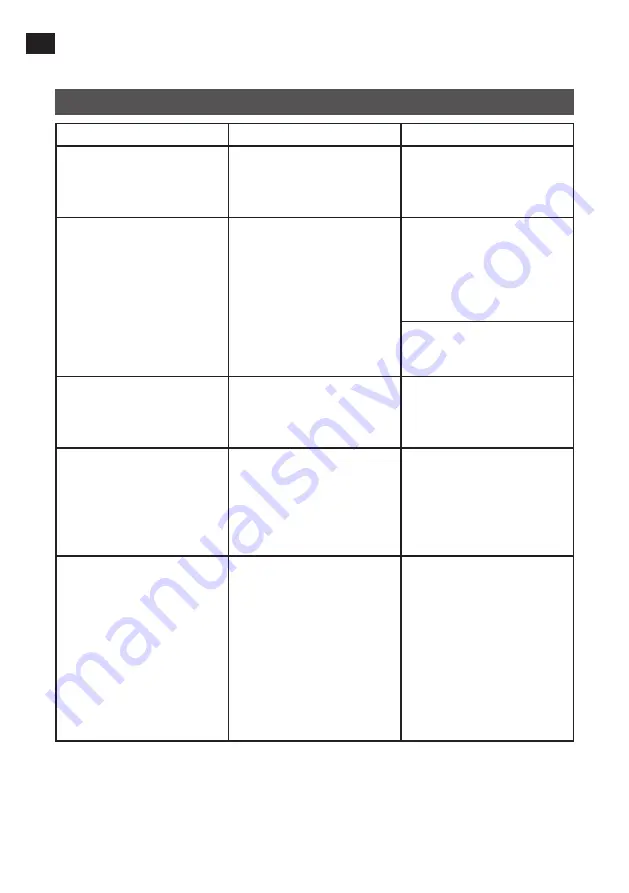
background image

EN

16

TROUBLESHOOTING

PROBLEM

PROBABLE CAUSE

ACTION

The pressure does not increase 
or increases slowly, even 
though the product is correctly 
connected.

Leakage.

Put the hose in water and 
pump to see where air leaks 
out.

The pump handle is stiff and 
sinks automatically after it is 
pulled up.

The non-return valve in the 
three stage piston is not 
working.

Open the venting valve on the 
primary stage tube and drip a 
small amount of silicone oil in 
the tube. Close the valve and 
pump rapidly a few times to 
remove the blockage.

Open the three stage piston to 
localise the leakage, or replace 
the piston seal.

It is easy to pull up the pump 
handle, but difficult to press 
it down, or it moves up 
automatically.

The bottom non-return valve is 
defective, blocked or leaking.

Remove the bottom non-return 
valve with a spanner and clean 
or replace it.

It is more and more difficult to 
pump, both up and down.

Inadequate lubrication.

Apply silicone oil.
NOTE: Pump a few strokes 
after applying silicone oil to 
press out any residual oil. 
Excess silicone oil can cause an 
explosion.

The pressure gauge is not 
reset.

If there is excess oil in the 
product the oil and gas will 
expand when the pressure 
reaches 200 bar. The pressure 
will then quickly increase to 
400 bar, which exceeds the 
maximum permitted pressure 
for the pressure gauge and will 
damage it. The pressure gauge 
can also have been subjected 
to knocking.

Replace the pressure gauge.

Summary of Contents for 016592

Page 1: ...or future reference Translation of the original instructions Viktig Les bruksanvisningen n ye f r bruk Ta vare p den for fremtidig bruk Oversettelse av original bruksanvisning Viktig L s bruksanvisnin...

Page 2: ...reserves the right to make changes In the event of problems please contact our customer service www jula com Tillverkare Produsent Producenci Manufacturer Jula AB Box 363 532 24 SKARA Distribut r Dis...

Page 3: ...1 2 3 4 5 6 13 7 8 9 10 11 12 14 15 16 17 18 19 20 21 22 23 24 25 26 27 28 29 30 31 32 33 34 35 36 37 1...

Page 4: ...2 2 1 3 5 4 6 8 7 9...

Page 5: ...ra slangen 6 Montera manometern 7 Dra fast manometern med skruvnyckeln 8 Montera handtaget 9 Dra t skruven BILD 2 SYMBOLER L s bruksanvisningen Godk nd enligt g llande direktiv f rordningar Kasserad p...

Page 6: ...ilen 4 Stabilisera produkten med foten p produktens bas vid anv ndning 5 F r handtaget upp t och ned t f r att pumpa N r trycket verskrider 100 bar g r pumpningen tr gare Detta r helt normalt 6 Efter...

Page 7: ...phandtaget men tr gt att trycka ned det eller det r r sig upp t automatiskt Den nedre backventilen r trasig eller igensatt eller l cker Demontera den nedre backventilen med hj lp av skruvnyckeln och r...

Page 8: ...Monter manometeret 7 Fest manometeret med skrun kkelen 8 Monter h ndtaket 9 Trekk til skruen BILDE 2 SYMBOLER Les bruksanvisningen Godkjent i henhold til gjeldende direktiver forskrifter Kassert produ...

Page 9: ...ed foten p produktets sokkel ved bruk 5 F r h ndtaket oppover og nedover for pumpe N r trykket overskrider 100 bar g r pumpingen tregere Dette er helt normalt 6 pne lufteventilen n r pumpingen er avsl...

Page 10: ...ket men tregt trykke det ned eller det beveger seg oppover automatisk Den nedre returventilen er delagt eller tilstoppet eller lekker Demonter den nedre returventilen ved hjelp av skrun kkelen og reng...

Page 11: ...er cie t oka 36 Przek adnia t oka 37 Pier cie blokuj cy RYS 1 MONTA 1 Zamontuj uszczelk 2 Sprawd O ring 3 Zamontuj rur pierwszego stopnia SYMBOLE Przeczytaj instrukcj obs ugi Zatwierdzona zgodno z obo...

Page 12: ...zaj cy 4 Ustabilizuj produkt umieszczaj c podpor na podstawie produktu podczas pracy 5 Poruszaj uchwytem w g r i w d aby pompowa Gdy ci nienie przekroczy 100 bar w zwi ksza si op r podczas pompowania...

Page 13: ...yt mo na atwo podnie ale przy opuszczaniu wyst puje op r lub uchwyt unosi si automatycznie do g ry Dolny zaw r zwrotny jest uszkodzony niedro ny lub nieszczelny Zdemontuj dolny zaw r zwrotny przy u yc...

Page 14: ...n tube 5 Fit hose 6 Fit pressure gauge 7 Tighten pressure gauge with spanner 8 Fit handle 9 Tighten screw FIG 2 SYMBOLS Read the instructions Approved in accordance with the relevant directives Recycl...

Page 15: ...t on the base 5 Move the handle up and down to pump When the pressure exceeds 100 bar the pumping is stiffer This is perfectly normal 6 After pumping open the venting valve to release residual air in...

Page 16: ...asy to pull up the pump handle but difficult to press it down or it moves up automatically The bottom non return valve is defective blocked or leaking Remove the bottom non return valve with a spanner...

Reviews: