


OPERATION
PLAN THE INSTALLATION
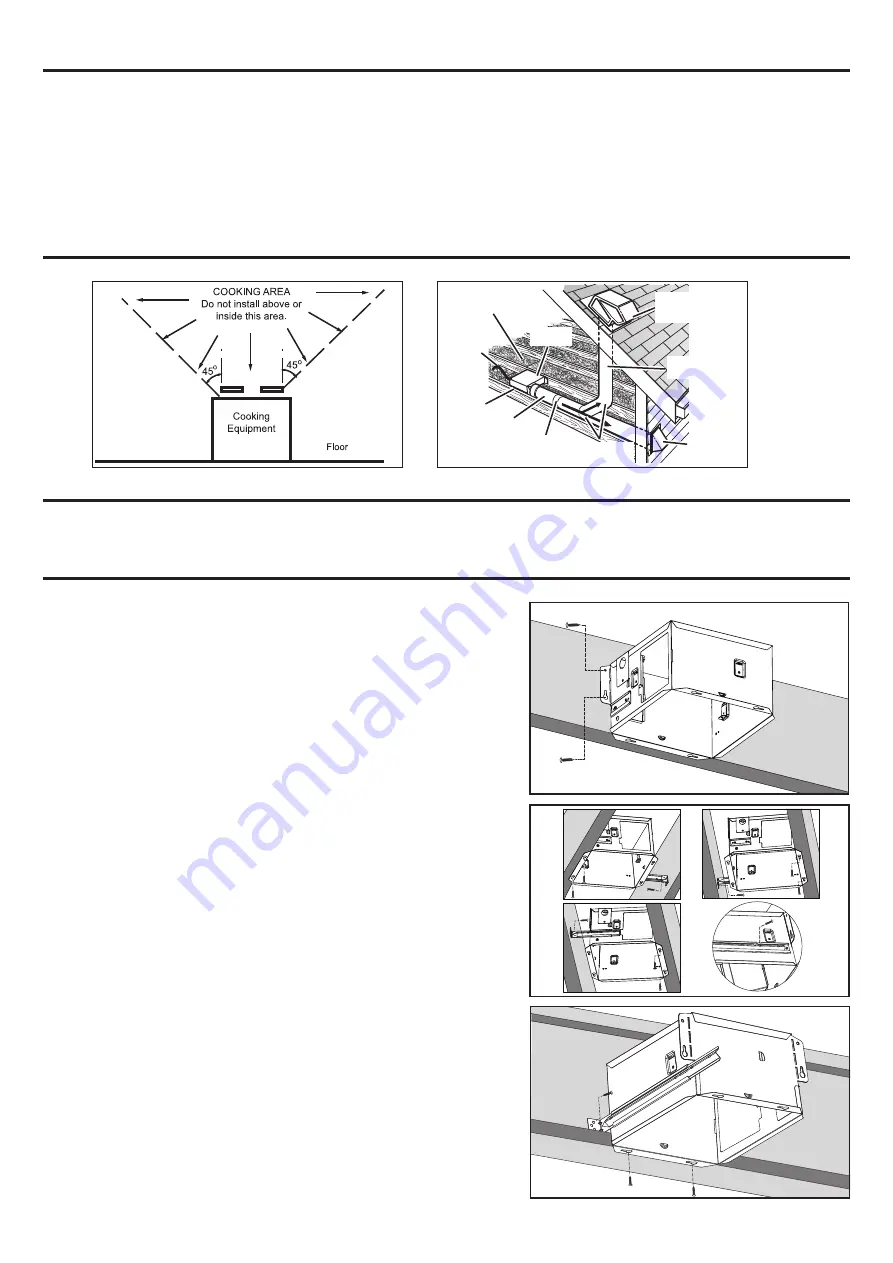
TYPES OF TYPICAL INSTALLATIONS
1. Do not use in a cooking area. 2. Two ways to connect ductwork to a factory-shipped unit.
ASSEMBLY INSTRUCTIONS
1. Housing mounted to I-joists (Start at “ASSEMBLY INSTRUCTIONS 1”)
2. Housing mounted to joists (Start at “ASSEMBLY INSTRUCTIONS 1” )
3. Housing mounted to truss (Start at step “ASSEMBLY INSTRUCTIONS 2”)
1. MOUNT HOUSING TO JOIST OR I-JOIST.
ROOF CAP*
(with built-in
damper)
ROUND
DUCT*
WALL CAP*
(with built-in
damper)
*
Purchase
separately
POWER
CABLE*
INSULATION*
(Place around and
over Fan Housing.)
Seal gaps
around
Housing.
FAN
HOUSING
ROUND
ELBOW(S) *
Seal duct
joints with
tape.
Keep duct
runs short
2. Mount with mountion holes and hanger bar
a. Hold the housing so that it is in contact with the bottom of the joist.
b. Attach the housing with four (4) screws to the joist through the holes in each
mounting flange.
a. Slide one hanger bar into the channel on the housing and adjust as needed to fit
between framing.
b. Hold housing in place so that the housing contact the bottom of the joist, Screw
housing to joist through the hole of the housing .
c. Screw the hanger bar onto the other side of joist through the hole.
d. Screw hanger bar to housing with screw.
e. Refer to the right diagram.
3. Mount to I-joist
a. Slide one hanger bar into channel on the housing and adjust as needed.
b. Hold housing in place so that the housing contacts the bottom of the joist.
c. Screw housing to joist through the hole of the housing.
d. Screw the hanger bar onto the joist through the hole.
e. Screw hanger bar to housing with screw .
TIMER ADJUSTMENT
The humidity sensing fan has a “T” (means timer) that can be adjusted from 5 to 60 minutes (factory-set at about 20 minutes). This “T” controls the
length of time that the fan remains ON after the sensor has stopped sensing a rise in humidity and the humidity level is below the user-adjustable
set-point. To adjust the “T”:
1. Disconnect power at service entrance;
2. Through the grille, locate the slot marked “T”;
3. Carefully rotate the “T” adjustment to desired setting (from 5 to 60 minutes).
4. Check operation by turning on a humidity source until the fan turns on.
5. Turn humidity source off and time the unit.
6. Repeat above steps if necessary.
2


