WARRANTY
INSTALL GRILLE
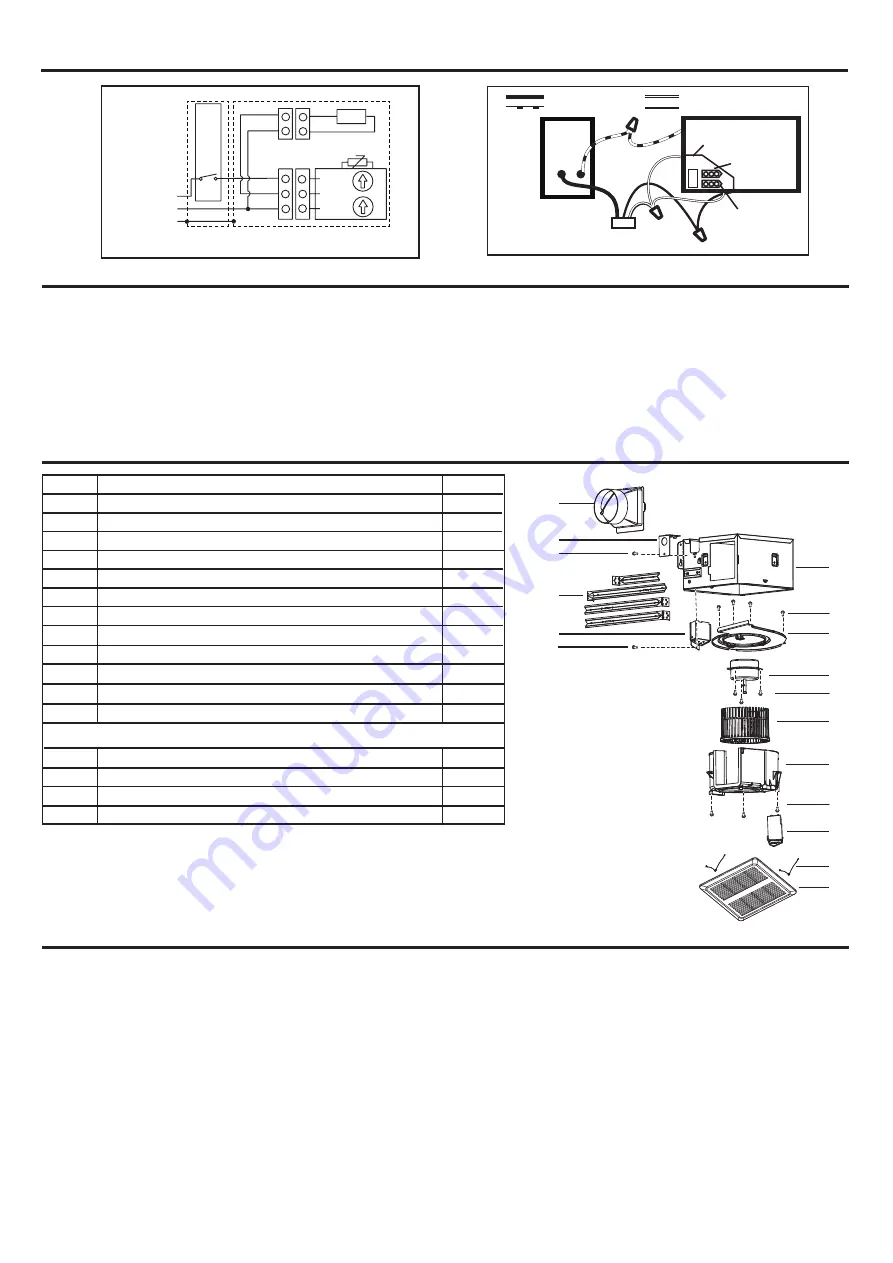
SERVICE PARTS
CONNECT ELECTRICAL WIRING
Install ceiling material to complete the ceiling construction and cut around the fan housing.
To attach the grille assembly to the fan housing, pinch the grille springs on the sides of the grille
assembly and position the grille into the housing with the grille springs in the appropriate slots. Push
the grille assembly towards the ceiling to secure.
This warranty covers all defects in workmanship or materials for:
The mechanical and electrical parts contained in this product, for a period of 12 months, from the date of purchase. You must keep and be able to
provide your original sales receipt as proof of the date of purchase. This warranty is covered the original retail purchaser of this product. The manufac-
turer will repair or replace, in your home, any mechanical or electrical part which proves defective in normal household use for a period of 12 months.
THIS WARRANTY DOES NOT COVER:
• Damages from improper installation
• Damages from shipping
• Damages from misuse, abuse, accident, alteration, lack of proper care and maintenance
• Damages from service by persons other than an authorized dealer or service center.
• Labor, service, transportation and shipping charges for the removal of defective parts and for installation of a replacement part, beyond the initial
12-month period.
This warranty does not extend to fluorescent lamp starters and tubes.
THIS LIMITED WARRANTY IS GIVEN IN LIEU OF ALL OTHER WARRANTIES, EXPRESSED OR IMPLIED, INCLUDING THE WARRANTIES OF
MERCHANTABILITY AND FITNESS FOR A PARTICULAR PURPOSE.
The remedy provided in this warranty is exclusive and is granted in lieu of all other remedies. This warranty does not cover incidental or consequential
damages. Some states do not allow the exclusion of incidental or consequential damages, so this limitation may not apply to you. Some states do not
allow limitations on how long an implied warranty lasts, so this limitation may not apply to you. This warranty gives you specific legal rights, and you
may also have other rights, which vary from state to state.
1
2
4
5
6
c
a
b
8
7
9
11
12
10
d
d
Grille Assembly (includes part 2)
* Blower Assembly includes part 4, 5, 6, 7, a, b
Replacement installation: Remove the screw (part a), then take out the blower
assembly from the housing (part 8). Replace the broken parts.
WARNING:
Ensure that the fan is switched off from the supply mains
before replacing.
PART
PART NAME
Qty.
1
3
4
5
6
7
8
9
10
Housing
Blower Wheel
Blower
Wire Panel / Harness Assembly
Motor
1
1
1
1
1
1
1
1
Wiring Plate
4
11
12
Damper/Duct Connector
1
1
Motor Plate
Power box
2
2
Grille Spring
Hanger Bars
a
3
Screw
b
3
Screw
c
4
Screw
d
2
Screw
3
SNP100H
WIRE
PANEL
UNIT
BLACK(BLK)
SENSOR
SWITCH BOX
POWER SUPPLY
120V AC
GROUND (GRD)
BROWN(BRN)
WHITE(WHT)
FAN
RECEPTACLE
HUMIDITY
HUMIDITY
SENSOR
RECEPTACLE
FAN
HUMIDITY
SENSOR
SWITCH
HUMIDITY SENSOR
LINE
IN
BLK
BLK
BLK
SWITCH
BOX
WHT
WHT
WHT
BRN
L
T
H
N
UNIT
Motor
GRD
4


