KBAC SERIES INSTALLATION AND OPERATION MANUAL
20
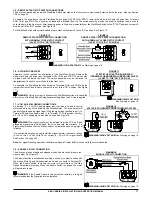
10.5 – BOOST MODE SELECTION (J6)
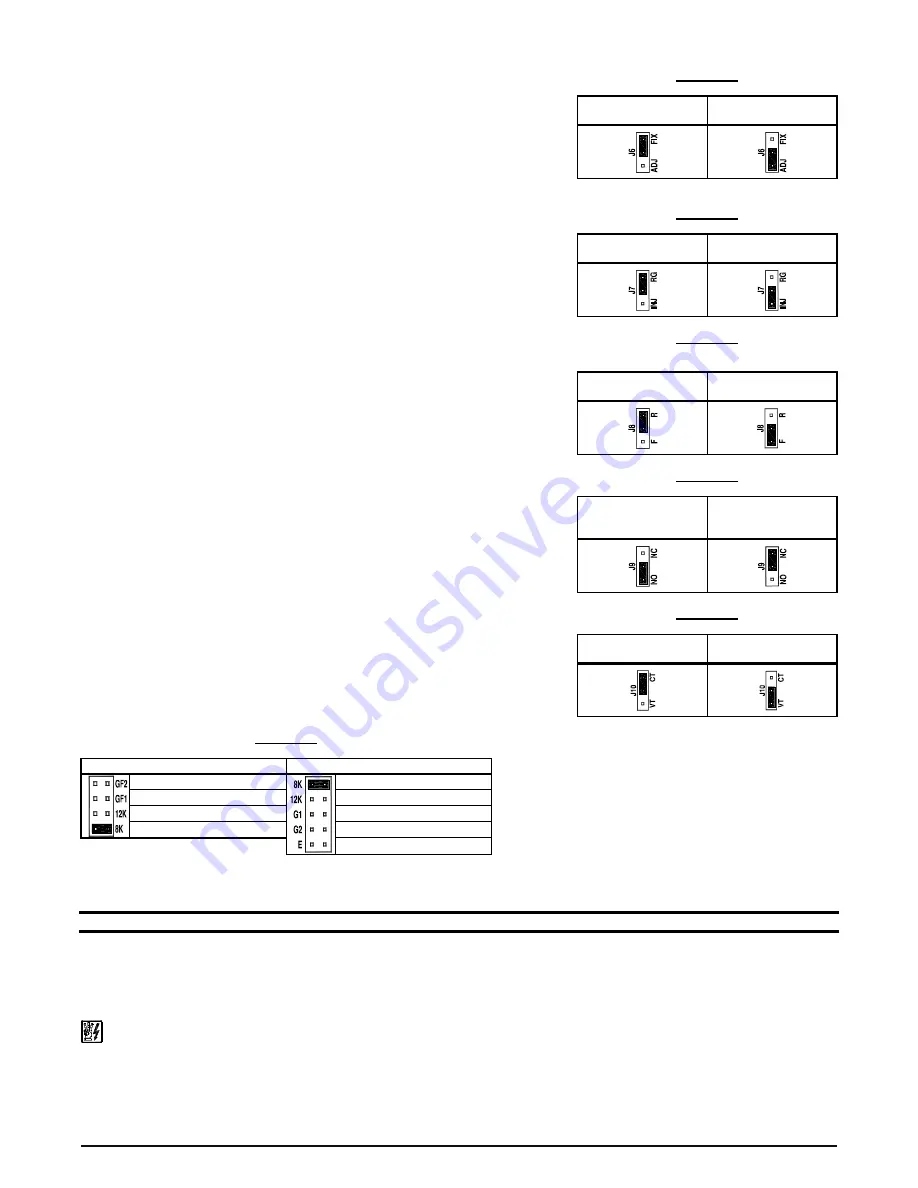
Jumper J6 is factory set to the "FIX" position for Fixed Boost. For Adjustable Boost using the
BOOST Trimpot, set Jumper J6 to the "ADJ" position. See Figure 27 Also see Section 12.8
on page 22 for the Boost Trimpot.
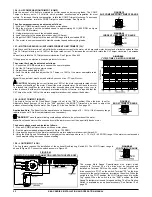
10.6 – BRAKING MODE SELECTION (J7)
Jumper J7 is factory set to the "RG" position for Regenerative Braking when the Start/Stop
Switch is set to the "STOP" position. For DC Injection Braking, set Jumper J7 to the "INJ"
position. See Figure 28. Also see Section 12.5 on page 21 for the DC Injection Brake
Trimpot.
When the Injection Brake Mode is selected, the DECEL Trimpot is used to set the amount of
time the DC current is applied to the motor.
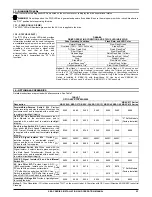
10.7 – RUN/FAULT OUTPUT RELAY OPERATION SELECTION (J8)
Jumper J8 is factory set to the "R" position for "Run" operation of the Run/Fault Relay. For
"Fault" operation of the Run/Fault Relay, set Jumper J8 to the "F" position. See Figure 29.
For Run/Fault Relay output contacts, see Section 7.9 on page 18. The Run/Fault Relay
contact status for various drive operating conditions is shown in Table 5 on page 18.
10.8 – STOP CONTACT TYPE SELECTION (J9)
Jumper J9 is factory set to the "NO" position for a normally open stop contact. For remote
normally closed stop contact, set Jumper J9 to the "NC" position. See Figure 30. For wiring
information, see Section 7.5 on page 17.
10.9 – TORQUE MODE SELECTION (J10)
Jumper J10 is factory set to the "CT" position for Constant Torque Mode, which is desirable
for most machine applications. For Variable Torque Mode, used for HVAC and fan
applications, set Jumper J10 to the "VT" position. See Figure 31.
10.10 – JUMPER J11
Factory use only.
10.11 – SWITCHING FREQUENCY AND GFCI SELECTION (J12)
(THIRD GENERATION (3G) DRIVES ONLY)
Jumper J12 is factory set to the "8K" position for a switching frequency at the motor of
8 kHz. For 12 kHz switching frequency, set Jumper J12 to the "12K" position. This jumper
also allows the drive to be used on standard ("G1" position) or sensitive ("G2" position)
GFCIs. See Figure 32.
Note:
GFCI operation may increase audible motor noise.
FIGURE 32
SWITCHING FREQUENCY AND GFCI SELECTION
KBAC-24D, 27D, 29, 29 (1P), 45, 48
KBAC-217, 416 Series
Sensitive GFCI
8 kHz Switching Frequency
*
Standard GFCI
12 kHz Switching Frequency
12 kHz Switching Frequency
Standard GFCI
8 kHz Switching Frequency
*
Sensitive
GFCI
*
Factory setting.
Not Used
*
Factory setting.
11 – DRIVE OPERATION
11.1 – START-UP PROCEDURE
After the drive has been properly setup (jumpers and trimpots set to the desired positions) and wiring completed, the start-up procedure can
begin. If the AC power has been properly brought to the drive, the power (PWR) LED will illuminate green. The status (ST) LED will indicate
drive status, as described in Section 13.2 on page 23.
To start the drive, momentarily set the Start/Stop Switch to the "START" position. The motor will begin to accelerate to the set speed.
WARNING!
Using a jumper to eliminate the start/stop function will cause the motor to run at the Main Speed Potentiometer setting when
the AC Line is applied. See Section 11.2 on page 21.
Note:
If the motor rotates in the incorrect direction, it will be necessary to disconnect the AC Line, reverse any two motor leads, and repeat the
start-up procedure.
FIGURE 27
BOOST MODE SELECTION
Fixed Boost
(Factory Setting)
Adjustable Boost
FIGURE 28
BRAKING MODE SELECTION
Regenerative Braking
(Factory Setting)
DC Injection Braking
FIGURE 29
RUN/FAULT OUTPUT RELAY
OPERATION SELECTION
"Run" Operation
(Factory Setting)
"Fault" Operation
FIGURE 30
STOP CONTACT TYPE SELECTION
Normally Open
Stop Contact
(Factory Setting)
Normally Closed
Stop Contact
FIGURE 31
TORQUE MODE SELECTION
Constant Torque
(Factory Setting)
Variable Torque


