background image

20

4

IMPORTAnT APPLICATIOn InfORMATIOn

4.1

Motor with External fan Cooling –

Most totally enclosed fan-cooled (TEFC) and open

ventilated 3-phase AC induction motors will overheat if used beyond a limited speed range at
full torque. Therefore, it is necessary to reduce motor load as speed is decreased.

Note:

Some fan-cooled motors can be used over a wider speed range. Consult the motor

manufacturer for details.

WARnInG! 

Some motors have low speed characteristics which cause overheating and

winding failure under light load or no load conditions. If the motor is operated in this

manner for an extended period of time, it is recommended that the unloaded motor current be
checked from 2–15 Hz (60 – 450 RPM) to ensure motor current does not exceed the name-
plate rating.

Do not use motor if the motor current exceeds the nameplate rating.

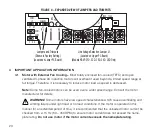
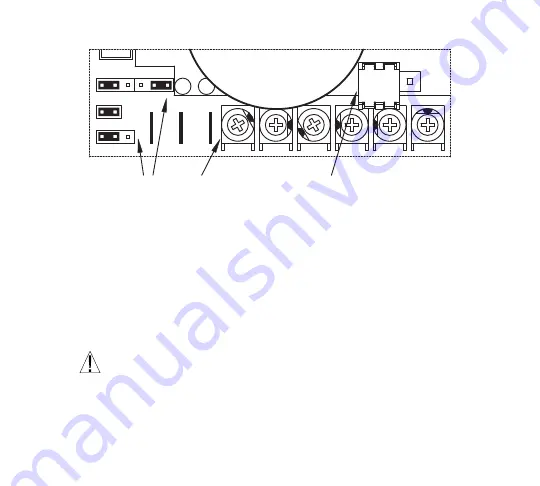
FIGURE 4 – EXPANDED VIEW OF JUMPERS AND TRIMPOTS

J1

CON3

J2

PW

R

ST

50/60Hz

F - S - R

CON2

A/M

J1

P2

P3

CON1

X1 X2

P1

DEC/B

MIN

MAX

CL

ACC

COMP

230V    115V

(Models KBVF-21D, 22D, 23D, 24D, 26D Only)

Jumpers and Trimpots

(Located on Lower PC Board)

Line Voltage Selection Jumper J1

(Located on Upper PC Board)

(Shown in Factory Setting)

Summary of Contents for KBVF-13

Page 1: ...ight to make changes in design which may not be included herein The QR code link to this manual is also located on the drive Notes 1 UL approved as an electronic overload protector for motors 2 Custom software is required for PSC motors See PSC Motor Addendum Part No A42142 3 Do not use this drive with GFCIs Special software is required Contact our Sales Department 4 Requires CE approved RFI Filte...

Page 2: ...9 Wiring Instructions 29 10 AC Line Fusing 35 11 Drive Operation 35 12 Diagnostic LEDs 37 13 Trimpot Adjustments 38 Limited Warranty 44 Table Page 1 Electrical Ratings 14 2 General Performance Specifications 15 3 Fault Recovery and Resetting the Drive 36 4 Drive Operating Condition and Status LED Indicator 37 figure Page 1 Quick Start Connection Diagram 5 2A Models KBVF 21D 22D 13 23 23D 23P Mecha...

Page 3: ...0 60 Hz and 50 Hz Motor Selection 25 11 Available Torque vs Output Frequency 26 12 120 Hz and 100 Hz Drive Output Frequency Selection 26 13 Automatic Start 27 14 Forward Reverse Speed Selection 27 15 Typical Hi Pot Setup 29 16 AC Line Input Motor and Ground Connections 31 17 Main Speed Potentiometer Connection 32 18 Voltage Following Connection 32 19 Manual Start Switch Connection 33 20 Forward St...

Page 4: ...s 3 Orange Motor and AC Line Terminals 5 Blue 2 Wire and 3 Wire Connector Kit Status Indicator Label Trimpot Adjustment Tool CE Approved Product Information Card Warranty Registration Card iv 230 VAC Controls Suitable For Use On A Circuit Capable Of Delivering Not More Than 5 kA RMS Symmetrical Amperes 230 Volts Maximum Use Copper Conductors Rated 75 ºC Suitable for Operation in a Maximum Surround...

Page 5: ...anual Start Switch Connection Forward Reverse Speed Selection Forward Stop Reverse Switch Connection Voltage Following Signal Input in Lieu of Main Speed Potentiometer see Section 12 on page 37 see Section 6 4 on page 27 see Section 9 7 on page 34 see Section 9 5 on page 32 Diagnostic LEDs see Section 9 8 on page 35 Enable Switch Connection AC Line Input Voltage Selection Main Speed Potentiometer ...

Page 6: ...le phase AC line input to Terminals L1 and L2 Models KbVf 21D 22D 23D 24D 26D Rated for 208 230 Volt AC line input with Jumper J1 on upper PC board set to the 230V position factory setting Rated for 115 Volt AC line input with Jumper J1 on upper PC board set to the 115V position Wire the single phase AC line input to Terminals L1 and L2 On Model KBVF 26D Jumper J1 is labeled 115VAC and 230VAC Mode...

Page 7: ...rive is programmed to operate 3 phase AC induction motors For PSC motors optional software is required contact our Sales Department 1 5 60 Hz and 50 Hz Motor Operation Jumpers J1 and J2 On the Lower PC board The drive is factory set for 60 Hz motor operation Jumper J1 set to the 60Hz position and Jumper J2 set to the X1 position For 50 Hz motor operation set Jumper J1 to the 50Hz position and be s...

Page 8: ... DC signal inputs See Section 3 5 on page 13 Note For signal following operation the Minimum Speed Trimpot MIN must be set fully counterclockwise WARnInG The signal input must be isolated from the AC line Earth grounding signal wiring will damage the drive and void the warranty It is recommended that the SIVfR Signal Isolator and Run fault Relay Part no 9597 be installed when using signal followin...

Page 9: ...ls plastics metals carbon silicon etc which may be a potential hazard Proper shielding grounding and filtering of this product can reduce the emission of radio frequency interference RFI which may adversely affect sensitive electronic equipment The input circuits of this drive may not be isolated from the AC line Be sure to read and follow all instructions carefully Fire and or electrocution can r...

Page 10: ...ost provides high torque and excellent load regulation over a wide speed range Power Start delivers over 200 motor torque to ensure startup of high frictional loads Electronic Inrush Current Limit EICL eliminates harmful AC line inrush current 3 The drive is suitable for machine or variable torque HVAC applications With option al Drive Link software the drive can be programmed for DC Injection Bra...

Page 11: ...rated RPM See Section 6 2 on page 25 bidirectional Signal Operation SIVfR Required Compatible with GfCIs with optional software Industry Standard Mounting See Section 7 on page 27 finger Safe Cover Meets IP 20 standard See Section 5 on page 22 3 2 Performance features Power Start Provides more than 200 starting torque which ensures startup of high frictional loads Slip Compensation with Static Aut...

Page 12: ...26D Contain Motor Filter 3 4 Trimpot Adjustments Minimum Speed MIn Sets the minimum speed of the motor See Section 13 1 on page 39 Maximum Speed MAX Sets the maximum speed of the motor See Section 13 2 on page39 Acceleration ACC Sets the amount of time for the motor to accelerate from zero speed to full speed See Section 13 3 on page 39 Deceleration DEC b Sets the amount of time for the motor to d...

Page 13: ...on the end of the drive s heat sink Programming Kit Part no 9582 Includes DownLoad Module DLM handheld programming device which uploads and downloads drive programs PC to DLM serial com munication cable DLM to inverter communication cable and PC Windows based Drive Link communication software Contact our Sales Department for more information DIVf Modbus Communication Module Part no 9568 Allows the...

Page 14: ... 0 10 0 230 2 4 1 2 37 1 3 0 6 KBVF 23D 9959 115 1 9 6 15 0 230 2 4 1 2 37 1 3 0 6 208 230 1 6 0 10 KBVF 23P 9676 208 230 3 3 2 5 0 230 2 4 1 2 37 1 1 0 5 KBVF 14 9977 115 1 14 0 20 0 230 4 0 1 75 2 2 1 0 KBVF 24 9978 208 230 1 10 0 15 0 230 4 0 1 75 2 2 1 0 KBVF 24D 9979 115 1 14 0 20 0 230 4 0 1 75 2 2 1 0 208 230 1 10 0 15 KBVF 24P 9677 208 230 3 5 2 10 0 230 4 0 1 75 2 0 0 9 KBVF 26D 9496 115 ...

Page 15: ...ting 0 40 0 Maximum Speed Trimpot MAX Range Frequency Setting 70 110 100 Acceleration Trimpot ACC and Deceleration Trimpot DEC B Range Seconds 0 3 20 1 5 Boost Trimpot DEC B Range 50 Hz Only Volts Hz 0 30 5 Slip Compensation Trimpot COMP Range at Drive Rating Volts Hz 0 3 1 5 Current Limit Trimpot CL Range Amps AC KBVF 21D 0 65 1 8 1 6 KBVF 22D 1 0 2 8 2 4 KBVF 13 23 23D 23P 1 5 4 5 3 8 KBVF 14 24...

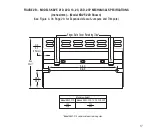
Page 16: ...aces Model KBVF 21D contains internal retaining clips Finger Safe Cover Retaining Clips Finger Safe Cover Retaining Clips FIGURE 2A MODELS KBVF 21D 22D 13 23 23D 23P MECHANICAL SPECIFICATIONS Inches mm Model KBVF 22D Shown See Figure 4 On Page 20 for Expanded View of Jumpers and Trimpots 16 ...

Page 17: ...VF 22D 13 23 23D 23P Model KBVF 21D contains internal retaining clips 2 00 50 8 2 75 69 9 Finger Safe Cover Retaining Clips FIGURE 2B MODELS KBVF 21D 22D 13 23 23D 23P MECHANICAL SPECIFICATIONS Inches mm Model KBVF 22D Shown See Figure 4 On Page 20 for Expanded View of Jumpers and Trimpots ...

Page 18: ...AFE COVER RETAINING CLIPS 0 2 5 1 6 Places 0 4 10 2 33 5 1 32 3 82 97 0 See Chart A on page 19 77 9 3 07 2 Places 0 08 2 0 2 Places FIGURE 3A MODELS KBVF 14 24 24D 24P 26D MECHANICAL SPECIFICATIONS INCHES MM Model KBVF 26D Shown See Figure 4 On Page 20 for Expanded View of Jumpers and Trimpots ...

Page 19: ... 5 70 145 Model KBVF 26D Model KBVF 26D Chart B Maximum Height 4 50 5 00 127 114 Models KBVF 14 24 24D 24P Chart B See 119 4 70 112 4 40 FIGURE 3B MODELS KBVF 14 24 24D 26D MECHANICAL SPECIFICATIONS INCHES MM Model KBVF 26D Shown See Figure 4 On Page 20 for Expanded View of Jumpers and Trimpots ...

Page 20: ...verheating and winding failure under light load or no load conditions If the motor is operated in this manner for an extended period of time it is recommended that the unloaded motor current be checked from 2 15 Hz 60 450 RPM to ensure motor current does not exceed the name plate rating Do not use motor if the motor current exceeds the nameplate rating FIGURE 4 EXPANDED VIEW OF JUMPERS AND TRIMPOT...

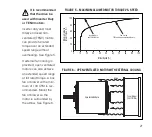
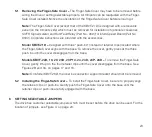
Page 21: ...eve an extended speed range at full rated torque A box fan or blower with a mini mum of 100 CFM is rec ommended Mount the fan or blower so the motor is surrounded by the airflow See Figure 6 20 Maximum Allowed Motor Speed 10 20 0 0 40 50 30 80 70 60 100 90 80 60 40 100 Motor Torque TEFC and Open Ventilated Motors and TENV Motors Inverter Duty Fan Cooled FIGURE 5 MAXIMUM ALLOWED MOTOR TORQUE VS SPE...

Page 22: ...while providing maximum motor protection If the motor is overloaded to 120 of full load 75 of the CL setting the I2 t Timer starts If the motor continues to be overloaded at the 120 level the timer will shut down the drive after 30 minutes If the motor is overloaded to 160 of full load the drive will trip in 6 seconds UL approved as an overload protector for motors 5 fInGER SAfE COVER The drive is...

Page 23: ... located where the Finger Safe Cover aligns with the base To remove the cover gently press at the three push ins until the cover disengages from the base Models KbVf 22D 13 23 23D 23P 14 24 24D 24P 26D To remove the Finger Safe Cover gently lift up on the four retainer clips until the cover disengages from the base See Figures 2B and 3A on pages 17 and 18 Note On Model KBVF 26D the inner bus capac...

Page 24: ...terminal back and forth vertically while pulling it upward See Figure 9 on page 25 24 FIGURE 7 MODELS KBVF 21D 22D 23D 24D AC LINE INPUT VOLTAGE SELECTION 230 Volt AC Line Input Factory Setting J1 Installed in 230V Position 115 Volt AC Line Input J1 Installed in 115V Position J1 230V 115V 230V 115V J1 FIGURE 8 MODEL KBVF 26D AC LINE INPUT VOLTAGE SELECTION 230 Volt AC Line Input Factory Setting J1...

Page 25: ...set to the X1 position Jumpers J1 and J2 are located on the lower PC board See Figure 10 6 2 2 Setting the Drive for Two Times the Rated Motor RPM The drive can also be used to operate the motor up to two times the rated RPM However con stant horsepower will result when operating the drive in the X2 mode above the motor rated frequency See Figure 11 on page 26 25 Installed Terminal Removed Termina...

Page 26: ...e lower PC board The drive will automatically start when power is applied and a run command is given The drive will automatical ly restart after a recovered fault due to undervoltage overvolt age or short circuit 26 FIGURE 12 120 Hz 100 Hz DRIVE OUTPUT FREQUENCY SELECTION 120 Hz Output with 60 Hz Motor J1 Installed in 60Hz Position J2 Installed in X2 Position 100 Hz Output with 50 Hz Motor J1 Inst...

Page 27: ...InG InSTRUCTIOnS WARnInG This drive must be mounted in an enclosure Care should be taken to avoid extreme hazardous locations where physical damage to the drive can occur due to moisture metal chips dust and other contamination including corrosive atmosphere that may be harmful See Safety Warning on pages 8 and 9 To prevent acciden tal contact with high voltage it is required that the finger Safe ...

Page 28: ...setup is shown in Figure 15 on page 29 All drives have been factory hi pot tested in accordance with UL requirements Warning All equipment AC line inputs must be disconnected from the AC power 8 1 Connect all equipment AC power input lines together and connect them to the H V lead of the Hi Pot Tester Connect the RETURN of the Hi Pot Tester to the frame on which the drive and other auxiliary equip...

Page 29: ...connected Connect Hi Pot AC Line Input H V RETURN Machine Equipment or Frame L2 L1 Auxiliary Equipment Chassis Connect All Drive Terminals Together Motor Wires Frame Main Power Disconnected FIGURE 15 TYPICAL HI POT SETUP 9 WIRInG InSTRUCTIOnS WARnInG Read Safety Warning on pages 8 and 9 before using the drive Disconnect main power before making connections to the drive To avoid electric shock be s...

Page 30: ...ut as described below The terminals are located on the upper PC board See Figure 16 on page 31 GfCI Operation Do not connect this drive to an AC power source controlled by a Ground fault Circuit Interrupter Special software is available for GfCI operation contact our Sales Department Models KbVf 13 14 Rated for 115 Volt AC line input only Wire the Single Phase AC line input to Terminals L1 and L2 ...

Page 31: ...d with a 5 kΩ Main Speed Potentiometer to control motor speed Wire the Main Speed Potentiometer to Terminals P1 low P2 wiper P3 high The terminals are located on the lower PC board See Figure 17 on page 32 31 FIGURE 16 AC LINE INPUT MOTOR GROUND CONNECTIONS 3 Phase 50 60 Hz 208 230 Volt AC Line Input Motor Ground Earth Chassis MOTOR U V W L1 L2 L3 AC LINE Models KBVF 23P 24P Models KBVF 21D 22D 13...

Page 32: ...rminal P1 The terminals are locat ed on the lower PC board With external circuitry a 0 10 Volt DC analog signal can also be used See Figure 18 If a non isolated signal is used install the SIVFR Signal Isolator Part No 9597 The SIVFR accepts voltage 0 to 2 5 thru 0 to 25 Volts DC or current 4 20 mA DC signal inputs See Section 3 5 on page 13 Note For signal following operation the Minimum Speed Tri...

Page 33: ...board The connector must be wired to a momentary switch or contact as shown in Figure 19 In the Manual Start Mode the drive will trip due to all faults Overvoltage Undervoltage Short Circuit and I2 t and remain tripped even when the fault is cleared To Start Reset the drive the switch or contact must be manually closed Also the drive must be restarted each time the AC line is interrupted For Autom...

Page 34: ...cut off at the connector 9 7 forward Stop Reverse Switch Connection COn2 To operate the drive using a Forward Stop Reverse Switch remove the factory installed jumper on CON2 and install the 3 wire connector sup plied CON2 is located on the lower PC board The connec tor must be wired to a main tained switch or contact See Figure 20 Also see forward Reverse Speed Selection in Section 6 4 on page 27 ...

Page 35: ...each ungrounded conductor Do not fuse motor leads For the recommended fuse size see Table 1 on page 14 Wire the drive in accordance with the National Electrical Code requirements and other local codes that may apply to the application 11 DRIVE OPERATIOn 11 1 Start Up Procedure After the drive has been properly setup jumpers and trimpots set to the desired positions and wiring completed the startup...

Page 36: ...r an I2 t fault Has Cleared The drive can be restarted after an I2 t Fault has cleared by any of the following methods Note If an I2 t Fault occurs the motor may be overloaded Check the motor current with an AC RMS responding ammeter Also the CL setting may be set too low See Section 13 7 on page 42 1 Disconnect and reconnect the AC power approximately 15 seconds The ST LED must change from quick ...

Page 37: ...Yellow On Continuously Phase Loss Detection1 2 Yellow 0 04 Sec On 0 06 Sec Off Communication Error3 Green Red 1 Sec On Off Green PWR Power Buss and Logic Power Supply Green On Continuously Notes 1 Phase Loss Detection Models KBVF 23P 24P 29 45 48 2 Requires AC line restart 3 With DIVF Modbus Communication Module Installed 4 All LED flash rates after recovered faults are 1 Sec On Off 5 Drive will r...

Page 38: ...ual Start Rest see Section 9 6 on page 33 13 TRIMPOT ADJUSTMEnTS The drive contains trimpots which are factory set for most applications See Figure 4 on page 20 for the location of the trimpots and their approximate factory calibrated positions Some applications may require readjustment of the trimpots in order to tailor the drive for a specific requirement The trimpots may be readjusted as descri...

Page 39: ... rotate the ACC Trimpot clockwise For more rapid acceleration rotate the ACC Trimpot counterclockwise See Figure 24 Note Rapid acceleration settings may cause the current limit circuit to activate which will extend the acceleration time 13 4 Deceleration DEC b Sets the amount of time for the motor to decelerate from full speed to zero speed The DEC B Trimpot is factory set to 1 5 seconds For longe...

Page 40: ...set to 1 5 Volts Hz which provides excellent speed regulation for most motors To increase the slip com pensation rotate the COMP Trimpot clockwise To decrease the slip compensation rotate the COMP Trimpot counterclock wise See Figure 26 The slip compensation may be adjusted as follows 1 Wire an AC RMS ammeter in series with one motor phase 2 Run the motor and set the unloaded speed to approximatel...

Page 41: ...st rotate the BOOST Trimpot clockwise To decrease the boost rotate the BOOST Trimpot counterclockwise See Figure 27 on page 40 In order for the 50 Hz motor to run properly the boost must be adjusted If the application does not require full torque below 10 Hz the Boost DEC B Trimpot can be conservatively set at 8 9 o clock position Note In 50 Hz motor operation the deceleration time is automaticall...

Page 42: ...crease the current limit rotate the CL Trimpot counter clockwise See Figures 28 32 on page 43 UL approved as an electronic overload protector for motors In order to ensure that the motor is properly protected with the I2t feature it is required that the CL Trimpot be set for 160 of the motor nameplate rating This is accom plished as follows Note This adjustment must be made within 6 seconds or the...

Page 43: ...URE 32 MODEL KBVF 26D CURRENT LIMIT TRIMPOT CL RANGE Amps AC Shown Factory Set 1 1 5 2 8 2 4 1 9 FIGURE 29 MODEL KBVF 22D CURRENT LIMIT TRIMPOT CL RANGE Shown Factory Set 1 5 2 3 Amps AC 4 5 3 8 3 FIGURE 30 MODELS KBVF 13 23 23D 23P CURRENT LIMIT TRIMPOT CL RANGE 1 6 95 Shown Factory Set Amps AC 65 1 8 1 3 FIGURE 28 MODEL KBVF 21D CURRENT LIMIT TRIMPOT CL RANGE ...

Page 44: ...l damage including injury to any person caused by items of our manufacture or sale Some states do not allow certain exclusions or limitations found in this warranty and therefore they may not apply to you In any event the total liability of KB Electronics Inc under any circumstance shall not exceed the full purchase price of this product rev 2 2000 COPYRIGHT 2014 Kb Electronics Inc All rights rese...

Reviews: