
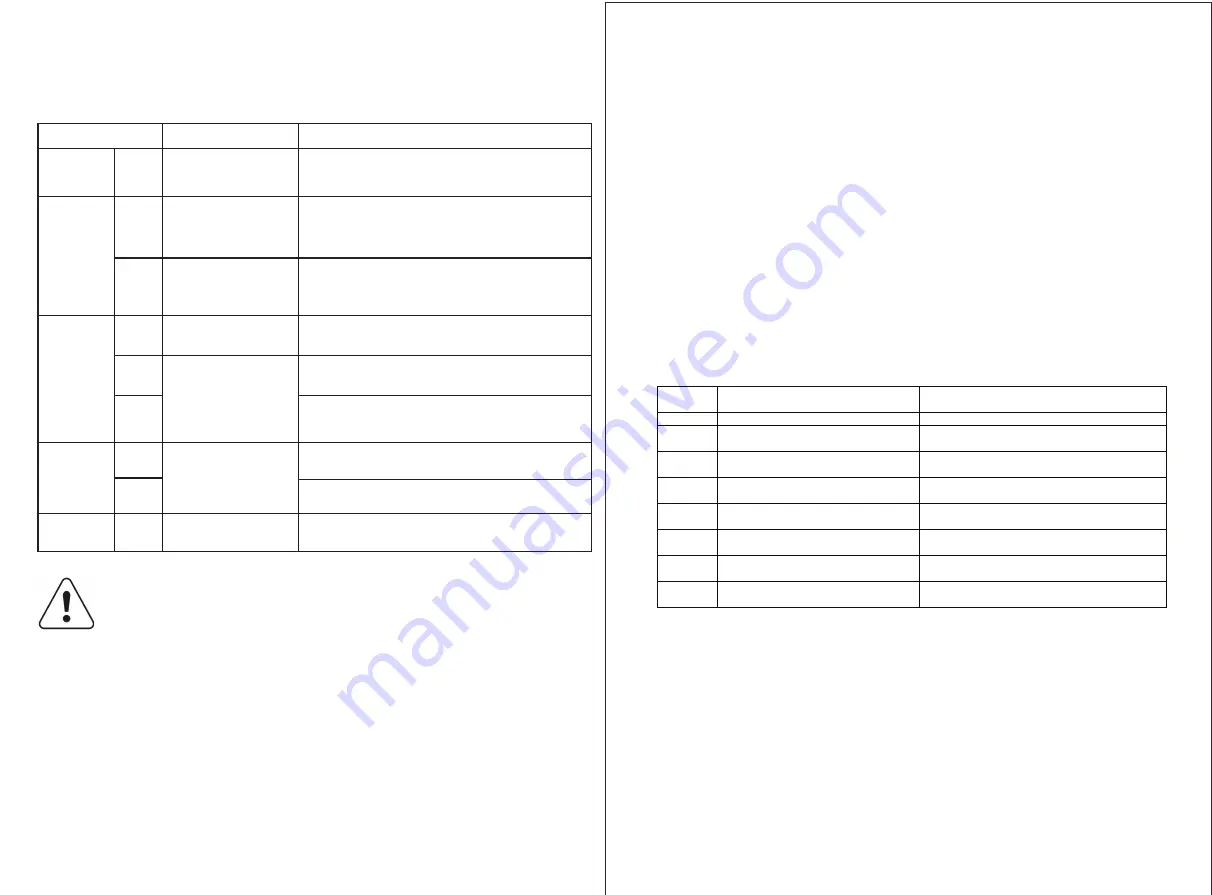
TEMPERATURE LEVEL TABLE
7
6
TECHNICAL INFORMATION
TROUBLE SHOOTING GUIDE
NOISES MADE BY THE HOB
CLEANING
Note: The data in the table is for guidance only. The relation between the heat setting and the
cooking zone consumption of power is not linear. When you increase the heat setting it is not
proportional to the increase of the cooking zone consumption of power. The power of the
cooking zones can be different in some small range. It changes with the material and
dimensions of the cookware.
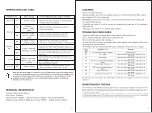
Voltage: 220-240V 50/60 Hz
Max. power: 10200W
Left up booster :1800W Left down booster :2200W Flex booster:4000W
Right up booster :2200W Right down booster:1800W Middle booster :2200W
-
Read and follow the instructions given in the section “Instructions for use”.
-
Check that the electricity supply has not been shut off.
-
Dry the hob thoroughly after cleaning it.
-
If, when the hob is switched on, alphanumeric codes appear on the display, refer to the
following table for instructions.
-
If the hob cannot be switched off after use it, disconnect it from the power supply.
Induction hobs can make whistling or crackling sounds during normal operation, these actually come from the pots and
pans as a result of the characteristics of the bottoms (for example, bottoms made of several layers of material, or uneven
bottoms). These noises vary depending on the pots and pans used and the amount of food they contain, and are not
indicative of a defect of any kind.
In addition, the induction hob is equipped with an internal cooling system to control the temperature of electronic parts;
as a result, during operation and for several minutes after the hob has been switched off, the noise of the cooling fan will
be audible. This is perfectly normal and indeed essential for proper functioning of the appliance.
C/C-C-C-C Error: automatic safety shut-off for liquid overflow. This means that the touch panel was watered
with liquid.
-Do not use steam cleaners.
-Before cleaning, make sure the cooking zones are switched off and that the residual
heat indicator (“H”) is not displayed.
IMPORTANT: Do not clean with scrub brushes, Clean the induction with a damp cloth
or a specific hob cleaner.
-Clean the hob (when it is cool) to remove any deposits and stains due to food residuals
after each use.
-Salt, sugar and sand may scratch the glass surface.
Temperature level Type of cooking Level use (Indicating cooking experience and habits)
Max level
9
Frying - boiling Ideal for browning, starting to cook, frying deep
frozen products, fast boiling.
High level
7-8
Browning -
sautéing - boiling -
grilling
Browning - cooking -
stewing - sautéing -
grilling
Ideal for sautéing, maintaining a lively boil,
cooking and grilling.
Ideal for sautéing, maintaining a light boil,
cooking and grilling, preheating purposes.
6-7
Medium
level
Low level
Power off
4-5
Cooking - stewing -
sautéing - grilling
Cooking - simmering -
thickening - creaming
Melting - defrosting -
keeping - food warm -
creaming
Support surface
Ideal for stewing, maintaining a gentle boil,
cooking (for a long period of time). Creaming pasta
Hob in stand-by or off mode (possible end-of-
cooking residual heat, indicated by an “H”)
Ideal for long-cooking recipes (rice, sauces, roasts, fish)
with liquids (e.g., water, wines, broth, milk), creaming pasta
3-4
Ideal for long-cooking recipes (less than a liter in volume:
rice, sauces, roasts, fish) with liquids (e.g. water, wines,
broth, milk)
Ideal for softening butter, gently melting chocolate, thawing
small products and keeping just-cooked food warm (e.g., sauces,
soups, minestrone)
Ideal for keeping just-cooked food warm, for creaming risottos
and for keeping serving dishes warm
(With induction-suitable accessory)
2-3
1-2
1
0/H
Error
code
Possible Cause
Remedy
E0
No Pan or did not detect the pan
Put on the pan
E1
Low voltage
Contact the after
-
sales service and specify the
error code
E2
High voltage
Contact the after
-
sales service and specify the
error code
E3
Sensor under glass High temperature
or short
Contact the after
-
sales service and specify the
error code
E4
Sensor under glass open
Contact the after
-sales service and
specify the
error code
E5
IGBT sensor high temperature or
Short
Contact the after
-
sales service and specify the
error code
E6
IGBT sensor open
Contact the after
-
sales service and specify the
error code
E8
Light board line poor connect
Contact the afte
r-
sales service and specify the
error code


