28
GB-Gas Euro Range
Oriental- Gas-20190620
FR
M
-P
DE
-0
3-
04
(N
YT
/R
&
D/
20
18
10
08
)
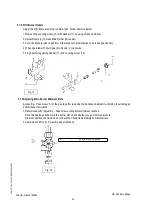
4.4 Position and Fixing
1.Authorized personnel must do the installation.
2.Install the appliance according to National Safety Standard about gas-heated standard.
3. Place the appliance in good ventilated room with permanent ventilation ducts to guarantee sufficient
exchange of air and keep the work place healthy.
4. If the Gas Euro Range not connected to a flue, it is recommended to install it under efficient hood, which
could evacuate burned gases and cooking steams. Below is construction type according to National
Regulations:
A
1
: Appliance without fan and does not have connection to a flue or to a device for evacuating combustion
products outside the room. The combustion air and burned gas mixed in one room.
5. Make sure that any object around or under Gas Euro Range does not obstruct air volume required for
combustion.
6.Put away any flammable materials near Gas Euro Range.
7. When the appliance is freestanding, keep a distance at least 10 cm from side, and rear walls. Especially
when the appliance close to wall and does not protected with fire-resistant materials made.
8.Install the appliance separately or side by side with other appliance according to recommended range.
9.Put Gas Euro Range on solid, flat, and horizontal floor.
10.Adjust the height of the four feet by using brackets.
11.Before turn the appliance ON, remove the protective film. Remove any adhesive with appropriate solvent.
Eliminate all packaging material according to national laws.
4.5 Gas Supply Connection
1. Before installing and connecting Gas Euro Range to gas supply, carefully control the fixed part of gas system,
which conformed to National Building Regulation.
2. Verify gas pipes sections to guarantee sufficient supply for all gas heated appliances. Install it in similar
condition to avoid excessive pressure drops.
3. The pipes must be made of steel (with junctions made using white cast iron, or galvanized steel fittings, or
autogenously welded joints) or copper pipes (with mechanical joints and couplings without seals or mastics
or brazed joints).
4.Control the gas bottle (if any) placed correctly and protected in dry area.
5. Check whether the gas pipes can easily inspected. If the pipes installed in floor and wall, make sure that this
work done according to professional standard with reference points that make it possible to find the pipes.
6. Before installing Gas Euro Range, make sure that it is set for the gas and pressure (see Technical Data
Plates). Consult the paragraph “Gas Conversion”.
7. Connect Gas Euro Range to gas supply using solid fittings or flexible steel pipes with suitable sections
related to nominal power and length.
8. Check whether the flexible pipes does not pass or near hot surfaces, put under stress and traction, contact
with sharp edges, or other things that could damage the pipe.
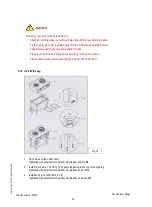
9.Install quick ON – OFF valve between the gas mains and each single appliance where easy to reach.
10.After install Gas Euro Range safely, take a pressure test the whole gas circuit by using leak finder spray or
non-corrosive foams.


