


Manual del usuario:
pertura del embalaje
2)Manilla
3)Estanterías de cristal redondas
4)Estanterías rejilla
5)Limpieza de los cristales internos
6)Limpieza del exterior
7)Conexión a la red eléctrica
8)Regulación
9)Control del funcionamiento
10)Limpieza interna
1)A
!
!
11)Sustitución de las lámparas internas
12)Sustitución del burlete magnético de la puerta
2)Limpieza del evaporador
3)Sustitución de un cristal
Manuale del manutentore (Pág.49):
1)Limpieza del condensador
4)Esquemas eléctrico, esquema equipo refrigeración
I
UK
D
E
F
NL
P
S
DK
FIN
B
GR
CZ
EE
LV
LT
H
M
PL
SK
SLO
10
Manual del usuario
OBSERVACIONES
Es muy importante conservar el presente manual de instrucciones junto con el aparato para
futuras consultas, por razones de seguridad.
2
3
4
5
6
7
Este aparato tiene que ser puesto en funcionamiento sólo por personas adultas. No hay que permitir a
los niños la manipulación de los mandos y controles como tampoco que jueguen con el producto.
. Es prohibido alterar o modificar en cualquier manera las características del aparato. . Los trabajos
eléctricos necesarios para la instalación del aparato tienen que ser realizados por un electricista
calificado o por una persona competente. . No tratar de reparar el aparato solos. Las reparaciones
efectuadas por personas inexpertas pueden causar daños o graves disfunciones. . La asistencia al
presente aparato tiene que ser efectuada por un Centro de Asistencia Técnica autorizado. Usar
solamente piezas de recambio originales. . El aparato es apto para la conservación de productos
alimenticios solamente. . La casa fabricante declina toda responsabilidad en el caso de que estas
normas contra accidentes no fueran respetadas. Además se reserva el derecho de aportar
modificaciones por mejorías técnicas sin ningún preaviso.
1
8
9
10
11
.
. Evitar la instalación del aparato cerca de los
rayos solares. . No instalar el aparto cerca de fuentes de calor tales como estufas termosifones,etc.
. Mantener alejadas de paredes las rejillas de ventilación del grupo compresor a una distancia no
inferior a los 30cm.
. Recordarse de que los productos no deben salir fuera del perímetro de las
estantes o bandejas.
12
13
14.
Nuestros productos son para el interior, non instalarlos en el exterior de los locales/tiendas.
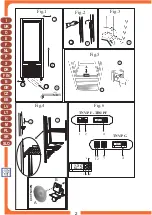
1. APERTURA DEL EMBALAJE
EMBALAJE EN CAJA DE CARTÓN 1a.
EMBALAJE EN
CAJÓN DE MADERA 1b
2.
3
4
5
6
7
2. MANILLA
1
2
3
3. ESTANTERÍAS DE CRISTAL REDONDAS
1
2
4. ESTANTERÍAS REJILLA
1
2
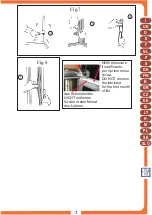
5. LIMPIEZA DE LOS CRISTALES INTERNOS
1
2
. Si se verificase una producción anómala de hielo en el evaporador, causado
bien por la humedad del aire o de los productos que se quieren refrigerar, les aconsejamos que paren el
compresor y que saquen y coloquen los alimentos en específicos contenedores refrigerados a la misma
temperatura y durante el tiempo necesario para la descongelación. De no hacerlo así, el compresor
funcionará siempre provocando un consumo de energía eléctrica inútil y con un escaso rendimiento.
. Si el aparto està parado y inutilizado, es indispensable dejar la puerta abierta, al menos 30 cm.
No tener la iluminación encendida sin refrigeración activada.
Cortar la cinta, sacar la caja hacia arriba.
. Desclavar las tablas de madera, teniendo cuidado con los clavos.
Introducir
las horquillas del elevador entre el equipo y la paleta o caja. . Levantar el equipo. . Eliminar la paleta o
caja. . Colocar el equipo en un plano horizontal nivelado. . Antes de desechar el embalaje verificar si
quedó algo adentro. . Separar los materiales del embalaje según la composición para facilitar su
eliminación (Véase figura 1).
. La manilla se encuentra en un sobre dentro del equipo. . Ensamblar la base de la manilla con los dos
tornillos que se encuentran en los orificios de la columna de la puerta; apretar a fondo. . Aplicar la pieza
de plástico y apretarla hasta oír el encastre (Véase figura 2).
. Las estanterías, que se encuentran en la caja de cartón, se encastran en las guías de los montantes.
. Montar en primer lugar la estantería de espejo abajo (Véase figura 3).
. Las rejillas se encuentran dentro del equipo, en el fondo. . Montarlas encastrándolas en los
elementos de soporte. Es posible regular la altura (Véase figura 4).
. Limpiar el interior y los cristales con una esponja blanda y detergentes neutros. . Secar con un paño
suave.
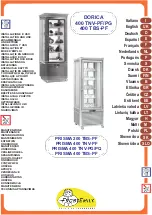
Modelo
Modelo
PRISMA 400 TNV/PG
PRISMA 400 TNV/PF PRISMA 400 TBS/PF


