background image

I

UK

D

E

F

NL

P
S

DK

FIN

B

GR

CZ
EE

LV

LT

H

M

PL

SK

SLO

7

Operator's guide

7. CONNECTION TO THE MAINS
1.

2.

a)

b)

c)

3

4

5

N.B.

8. CONTROLS

PRISMA

400TN/PF

TB/PF models: 1. Light switch:

2. Refrigeration

switch:

3. Thermometer:

Thermostat:

a)

5

SET or P

6

UP

7

DOWN

PRISMA 400 TNV/PG model: 1. Rotation switch:

2.

Light switch:

3. Refrigeration switch:

9. CHECKING CORRECT OPERATION
Check that: 1.

2

3

4

5

N.B.:

10. INTERNAL CLEANING (EVERY 15 DAYS)
1.

2

3.

11. REPLACING THE INTERNAL LIGHTS
1.

2

3

4

5

6

7

12. REPLACING THE DOOR'S MAGNETIC GASKET
1.

2.

3

Ensure that mains voltage and frequency are the same as those stated on the rating plate (A) attached

to the appliance.

Ensure that the supply socket has the following characteristics:

it is properly

earthed.

It fulfils the requirements of the rated current as set out on the rating plate.

It complies with

the IEC regulations: - magnetothermal differential switch (also known as ground fault interrupter) with In
= nominal value as stated on the rating plate; - Differential with Id sensitivity = 30 mA. . Ensure that
there is no danger of explosion (AD) in the room. . The connecting cable to the appliance is H05 VVF,
designed for internal use. For installation in any other environments, it will be necessary to change the
cable with the appropriate type (for example H07 VVF for external use).

. Connect the plug (do not use

three-way adapters and reduction adapters).

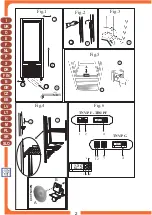
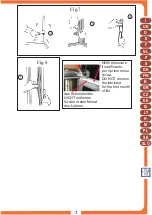
If during transport or storage the appliance has been

placed by mistake in a horizontal position or has been turned upside down, leave for at least three hours
in the correct position before switching on the power supply (see figure 4).

The appliance features adjusting controls, located at the front of the cabinet.

to switch on the light inside the display cabinet.

to switch on the refrigeration system.

to display the temperature in the

appliance.

to adjust the temperature in the appliance.

Press button

once to

display the temperature set-point, which can be changed by pressing button

or button

.

to set the rotating shelves into motion.

to switch on the light inside the display cabinet.

to switch on the

refrigeration system (see figure 6).

The plug is connected. . The refrigeration unit switch is switched on (green light on).

. The thermometer shows the desired temperature for the goods to be stored. . The appliance is not

exposed to direct sunlight or to high-powered lamps. . The room temperature does not exceed that in
which the appliance is designed to work normally, i.e. + 25°C, 60% r.h. (climatic class 3).

the

appliance must be correctly filled, without overloading the shelves and with sufficient space for correct
cold air circulation.

Switch off the appliance.

. Open the door and remove the refrigerated goods.

Wipe the sides and

accessories with a sponge dipped in water with a little sodium bicarbonate. Dry with care.

Switch off the appliance. . Undo the screws which hold the top lamp socket in place. . Detach the

fluorescent tube with its protective cover from the top lamp socket. . Take the tube out of the bottom
lamp socket. . Remove the protective cover. . Replace the fluorescent tube. . Reassemble by following
the above instructions in reverse order (see figure 7).

Open the door.

Take hold of the magnetic gasket and pull it out of the frame.

. Insert the new

gasket and press it firmly down all around (see figure 8).

200-

Summary of Contents for DORICA 400 TBS-PF

Page 1: ...www kbs gastrotechnik de Stand Juli 2018 BEDIENUNGSANLEITUNG Panoramavitrine Prisma 200 und 400 KBS Gastrotechnik GmbH Johannes Kepler Str 14 55129 Mainz...

Page 2: ...RUIK INSTALACE A POU IT UN INSTALACIJA IN UPORABA PAIGALDAMINE JA KASUTAMINE BE P T S S HASZN LAT IN TAL CIA A POU ITIE INSTALACJA I UZYTKOWANIE ISTALLAZJONI U U U INSTALIAVIMAS IR NAUDOJIMAS MANUTENZ...

Page 3: ...UK D E F NL P S DK FIN B GR CZ EE LV LT H M PL SK SLO 2 2 Fig 1 Fig 2 Fig 3 6 2 3 3 Fig 4 Fig 5 2 2 4 3 5 A 1 5 4 2 1 12 5 P T 5 6 12 5 P 7 4 3 2 12 5 P T 1 TNV PF TBS PF TNV PG Fig 6 1 2 A B 400 TNV...

Page 4: ...R CZ EE LV LT H M PL SK SLO 3 Fig 7 2 3 4 Fig 8 2 NON rimuovere il lubrificante per il primo mese di vita DO NOT remove the lubricant for the first month of life das Schmiermittel f r den ersten Monat...

Page 5: ...compressore funzioner continuamente provocando un inutile consumo di energia elettrica e uno scarso rendimento Se l apparecchiatura rimane ferma ed inutilizzata indispensabile lasciare aperta la port...

Page 6: ...UP o sul DOWN Serve per azionare i piani rotanti Serve ad accendere la luce interna Serve ad accendere l impianto refrigerante La spina sia inserita L interruttore dell impianto refrigerante sia inser...

Page 7: ...truction for at least 30 cm Ensure that the products displayed on the shelves and grills do not hang over the edges If damp air or products to be refrigerated should cause ice to form on the evaporato...

Page 8: ...correct position before switching on the power supply see figure 4 The appliance features adjusting controls located at the front of the cabinet to switch on the light inside the display cabinet to sw...

Page 9: ...nicht im Aussenbereich von R umen Gesch ften anbringen 1 VERPACKUNGS FFNUNG KARTONVERPACKUNG1a HOLZKISTENVERPACKUNG 1b 2 3 4 5 6 7 2 DER HANDGRIFF 1 2 3 3 DIE RUNDEN GLASABLAGEN 1 2 4 DIE GITTERABLAGE...

Page 10: ...inschalten der Innenbeleuchtung Zum Einschalten der K hlanlage siehe Abb 6 Der Stecker in der Steckdose steckt Der Schalter der K hlanlage eingeschaltet ist und das gr ne Licht leuchtet Das Thermomete...

Page 11: ...cordarse de que los productos no deben salir fuera del per metro de las estantes o bandejas 12 13 14 Nuestros productos son para el interior non instalarlos en el exterior de los locales tiendas 1 APE...

Page 12: ...dr modificarse con las teclas y Sirve para accionar las estanter as giratorias Sirve para encender la luz interna Sirve para encender la instalaci n refrigeradora V ase figura 6 El enchufe est conecta...

Page 13: ...es de l l vateur entre la vitrine et la palette ou la caisse Soulever la vitrine liminer la palette ou la caisse Poser la vitrine sur un plan nivel et horizontal S assurer de n avoir rien laiss dans l...

Page 14: ...ou de la Touche il sert actionner les tablettes pivotantes il sert allumer la lumi re interne il sert allumer le syst me de r frig ration voir illustration 6 La fiche est branch e L interrupteur de l...

Page 15: ...producten niet buiten de omtrek van de schappen of roosters mogen steken 12 13 14 Onze producten zijn bedoeld voor binnengebruik installeer ze niet buiten vertrekken winkels 1 UITPAKINSTRUCTIES KARTON...

Page 16: ...rgegeven die gewijzigd kan worden door op toets of toets te drukken Deze schakelt de draaiplateaus in werking Deze dient om de binnenverlichting aan te doen Deze dient om de koelinstallatie in werking...

Page 17: ...va o direito de realizar modifica es melhorativas sem nenhum pr aviso Evitar de instalar a vitrina directamente sob os raios do sol N o instalar o aparelho em proximidades de fontes de calor tais como...

Page 18: ...cionar os planos rotativos serve para acender a luz interna serve para ligar o sistema de arrefecimento ver a Fig 6 A ficha est ligada O interruptor do sistema de arrefecimento est activado luz verde...

Page 19: ...lls r tt till ndringar utan varsel Undvik att installera montern under direkt solljus Installera inte apparaten i n rheten av v rmek llor t ex kaminer element o s v Se till att kompressorns ventilatio...

Page 20: ...are F r att t nda de inre lamporna Kylbrytare F r att sl p kylsystemet se fig 6 Stickkontakten satts i Kylaggregatets brytare kopplats in och att den gr na lampan lyser Termometern visar nskad tempera...

Page 21: ...DVENDIGE GLASPANELER 1 2 6 UDVENDIG RENG RING 1 Install r ikke montren p steder med direkte sollys Install r ikke apparatet i n rheden af varmekilder eksempelvis varmeapparater radiatorer osv S rg for...

Page 22: ...rnes rotation Anvendes til at t nde den indvendige belysning Anvendes til t nding af k leenheden Jvf fig 6 Stikket er sat i stikkontakten Kontakten til k leenheden er sat i det gr nne lys lyser Termom...

Page 23: ...a vitriini suoraan auringonvaloon l asenna laitetta l helle l mp tuottavia laitteita kuten l mmittimi l mp pattereita jne J t kompressoriyksik n ritil iden ja seinien v lille v hint n 30 cm et isyys M...

Page 24: ...een K ytet n sis valon sytytt miseen K ytet n j hdytysj rjestelm n k ynnist miseen katso kuva 6 Pistoke on kytketty pistorasiaan J hdytyslaitteen kytkin on kytketty vihre valo palaa L mp mittari osoit...

Page 25: ...te installeren Het apparaat niet in de buurt van warmtebronnen zoals kachels centrale verwarming enz Installeren Houd de ventilatieroosters van de compressorgroep tenminste 30 cm van de wand Denk era...

Page 26: ...of op de toets deze dient om de draaiplateaus te activeren deze dient voor het aansteken van de binnenlichten deze dient om de koelinstallatie aan te zetten zie fig 6 De stekker ingestoken is De scha...

Page 27: ...51 1 4 1 2 3 4 5 6 7 8 9 10 11 12 13 14 30 0 cm evaporator 3 cm 1 1 1 2 3 4 5 6 7 2 1 2 3 3 PRISMA 400 TNV PG 1 2 4 PRISMA 400 TNV PF PRISMA 400 TBS PF 1 2 5 1 2 6 1 1 2 3 4 I UK D E F NL P S DK FIN B...

Page 28: ...0TNV PF TBS PF 1 2 4 5 SET 6 UP 7 DOWN M PRISMA 400 TNV PG 1 2 3 9 1 2 3 4 5 10 1 2 3 11 1 2 3 4 5 6 7 12 1 2 3 IEC In Id 30 mA AD H05 VVF 5 6 25 C U R 60 3 7 8 200 I UK D E F NL P S DK FIN B GR CZ EE...

Page 29: ...ti nebo p m m slune n m paprsk m Neinstalujte za zen v bl zkosti zdroj tepla jako jsou kamna radi tory apod M ky ventilace kompresorov jednotky mus b t vzd len od st ny nejm n 30 cm Ulo en potraviny u...

Page 30: ...stavenou teplotu Teplotu lze m nit tla tky nebo pro spu t n ot en polic pro zapnut vnit n ho osv tlen pro zapnut chladic ho za zen viz obr 6 Z str ka je spr vn zasunut do s t Vyp na chlazen je zapnut...

Page 31: ...ja otsese p ikesekiirguse k tte Mitte paigaldada seadet soojusallikate nagu ahjude radiaatorite jne l hedusse Paigaldada kompressorigrupi ventilatsioonirestid seinast v hemalt 30 cm kaugusele P rata t...

Page 32: ...e lampide p lema panemiseks kasutatakse k lmutusseadme sisse l litamiseks vt Joon 6 Pistik on pistikupesas K lmutusseadme l liti on sisse l litatud roheline tuli p leb Termomeeter n itab kaupadele sob...

Page 33: ...as Iek rtu nedr kst uzst d t rpus telpas kur iesp jama lietus vai tie u saules staru iedarb ba Aizliegts iek rtu uzst d t siltumener ijas avotu tuvum pie kr sn m elektriskajiem sild t jiem utt Kompres...

Page 34: ...dzis lai iesl gtu iek jo pagaismojumu Sald anas ier ces sl dzis lai iesl gtu sald anas ier ci skat 6 att Iek rta ir iesl gta kontaktdak a iesprausta Sald anas ier ces sl dzis ir iesl gts un za indikat...

Page 35: ...arato negalima instaliuoti lauko s lygomis jis neturi patekti liet ar b ti veikiamas tiesiogini saul s spinduli Neinstaliuoti rangos alia ilumos altini krosni ildytuv ir pan Kompresoriaus mazgo ventil...

Page 36: ...aus viesas jungia aldymo sistem r 6 pav Ki tukas statytas lizd aldymo sistemos jungiklis nuspaustas vie ia alia lemput Termometras rodo prek ms tinkam vert Aparat ros neveikia tiesioginiai saul s spin...

Page 37: ...r csok perem n k v l Ha a leveg p r s t n a leveg p ratartalma vagy a leh tend term kek ltal okozott rendellenes j gk pz d s k vetkezne be akkor a kompresszor le ll t s t s az runak megfelel ugyanolya...

Page 38: ...ndez s belsej ben l v h m rs kletet jelzi A berendez s belsej ben l v h m rs kletet szab lyozza A Az egyszer benyomott nyom gomb lehet v teszi a be ll tott h m rs klet kijelz s t amelyet a nyom gomb v...

Page 39: ...ini wienet 6 7 2 1 2 1 2 1 Mhuwiex permess tibdil fil karatteristi I tal appliance Xog olijiet elettri i ne essarji g all installazjoni tal appliance iridu jkunu e egwiti minn elettri isti kwalifikati...

Page 40: ...It temperatura ambjentali m hiex ta aktar minn 25 C l umdit relattiva ta 60 li fihom l apparat ja dem sew Kategorija klimatika 3 L o etti g andhom ji u mqassma sew ming ajr ma jkun hemm pi Skonnettja...

Page 41: ...mo e by zainstalowane na zewn trz wystawione na deszcz czy bezpo rednie dzia anie promieni s onecznych Nie instalowa urz dzenia blisko r de ciep a takich jak kaloryfery czy piecyki itd Kratki wentylac...

Page 42: ...i j na now uwa aj c aby docisn j na ca ej powier a b c wyposa one w przew d uziomowy odpowiednie do pr du nominalnego okre lonego na tabliczce wyposa one w zabezpieczenia zgodnie z normami IEC W cznik...

Page 43: ...zariadenie nesmie by in talovan vonku vystaven da u alebo slne n mu iareniu Nein talujte pr strojov zariadenie do bl zkosti tepeln ch zdrojov ako s napr kachle radi tory a pod Ventila n mrie ky kompre...

Page 44: ...ho neo aruj vysokov konn osvetlova e Teplota prostredia neprevy uje relat vna vlhkos 60 pre ktor hodnoty je pr strojov zariadenie ur en Klimatick trieda 3 Potraviny musia by rovnomerne rozlo en na po...

Page 45: ...irana na odprtem prostoru izpostavljena de ju ali son nim arkom Ne instalirati te naprave v bli ini virov toplote kot na primer pe i radiatorji itd Re etke za ventilacijo kompresorja morajo biti oddal...

Page 46: ...ientna temperatura ne sme biti vi ja od 25 C vla nost 60 te so vrednosti za katere je bila naprava umerjena klimatski razred 3 notranji prostor mora biti pravilno Izklju iti elektri no napajanje Odpre...

Page 47: ...ro dr bu Hooldusjuhend Instrukcija tehnisk s apkopes darbiniekam Techninio aptarnavimo darbuotojo vadovas Karbantart si k zik nyv Manwal g all manutenzjoni Podrecznik obslugi konserwacyjnej Pr ru ka p...

Page 48: ...I UK D E F NL P S DK FIN B GR CZ EE LV LT H M PL SK SLO 47 Fig 1 2 3 Fig 2 Fig 3...

Page 49: ...a suitably refrigerated plate Leave the door open and defrost the appliance completely Take the plug out from the inside of the display cabinet Do not use sharp or pointed metal tools to remove the i...

Page 50: ...ectement r frig r Laisser la porte ouverte et proc der un d givrage total Enlever le bouchon interne au fond de la vitrine Ne pas utiliser de corps m talliques pointus pour essayer d enlever la glace...

Page 51: ...sterande damm mellan fl nsarna S tt p gallret igen och koppla p str mmen se fig 1 Bryt str mmen Plocka ur varorn och l gg dem p annan lika sval plats L mna d rren ppen och frosta av helt Ta bort botte...

Page 52: ...INNENKANT EN VAN DE VERDAMPER 1 2 3 4 5 6 7 3 VERVANGING VAN EEN GLASWAND 1 2 3 4 5 OPGELET 6 7 8 Schakel de elektrische voeding uit middels de hoofdschakelaar en haal de stekker uit het stopcontact D...

Page 53: ...ee sobivalt jahutatud kohta J tta uks lahti ja lasta seadmel t ielikult lahti sulada V tta vitriinkapi sees p hjast kork ra Mitte kasutada aurustilt j eemaldamiseks teravaid metallesemeid Kuivatada k...

Page 54: ...belsej ben alul tal lhat dug t Ne haszn ljanak hegyes f mt rgyakat a j gnek a p rologtat r l t rt n elt vol t s hoz Gondosan sz r tsanak meg minden r szt Nyitott ajt n l hagyj k megsz radni a k sz l...

Page 55: ...osu te Sk r ako pr strojov zariadenie znova zapnete nechajte ho dokonale osu i s otvoren mi dverami Pozri obr lo te Vyberte plastick uz very z rohov stropn ho panelu Vytiahnite upev ovacie skrutky str...

Page 56: ...I UK D E F NL P S DK FIN B GR CZ EE LV LT H M PL SK SLO 55 15 7 4 14 12 48 13 M M 2 18 19 10 7 M 15 7 4 14 12 16 13 M M 2 18 10 7 TBS PF 400 TNV PF...

Page 57: ...I UK D E F NL P S DK FIN B GR CZ EE LV LT H M PL SK SLO 56 400 TNV PG M 15 8 17 14 12 16 13 2 M M 18 10 7 11 9 19 M 19 5 6 3 19 1 2 TNV PF TNV PG 19 2 5 6 1 3 TBS PF...

Page 58: ...AUTOMATICA PLATEAU D VAPORATION AUTOMATIQUE La maggior parte delle unit dispone di una bacinella di evaporazione automatica Anche l acqua di sbrinamento pu causare guasti considerevoli poich pu bucar...

Page 59: ...oorspoel Sonde Stekker Starter Thermostaat Ventilator koelinstallatie Ventilator verdamper 1 2 3 4 5 6 7 8 9 10 11 12 13 14 15 16 17 18 19 1 2 3 4 5 6 7 8 9 10 11 12 13 14 15 16 17 18 19 Vani ka Kompr...

Page 60: ...1 2 3 4 5 6 7 8 9 10 11 12 13 14 15 16 17 18 19 Trej Kompressur Kondensatur Kambju Elettroniku Evaporatur Filtru Interruttur Interruttur Mikro interruttur Terminal Riduttur tal Magna Dwal Neon Rijattu...

Page 61: ...FRIGO s p a 42024 Castelnovo di Sotto Reggio Emilia Italy Via Galileo Galilei 22 Tel 0522 683246 0522 688443 Fax 0522 682196 Fax Uff acquisti 0522 682311 Fax Uff amm 0522 688444 e mail info tecfrigo c...

Reviews: