9
How to install
ԃդԊ၆
2
■
Install to Ceiling
ġ
■
Ԋ၆ՍЈ߆ݖ
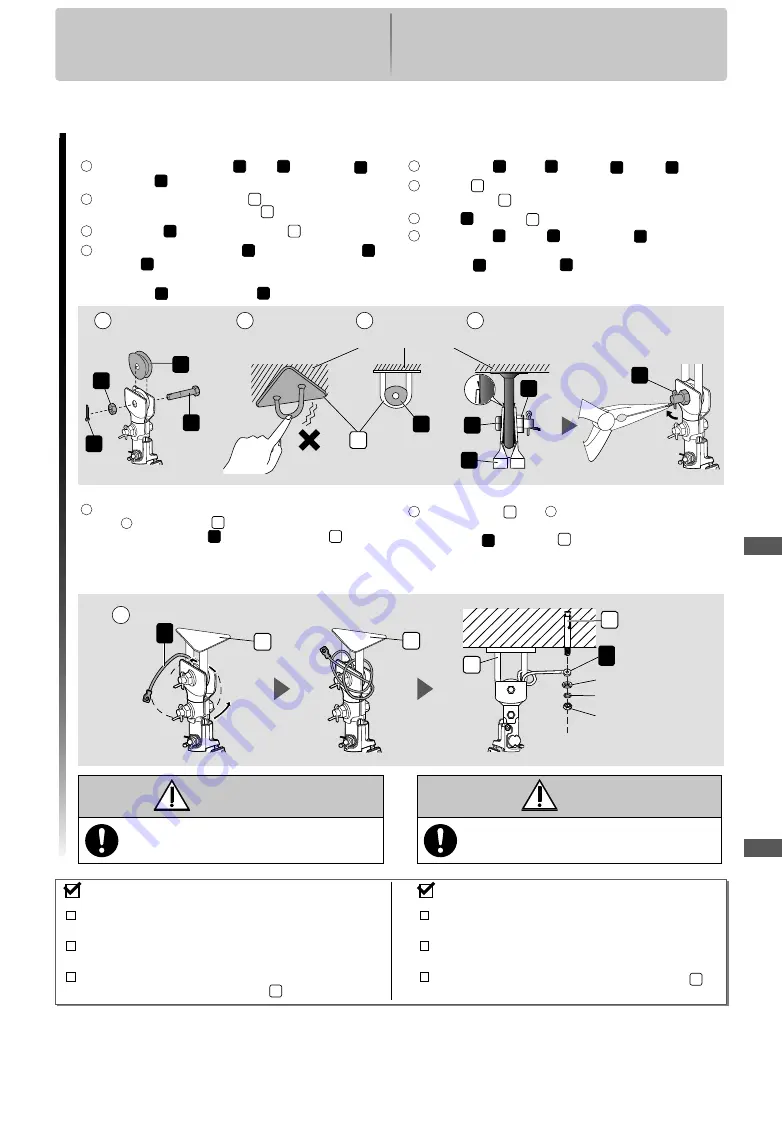
1
Remove the supplied Bolt
a
, Nut
b
, Cotter Pin
c
and Pulley
d
.
2
Ensure that the Hanger Base
K
is not loosen.
For reference, the Hanger Base
K
can sustain 20 N.
3
Place Pulley
d
on the Hanger Base
K
.
4
Tighten the Pulley Set Plate
e
fi
rmly with the Bolt
a
and Nut
b
provided.
For reference, tightening torque is 1500-1800 N•cm.
• Cotter Pin
c
must
fi
x into Bolt
a
and bent.
1
രޟᖳ
a
ȃᖳൾġ
b
ȃοġ
c
Ѕྤᎈ
d
ܶଶȄ
2
ጂ߳ࢆ႙ġ
K
ġϐᔡᆧȄ
༉ټՃĭġࢆ႙ġ
K
ġஊЛኤġ
20 N
Ȅ
3
ྤᎈ
d
ညܻࢆ႙ġ
K
Ȅ
4
Ңᓍߣޟᖳġ
a
ġڷᖳൾġ
b
ġྤᎈ၆ညዺġ
e
ġᔡᆧȄ
༉ټՃޟᔡᆧᙽઐ࣏ġ
1500-1800 N•cm
Ȅ
ġ
˙
οġ
c
ġ҆ඨΣᖳġ
a
ġณࡣ᠉Ȅ
5
Remove Hexa Nut, Spring Washer, and Plain Washer from
hole
a
Carl Bolt Plug
I
.
Loop the Safety Wire
g
to the Hanger Base
K
and
install Safety Wire as shown.
Replace the removed Plain Washer, Spring Washer and
Hexa Nut and tighten them.
5
њᅭᖳ༬υġ
I
ġӨЌġ
a
ġޟϲُלᖳൾȃኆᙋწڷලწ
ЌڥюȄ
ԊӒᏲ㣶ġ
g
ġᕗᙓӵࢆ႙ġ
K
ġΰȂԃყܚҰԊ၆ԊӒᏲ
㣶Ȅ
װϲُלᖳൾȃኆᙋწڷලწΙΙ၆ΰࡣᔡᆧ։џȄ
5
g
Plain Washer /
ලწ
Spring Washer /
ኆᙋწ
Hexa Nut /
ϲُלᖳൾ
K
K
K
I
g
WARNING
Safety Wire must be
fi
xed correctly to the Pipe.
Can cause injury if the Ceiling Fan drops.
ឌ֙
߳ᓎጣ҆ғጂӴԊ၆ՍᏲᆓȄ
षӤਉ௬ဣོᏲमڧ༌Ȅ
Check point after installation
Make sure Bolt and Nut are
fi
rmly tightened and Cotter
Pin is inserted and bent for safety reason.
ಢ၆ࡣޟᔮᡛᘈ
ጂ߳ܚԤᖳڷᖳൾ֯ϐᔡᆧȂи࣏ΟԊӒޟՃ໔Ȃ
ඨΣٮᔡ᠉Ȅ
Make sure Ceiling Fan is securely
fi
xed on the Hanger
Base and Ceiling Fan not slanting after installation.
ጂ߳Ӥਉھۡԁӵ௮႙ΰȂٮиӤਉӵԊ၆ࡣϚོ༊ఇȄ
The Safety Wire is looped to the Hanger Base and
securely
fi
xed to the Carl Bolt Plug
I
.
װ߳ᓎጣᕗᙓӵࢆ႙ĭٮذھӴھۡӵњᅭᖳ༬υġ
I
ġ
ΰȄ
d
2
4
1
b
c
3
a
Concrete Ceiling /
ᏗπЈ߆ݖ
a
b
d
c
K
e
How to install
ԃդԊ၆
Summary of Contents for E48HP
Page 4: ...4 250 300 N cm 10 MCB...


