background image

caused by poorly maintained tool. 


Use  only  accessories  that  are  recommended  by  the  manufacturer  for  your  tool.  Accessories  are 

suitable for the tool, but may become hazardous when used on another tool. 


Dry your hands before turning the tool ON or OFF and before replacing battery. 


Protect against excessive heat. The product should be put away from heat sources, such as radiators

heat registers

stoves or other products (including amplifiers) that produce heat. Don’t use the tool 

near moving machinery or areas where the temperature is exceed 45

℃. 


Put on the camera protector after operation. 


Store the product in ventilated and dry places.


Maintenance Instructions 


Tool  service  must  be  performed  only  by  qualified  repair  personnel.  Performed  by  untrained  repair 

personnel could result in injury. 


When  servicing  a  tool,  only  use  identical  replacement  parts.  Use  of  authorized  parts  or  failure  to 

follow maintenance instructions may create a risk of electrical shock or injury.   


Don’t attempt to take any pieces of this product apart, unless directed by this manual. 


Provide proper cleaning: don’t use acetone to clean the tool. Use soap or soft abluent to clean. Gently 

clean the LCD with a dry cloth. Remove the battery before cleaning. 


Upon completion of any service or repair, please ask the service technician to check if the tool is in 

proper condition. 


Stop using the unit if it starts smoking or emitting noxious fumes. 


Remove the battery and ask qualified person under the following conditions: 

a

If liquid has been spilled or objects have fallen into product. 

b

If product doesn’t operate normally even if you have followed the operation instructions. 

c

If the product has been dropped or damaged in any way. 

d

When the product exhibits a distinct change in performance. 


Trouble shootings 


PROBLEMS 

CAUSES 

SOLUTION 

Display is on, but no image. 

1

The connection loosed.  Reassemble 

probe 

connection. 

2

Camera shielded from 

light. 

Clean the camera head. 

After  the  unit  is  on  shortly,  LED  lighting 
appears  to  be  dimmer  at  maximum  lighting 

Low battery 

Replace battery. 

Summary of Contents for KC-360B-2

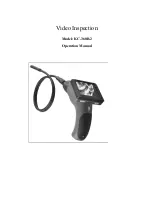
Page 1: ...Video Inspection Model KC 360B 2 Operation Manual ...

Page 2: ...can provide excellent performance for your observation It become as a right hand man in your daily work and equipment maintenance Safety Instructions Failure to follow the instructions listed below may result in electric shock or personal injury Read and understand all instructions prior to any operation Do not remove any labels from the tool Keep the work area clean and well lit cluttered and dar...

Page 3: ...y by matching the positive and negative charges Please dispose the battery properly High temperature will cause explosion Use insulating tape on the battery charges to avoid unsafe contacts with other objects Please follow the local regulations of disposing the old battery Product configures 1 LCD screen 1 2 Camera probe 1 3 Magnetic tip 1 4 Hook tip 1 5 Mirror tip 1 Product Overview A camera prot...

Page 4: ...s shown in Fig 5 Connect the probe to the main body The main body must be connected to the camera probe To connect the probe to the main body make sure the keyed ends are properly aligned Fig6 Once they are aligned finger tighten the nut Accessories installation A standard 12mm probe accessories installation The three accessories are showed in Fig 2 mirror hook and magnetic As showed in Fig 7 hold...

Page 5: ... 11 Roll the wheel upwards to turn on the device 2 The wheel then acts as a dimmer of the twin LEDs Fig 12 which provide light for the camera Roll the wheel forward and backward to adjust the LED brightness 3 Press the button to rotate the image by 180 4 Zoom the image from 1 0X to 2 0X by pressing the button This product is suitable for hard to reach distance inspection The typical applications i...

Page 6: ...urned to the cast aluminum pipes and cause them to be charged For automobiles Be sure the automobile is not running during inspection Metal and liquid under the hood may be hot Don t get oil or gas on the camera head Operation Instructions Please don t operate this product unless the manual has been read and proper training has been completed Don t turn on and off the device continuously Please al...

Page 7: ...ay create a risk of electrical shock or injury Don t attempt to take any pieces of this product apart unless directed by this manual Provide proper cleaning don t use acetone to clean the tool Use soap or soft abluent to clean Gently clean the LCD with a dry cloth Remove the battery before cleaning Upon completion of any service or repair please ask the service technician to check if the tool is i...

Page 8: ...ry if it is not for use for long time Technical Specifications Name Video inspection Model KC 360B 2 3 5 LCD screen Recommended usage Indoor Viewable angle 60 degrees Focal length 12mm lens 50mm 50cm for your choice 9mm lens 50mm 5 5mm lens 10mm Outer diameter of camera head Standard 12mm attachments magnet hook and mirror Optional 9mm accessories magnet hook mirror and screw thread protector 5 5m...

Page 9: ...he product is warranted to be free from defects in materials and workmanship for a period of one year from the date of purchase Notice The warranty does not apply to the following conditions Unauthorized disassembling the device will void the warranty We are not responsible for any damage resulting from abrasion water dropping or disassembling Tips Most parts of the product could be recycled pleas...

Reviews: