background image


3. 

Start Up 

Please refer to the Quick Start Guide in the packing for device installation and wiring.   

3.1 Client Installation Conditions 

Requirements of PC for installing the client: 

  Operating System: Windows XP or newer versions 

  Browser: IE7.0 or later versions, Firefox, Google Chrome (41 and below versions) 

  Processor: 3.3 GHz CORE®i3 series and later version or other equivalent processors 

  RAM Memory: 4GB or above 

  DirectX

9.0c 

We will take IE8.0 as an example. 

3.2 Initial Configuration 

After installation and wiring, electrify the camera. 

3.2.1 

Modify Parameter 

1) 

Get IPCSearch from the attached CD. 


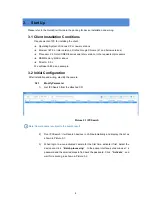
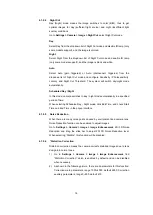
Picture 3-1 IPCSearch 

Note: Camera name is subject to the search result. 

2) 

Run IPCSearch: it will search devices in LAN automatically and display the list as 

shown in Picture 3-1.   

3) 

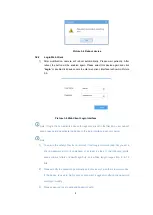
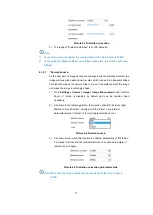
When login to a non-activated camera for the first time, activate it first. Select the 

device and click 

Batch processing

. In the popup interface, set admin user

password and the email address to find back the password. Click 

Activate

  and 

wait for rebooting, as shown in Picture 3-2. 

Summary of Contents for IPC Series

Page 1: ...KEDACOM User Manual for HD IP Camera of IPC Series V3 Mar 2018 ...

Page 2: ... reserved Without the prior written permission of Suzhou Keda Technology Co Ltd any reproduction translation or retransmission of all or any part of this document for any purpose in either electronic or mechanical form is not allowed Notice The information in this document is subject to change without Note Every effort has been made in the preparation of this document to ensure accuracy of the con...

Page 3: ...IPC2X11 series IPC2X40 series IPC2X33 series Related Document Quick Start Guide Convention Icon Convention Notes italic Book or document name Filling content Connector between menus of different level BOLD Menu Button Option UL Safety Instruction CAUTION Risk of Explosion if Battery is replaced by an Incorrect Type Dispose of Used Batteries According to the Instructions Suitable for Mounting on Co...

Page 4: ...Tma 60Deg C complied with LPS a the function of the ITE being investigated to IEC 60950 1 is considered not likely to require connection to an Ethernet network with outside plant routing including campus environment and b the installation instructions clearly state that the ITE is to be connected only to PoE networks without routing to the outside plant ...

Page 5: ...oduct Functions 12 4 1 Live View 12 4 1 1 Toolbar Buttons 12 4 1 2 Image Adjustment 14 4 1 2 1 Aperture 14 4 1 2 2 Brightness 14 4 1 2 3 White Balance 15 4 1 2 4 Night Cut 16 4 1 2 5 Noise Reduction 16 4 1 2 6 Distortion Correction 16 4 1 2 7 Remote Zoom In 17 4 1 2 8 Defog 18 4 1 2 9 EIS 18 4 1 2 10 Rotate and BNC 18 4 1 3 Auxiliary Function 18 4 2 Motion Detection 18 4 2 1 Set Area 19 4 2 2 Clea...

Page 6: ...ng 26 4 12 Audio Surge 26 4 13 Alarm Linkage 27 4 13 1 Motion Detection Alarm Linkage 28 4 13 2 Tampering Alarm Linkage 28 4 13 3 Alarm Input Linkage 29 4 13 4 Abnormality Linkage 30 4 14 ROI 31 4 14 1 Set 31 4 14 2 Clear 31 4 14 3 Disable 31 4 15 Privacy Mask 31 4 15 1 Set 32 4 15 2 Clear 32 4 15 3 Disable 32 4 16 Video Info Overlay 32 4 17 SDI Output 33 4 18 Snapshot 34 ...

Page 7: ...lient Upgrade 36 4 20 3 Restoration 37 5 Settings 39 5 1 Network Access 39 5 1 1 Ethernet 39 5 1 2 PPPoE 39 5 2 Register to VMS 40 5 3 BNC Output 40 5 4 User Security 41 5 4 1 User Management 41 5 4 2 IP Filter 41 5 4 3 Security Service 42 5 5 Text Overlay 42 5 6 Video Encoding 43 6 Appendix Glossary of Terms 45 ...

Page 8: ... stream to fit different network bandwidth Configurable text overlay on video image Alarm With audio and alarm connectors realize functions of talkback and alarm Motion detection and alarm linkage make video surveillance intelligent Support alarm linkage edit Alarm Text Overlay Device Output Live View Display and etc Networking Static address DHCP or PPPoE NAT traversal DNS and multicast technolog...

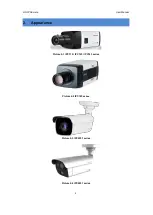
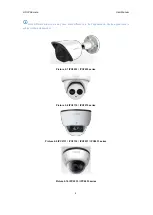
Page 9: ...HD IP Camera User Manual 2 2 Appearance Picture 2 1 IPC113 IPC123 IPC143 series Picture 2 2 IPC185 series Picture 2 3 IPC2251 series Picture 2 4 IPC2451 series ...

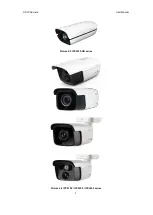
Page 10: ...HD IP Camera User Manual 3 Picture 2 5 IPC2255 GN series Picture 2 6 IPC2152 IPC2252 IPC2452 series ...

Page 11: ...s may have some difference in their appearance Device appearance is subject to the actual model Picture 2 7 IPC2253 IPC2453 series Picture 2 8 IPC2110 IPC2210 series Picture 2 9 IPC2131 IPC2132 IPC2231 IPC2431 series Picture 2 10 IPC2233 IPC2433 series ...

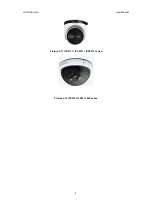
Page 12: ...HD IP Camera User Manual 5 Picture 2 11 IPC2111 IPC2211 IPC2411 series Picture 2 12 IPC2140 2240 2440 series ...

Page 13: ...e will take IE8 0 as an example 3 2 Initial Configuration After installation and wiring electrify the camera 3 2 1 Modify Parameter 1 Get IPCSearch from the attached CD Picture 3 1 IPCSearch Note Camera name is subject to the search result 2 Run IPCSearch it will search devices in LAN automatically and display the list as shown in Picture 3 1 3 When login to a non activated camera for the first ti...

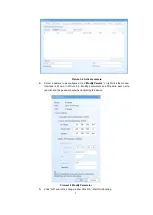
Page 14: ...click Modify Params or right click the mouse Interface is shown in Picture 3 3 Modify parameters and fill admin user name admin and the password set when activating the device Picture3 3 Modify Parameter 5 Click OK and in the popup window click OK Wait for rebooting ...

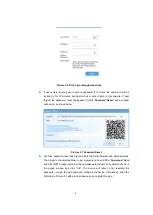
Page 15: ...lient for the first time user can set admin password and activate the device in the login interface as shown below Note 1 To ensure the safety of device on internet it is strongly recommended that you set a strong password which is composed of at least 2 kinds of the following digits case sensitive letters or specific symbols and whose length ranges from 8 to 16 bits 2 Please modify the password p...

Page 16: ...wn below Picture 3 7 Password Reset 3 Click the password reset link first and fill in the Serial Number and Email address Then login to the email address to get a security code and fill in Command blank and click OK Please remember the new password admin123 by default shown in the popup window and click OK The device will reboot After resetting the password re login the web client and configure th...

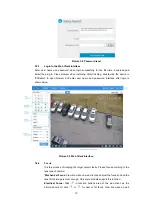
Page 17: ...nd password Interface after login is shown below Picture 3 9 Web Client Interface 3 2 4 Focus It is the process of imaging the target object clearly Please focus according to the lens type of camera Mechanical Focus View live video on web client and adjust the focus knob on the lens till the image is clear enough Only some models support this function Electrical Focus Click in function buttons are...

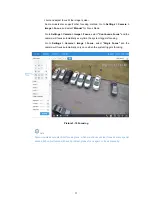
Page 18: ...Focus and the camera will focus automatically every time the system triggers focusing Go to Settings Camera Image Focus select Single Focus and the camera will focus automatically only once when the system triggers focusing Picture 3 10 Focusing Note Some models adopts electrical focusing lens which may cause unclear focus at some special scenes When confronted with such problem please focus again...

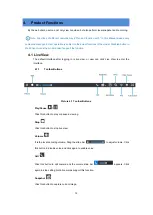
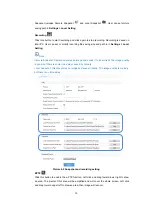
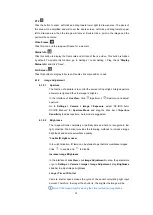
Page 19: ...ew The default interface after logging in is live view or user can click Live View to enter the interface 4 1 1 Toolbar Buttons Picture 4 1 Toolbar Buttons Play Pause Click this button to play or pause a viewing Stop Click this button to stop live view Volume It is the local decoding volume Drag the slide bar to adjust volume Click this button to disable voice and click again to enable voice Call ...

Page 20: ...ra captures an image and sends it to local client The image quality is good but there is some time delay caused by network Local Snapshot Client captures an image and saves it locally The image quality is ordinary but there is no time delay Picture 4 2 Snapshot and recording setting EPTZ Click this button to enable the e PTZ function Left click and drag toward lower right to draw an area The pixel...

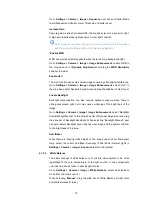
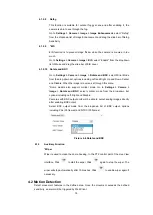
Page 21: ...r In the interface of Live View click Aperture Aperture and adjust aperture Go to Settings Camera Image Exposure select DC IRIS Auto DC IRIS Manual for Aperture Mode and drag the slide bar of Aperture Sensitivity to adjust aperture Auto mode is suggested 4 1 2 2 Brightness The image will look completely or partially dark and hard to recognize in low light condition Web client provides the followin...

Page 22: ...ompensation can also provide optimal exposure when there is strong background light but it may cause whitening of the bright part of the image Go to Settings Camera Image Image Enhancement select Backlight Auto Backlight Manual in the drop down list of Dynamic Adjustment and drag the slide bar of Backlight Sensitivity When selecting Backlight Manual user can set or select Backlight Area in the liv...

Page 23: ...witches to day night mode automatically in a specified period of time When selecting Scheduled Day Night mode click Edit Time and check Start Time and End Time in the popup interface 4 1 2 5 Noise Reduction When there are many noise points caused by environment and camera lens Noise Reduction function can be enabled to adjust images Go to Settings Camera Image Image Enhancement 2D 3D Noise Reducti...

Page 24: ...part of the image and make the image in rectangle shape 1 Go to Settings Camera Image Image Enhancement find Remote Zoom In which is disabled by default and can be enabled when necessary 2 As shown in the following picture there are 4 options for its level High Middle Low and Custom among which the former 3 are internal parameters while Custom is to import parameters by a tool Picture 4 4 Remote z...

Page 25: ...ge is reverse set through this menu Some models also support corridor mode Go to Settings Camera Image Rotate and BNC select corridor mode from the drop down list options including Left Right and Disable Cameras with BNC output ports will be able to output analog images directly after enabling BNC output Select BNC output mode from the dropdown list of BNC output options including PAL 25 frames an...

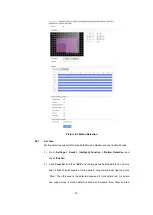
Page 26: ...telligent Function Motion Detection and check Enable 2 Click Clear All and then Edit and the image will be divided into 16 columns and 12 lines of small squares Click a square drag toward lower right and click Stop Then the area is the detected area and it turns purple red A camera can support max 4 motion detection areas at the same time Draw an area ...

Page 27: ...Settings Storage Snapshot to set image format resolution and quality and enable Event Snapshot and set Time Interval and Number of Snapshots 7 Click Save 4 2 2 Clear Area Start from an undefined square and draw an area that contains the defined area or click the defined squares one by one to clear setting or click Clear to clear setting Save to make settings effective 4 2 3 Disable Function To dis...

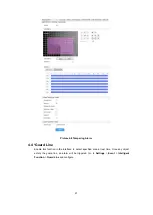
Page 28: ...larm 4 4 Guard Line Enable this function in the interface to detect specified area at real time Once any object enters the guard line an alarm will be triggered Go to Settings Event Intelligent Function Guard Line and configure ...

Page 29: ... Line and once one number only After saving it user can set another one and max 4 guard lines are allowed 3 Select a direction from the dropdown list of Guard Line Direction A B or A B Take A as an example when selecting this direction only moving objects from A to B will be detected and trigger an alarm ...

Page 30: ...ach weekday and drag mouse to make a blue bar as the task duration for that day Select the blue bar and adjust or delete duration by mouse Check several weekdays or Select All and click Copy to copy the defined motion detection durations to the days 7 Check Linkage Type and Save to make settings take effect 4 5 Defocus Enable this function to detect if the image is clear and to trigger some alarm ...

Page 31: ... a blue bar as the task duration for that day Select the blue bar and adjust or delete duration by mouse Check several weekdays or Select All and click Copy to copy the defined motion detection durations to the days 4 Check Linkage Type and click Save 4 7 Enter Guard Area Enable this function in the interface to detect specific area at real time Once any moving object enters the guard area an alar...

Page 32: ...et area Click Edit and drag the mouse in the scene to draw a rectangle Click Stop after finishing and drag the slide bar of Max and Min Target Ratio 1 by default Moving objects exceeding max and less than min will not trigger an alarm when they enter the guard area s 4 Area Setting to set guard area Click Edit and click mouse to draw a closed area made up of 3 to 6 points in the scene Right click ...

Page 33: ...e to detect specific area at real time When any object is left in the area an alarm will be triggered Go to Settings Event Intelligent Function Object Left and configure Setting steps can be referred to in Enter Guard Area 4 10 Object Removal Enable this function in the interface to detect specific area at real time When any object is taken from the area an alarm will be triggered Go to Settings E...

Page 34: ...ure 4 13 Audio Surge 4 13 Alarm Linkage Alarm Linkage is the system reaction after an alarm signal is received It is to raise watch man s attention to handle the event The alarm signal comes from the alarms triggered in the set surveillance areas such as motion detection and tampering or alarm input devices such as smoke detector Alarm Linkage reaction includes Alarm Text Overlay Snapshot or trigg...

Page 35: ...l Transfer Protocol is a group of rules for sending email from source address to target address and it determines the transition method of email Picture 4 14 SMTP 4 13 1 Motion Detection Alarm Linkage 1 Enable Motion Detection and set the detection area and sensitivity Please refer to Motion Detection for details 2 Check the Linkage Type for motion detection For example if user checks Snapshot whe...

Page 36: ...rm Input and select a number from the dropdown list of Alarm Input ID corresponding to the connected input ID 3 Enter alarm name If the alarm input device is always disabled which means the circuit is usually open user must select Always Disabled from the dropdown list of Alarm Type If the alarm input device is always enabled which means the circuit is usually loop user must select Always Enabled ...

Page 37: ...lity Linkage It is triggered when something abnormal happens Abnormality includes Disk Full Disk Error and Internet Disconnected Picture 4 16 Abnormality Linkage 1 Select Abnormality Type from the dropdown list 2 Check Linkage Type 3 Click Save ...

Page 38: ...grade from the dropdown list Click Save to make settings effective 4 14 2 Clear Click Clear to clear edition and reset area Note When ROI Encode is enabled if user modifies image resolution or aspect ratio standard screen widescreen the device will quit ROI Encode automatically 4 14 3 Disable To disable this function uncheck Enable 4 15 Privacy Mask Mask sensitive and private part of the image so ...

Page 39: ...e by one to clear setting or click Clear directly Click Save to make settings effective 4 15 3 Disable To disable this function uncheck Enable 4 16 Video Info Overlay Go to Settings Camera Video Video Info Overlay and configure OSD info on video GPS Check GPS and camera coordinates will be displayed Lens Direction Check Lens Direction and the lens direction will be displayed Basic Intelligent Feat...

Page 40: ...fps and 60 fps when the resolution is 720P frame rate supports 50 fps and 60 fps Go to Settings Camera Video Encoding Format and set Picture 4 20 Encoding Format Note Settings on resolution and frame rate are also effective to SDI output When user wants to set resolution as 1080i please go to Settings Camera Image Image Quality and select NTSC same as main stream resolution in Rotate and BNC part ...

Page 41: ... 4 19 Playback Click Playback to enter recording management interface User can playback clip and download recordings in SD card An SD card must be inserted in the camera Note If the Playback interface is disabled please confirm the SD card is inserted and then login client again Note User can set scheduled recording durations in Settings Storage Recording Check Enable Click the white bar behind ea...

Page 42: ...ion of the date and the video will be displayed directly in the right window 4 19 2 Download Select recording duration from calendar and download recording to local PC Download path can be configured in Settings Local Setting Local Setting 4 20 Upgrade 4 20 1 Firmware Upgrade Contact dealer for upgrade file Method 1 1 Go to Settings System System Maintenance Upgrade as shown below ...

Page 43: ...efer to the Web Client Upgrade for details Note Please click Upgrade when upgrading and the upgrade file is usually in pkg format Method 2 1 Run IPCSearch and select the device from the list 2 Click Batch Processing Upgrade to upgrade firmware of cameras for the same models simultaneously 4 20 2 Web Client Upgrade Method 1 Go to Settings Local Setting Local Setting Download Plug in Click Download ...

Page 44: ...tions of Web Client please refer to the help document 4 20 3 Restoration Go to Settings System System Maintenance and in the configuration management part there are options of Partial Restoration and Complete Restoration Partial Restoration click this button and all parameters will restore to factory default except camera IP address protocols user info and RTSP authorization Complete Restoration c...

Page 45: ...38 Picture 4 25 Restoration ...

Page 46: ...amera accepts multiple network access methods via Ethernet and PPPoE The following introduces how to configure camera network parameters in Web Client 5 1 1 Ethernet Go to Settings Network IP and Port IP Address as shown in Picture 5 1 to configure IP address subnet mask and default gateway Picture 5 1 Ethernet Parameter 5 1 2 PPPoE Go to Settings Network Other Protocols PPPOE as shown in Picture ...

Page 47: ...d VMS Port Number Click Save and reboot device Picture 5 3 Register to VMS 5 3 BNC Output Camera with BNC output can output analog image directly when local display function is enabled Go to Settings Camera Image Rotate and BNC select BNC output mode from the drop down list as shown below Picture 5 4 BNC Output ...

Page 48: ...16 digits case sensitive letters or special symbols The system will judge the password strength according to the complexity of the password Only when the password strength being Good or Strong can the setting be successful Delete Select user IP and click Delete to delete the user Modify Select user IP and click Modify to modify in the popup interface 5 4 2 IP Filter By setting IP address filtering...

Page 49: ... to delete the IP address Click Delete All to clear all the IP addresses 5 4 3 Security Service Go to Settings System User Security Security Service and configure function of unauthorized login Check Enable Unauthorized Login When user logs in and input wrong password for 3 times the user IP will be locked up for 10 minutes during which the user cannot log in Picture 5 6 Security service 5 5 Text ...

Page 50: ...and position according to the above steps 7 Click Advanced to set Format Font and Margin 8 Click Save to save OSD setting Picture 5 8 Advanced Setting of OSD 5 6 Video Encoding Camera supports multiple streams encoding and decoding Multi stream means the same video source is encoded into different streams of videos with different resolutions User can select proper resolution to view or record acco...

Page 51: ...gin 4 Go to Settings Camera Video Encoding Format as shown in Picture 5 10 In Multi stream option select Single Stream Dual stream Triple stream or Quad stream from the dropdown list and the selection takes effect after reboot After enable user can set parameters below the option accordingly Picture 5 10 Stream Type ...

Page 52: ...solution of 1920 1080 pixels 720P Resolution of 1280 720 pixels CIF Resolution of 352 288 pixels QCIF Resolution of 176 144 pixels PC Personal Computer IP Internet Protocol MPEG4 Moving Pictures Experts Group NAT Network Address Translation DHCP Dynamic Host Configuration Protocol DDNS Dynamic Domain Name Server PPPoE Point to Point Protocol over Ethernet ...

Reviews: