- 9 -
18.
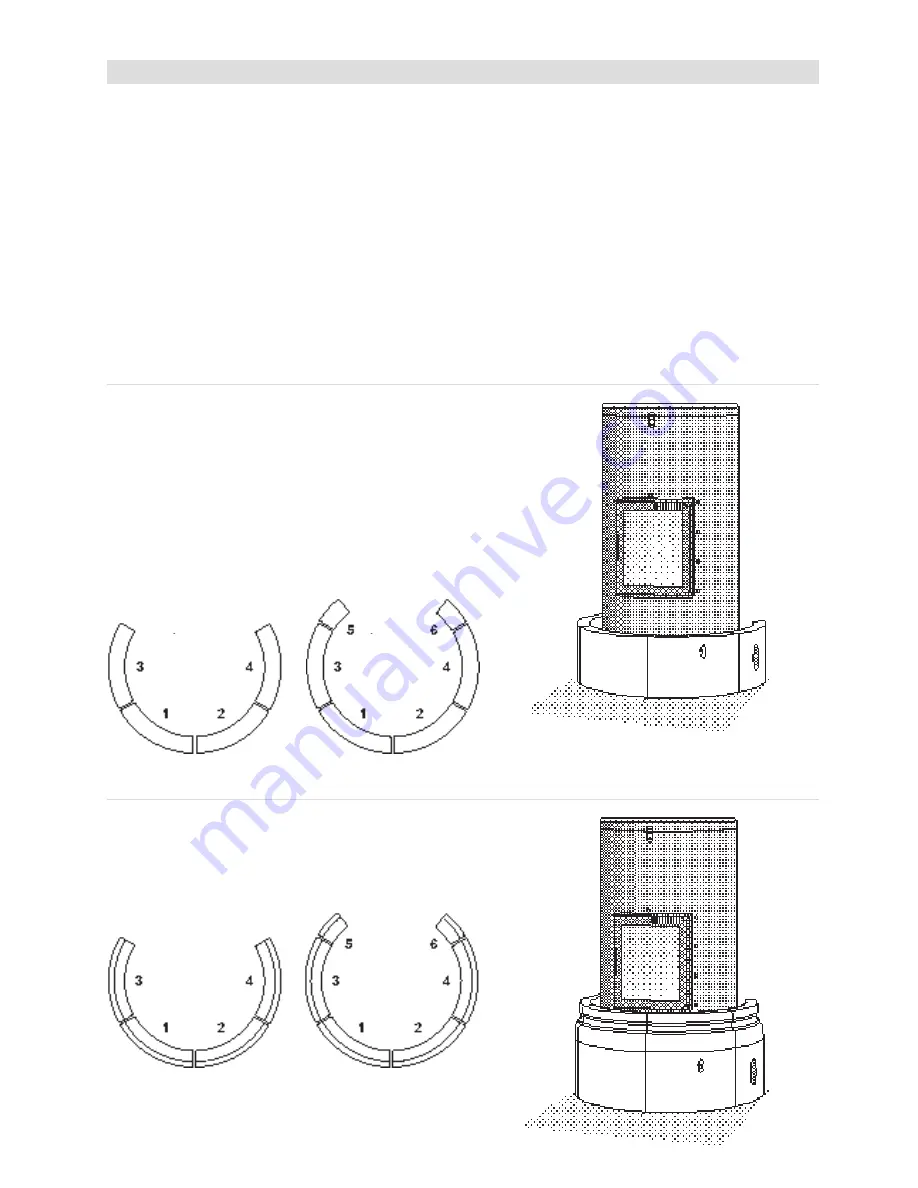
Carefully push out the half-arc-shaped cardboard
strip from the template, in which the tile base is to be
assembled.
Assemble the base on some blobs of silicone (transpar
-
ent) and with adhesive between the tiles in the numerical
order shown in the overview. Make sure that the joints
between tiles 1 and 2 are in line with the template's centre
marking. Fix using tape.
Once the tile base is assembled, carefully tear away the
template in front of the tiles and the safety case. Also test
that the shaft for the air supply fits and is working properly.
19.
Assemble
tile course 1
(the wide, lower, tile mould
-
ing) in adhesive, in the numerical order shown in the
overview. Make sure that the joints between the tiles are
in line with the joints in the tile base. The outside of the
tiles must be in line with the outside of the tile base.
ASSEMBLING THE TILES
It is now time to assemble the tiles. Each course of tiles is shown below by three illustrations.
•
The right illustration shows the Christineberg diagonally from the front.
•
The two illustrations on the left,
A
and
B
respectively, are overview illustrations showing the course of tiles in ques
-
tion from above:
A
illustrates the Christineberg
without the extension tiles.
B
illustrates the Christineberg
with the extension tiles.
The tiles must be assembled in the numerical order shown on the overview picture. Take due notice here of the differ
-
ent component tiles.
Setting the tiles:
1.
Mix the tile adhesive to a smooth consistency.
2.
Apply adhesive on the bottom of each tile and on the side that will be joined to any tiles which have been installed
before.
3. Then set the tile in place.
4.
Adjust to produce a finished joint of approx. 1 mm between the tiles, both horizontally and vertically.
5.
Check with a spirit level to ensure that the tiles are not sloping.
6.
Fix the tiles temporarily with masking tape or similar.
A
B
A
B
Tile base
Tile base
Tile course 1
Tile course 1
Summary of Contents for Christineberg
Page 1: ...Christineberg Installation Instructions Care and firing instructions ...
Page 19: ......
Page 20: ...01 03 2012 www keddy se ...


