background image

SerialGhost Wi-Fi 


Copyright © 2013 KeeLog 


13 

Viewing recorded data 

 
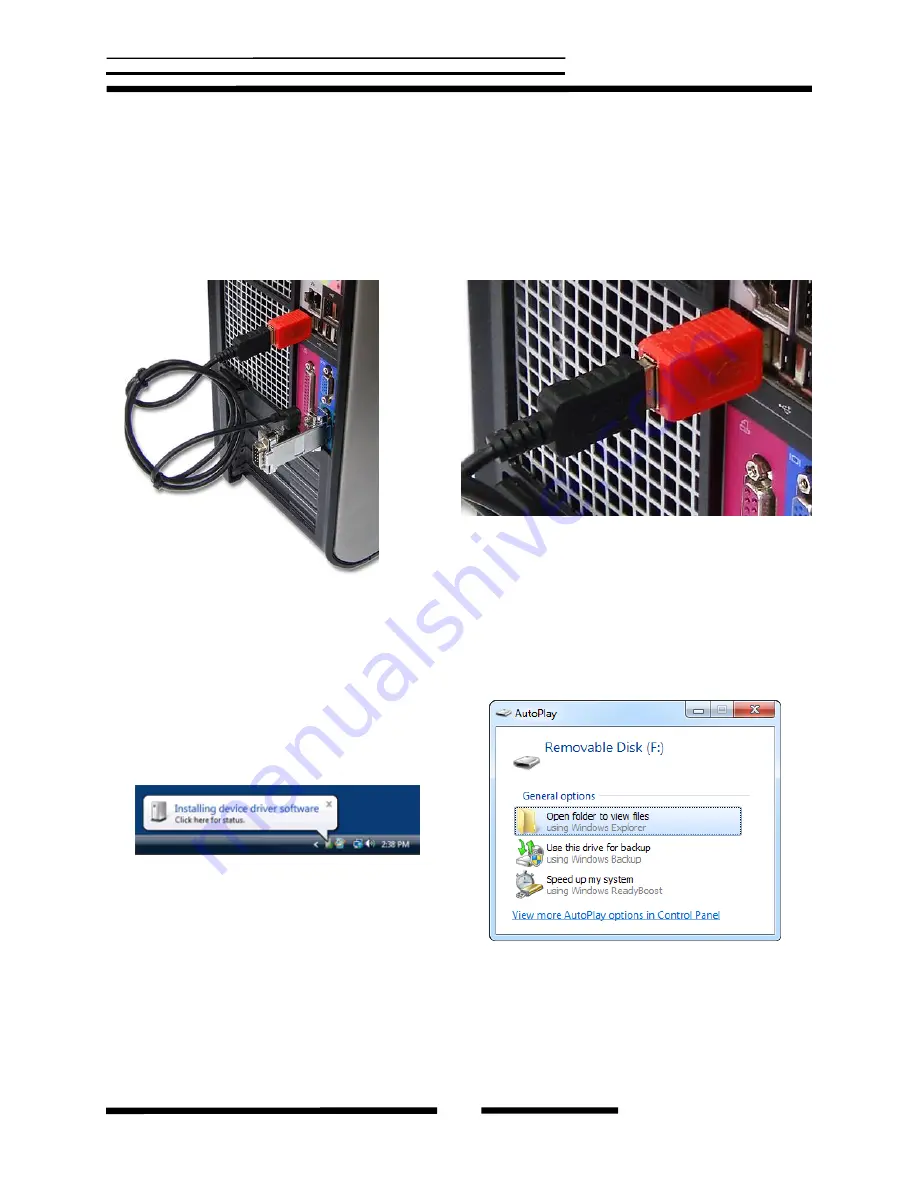
Once  serial  data  has  been  recorded,  it  may  be  retrieved  on  any  computer  with  a  USB  port. 
This is done by switching to Flash Drive mode. Take the supplied USB cable and connect it to 
the  mini-

port  on  the  logger’s  side.  Connect  the  USB  cable  to  a  free  USB  port 

using  the 

supplied red USB Key


After a few seconds, the 

SerialGhost Wi-Fi

 will automatically get detected as a mass storage 

device, and pop up as a removable drive. The operating system will use the standard built-in 
mass storage driver (

MS Windows 7

 in the following examples). 


Depending on the drive letters available, the device will be visible as a new drive, for example 
F:. Use the systems file manager to browse this disk (for example 

Explorer

).  

Summary of Contents for SerialGhost DB-25

Page 1: ...SerialGhost Wi Fi Copyright 2013 KeeLog 1 User s Guide SerialGhost Wi Fi DB 9 DB 25 2 GB Check http www keelog com for the latest version of this document...

Page 2: ...IME TXT 26 WIFI TXT 27 Specifications 29 Troubleshooting 30 Legal disclaimer 32 Getting started Already familiar with SerialGhost data loggers Make your logger go on line in a few simple steps section...

Page 3: ...the time and date persist even when the device is not powered The SerialGhost Wi Fi does not require any dedicated software or drivers Features Logs asynchronous serial transmission RS 232 compatible...

Page 4: ...nfiguration usually not used Number of stop bits per transfer usually 1 Step 1 Open a text editor such as Notepad and create a file named CONFIG TXT This file will later be used to configure the devic...

Page 5: ...s side Connect the USB cable to a free USB port using the supplied red USB Key After a few seconds the SerialGhost will automatically get detected as a mass storage device and pop up as a removable dr...

Page 6: ...rnal 5V DC min 200 mA power supply may be used to power the device through the mini USB port cell phone chargers with USB connectors are well suited for this Step 5 To retrieve the logged data enable...

Page 7: ...later be used to configure the device Use the following template WiFiNetwork MyNetwork WiFiPassword MyPassword WiFiEncryption WPA2 Recipient john smith com Replace MyNetwork with the Access Point ID S...

Page 8: ...the USB port Step 8 On the next power up the logger will automatically connect to the Access Point defined in WIFI TXT and send an E mail report to the specified recipient address every hour Besides...

Page 9: ...ols add the logger to the list by its IP number and explore the available features Using KL Tools you can communicate with multiple SerialGhosts allowing creating entire networks of wireless data logg...

Page 10: ...e insensitive Baudrate sets the baud rate in bits per second of the monitored serial bus Range is 300 bps to 115 200 bps Default value is 9600 Bits sets the number of bits per transfer of the monitore...

Page 11: ...uding the configuration file Password sets the 3 letter password for remote access over TCP IP for example using KL Tools Any three letter combination is allowed sequence and case are irrelevant Defau...

Page 12: ...to section Configuration for detailed instructions Installation of the SerialGhost Wi Fi in record mode is quick and easy no software or drivers are required Simply plug it in line on the serial bus u...

Page 13: ...onnect the USB cable to a free USB port using the supplied red USB Key After a few seconds the SerialGhost Wi Fi will automatically get detected as a mass storage device and pop up as a removable driv...

Page 14: ...interleave time stamps The file LOG TXT can be viewed and searched with any text editor such as Notepad or MS Word Switching back to record mode can be achieved by a safe software removal of the flas...

Page 15: ...y to make the configuration process as simple as possible install the supplied application KL Tools The installation process is straightforward just follow the wizard and answer a few standard questio...

Page 16: ...case sensitive If the WLAN Access Point does not allow Auto IP configuration through DHCP provide a static IP address network mask gateway address and DNS information To receive E mail reports contain...

Page 17: ...the specified recipient address by default every hour Besides logged data the report will contain Access Point information IP configuration and time stamps The report size and interval may be set by...

Page 18: ...evice needs to be added first This can be done by clicking the Add Device icon and supplying the IP address name optional and device password The password must match the local 3 character combination...

Page 19: ...therwise the procedure will fail Once a remote device is added the log may be retrieved using the Download Log option If interested in other parts of the remote log file than the most recent 50 kB use...

Page 20: ...on Document searching Document exporting Communication with remote device Multiple device handling Using KL Tools you can communicate with multiple SerialGhosts allowing creating entire networks of wi...

Page 21: ...time format and move to the succeeding dialogs KL Tools will guide you through enabling Flash Drive mode and placing the configuration file TIME TXT on the internal flash disk The clock can also be co...

Page 22: ...the next valid day value will be chosen Hour sets the clock hour value Valid range is from 1 to 12 for 12 hour time A M P M and 0 to 23 for 24 hour time Minute sets the clock minute value Valid range...

Page 23: ...e but may speed up usage by its intuitive user interface KL Tools is available on the CD ROM attached with the device Installing KL Tools is straightforward Simply follow the installation wizard and a...

Page 24: ...ue Parameter2 Value Parameter3 Value Example of WIFI TXT WiFiNetwork MyNetwork WiFiPassword MyPassword WiFiEncryption WPA2 Recipient john smith com These configuration files must be placed in the devi...

Page 25: ...e stamping disable flag TimestampInterval Timestamp interval in seconds default 10 TimestampInterval 1 Interval of bus inactivity which will result in a time stamp being added DisableLogging Yes No de...

Page 26: ...value range 1 12 or 0 23 default 1 Hour 6 Hour setting range 1 to 12 for A M P M format and 0 to 23 for 24 hour time Minute Minute value range 0 59 default 0 Minute 37 Minute setting range 0 to 59 Se...

Page 27: ...ask string no default NetMask 255 255 255 0 Network mask of device Skip this parameter if using Auto IP Gateway Gateway address string no default Gateway 192 168 0 1 Default gateway Skip this paramete...

Page 28: ...able flag Disables E mail reporting CustomSmtp Yes No default CustomSmtp Yes Custom SMTP flag Enables user defined SMTP server SmtpServer Server string no default SmtpServer smtp mail com Custom SMTP...

Page 29: ...s Access Point support Wi Fi CERTIFIED devices WLAN encryption support WPA 2 WPA WEP64 WEP128 WLAN range 150 m 165 yards in open terrain approx 50 m 55 yards through one concrete wall Dimensions inclu...

Page 30: ...ash Drive mode Please check the following 1 Have you powered the device from the USB port while recording 2 Did you properly configure the device through CONFIG TXT 3 Have you actually transmitted any...

Page 31: ...AN segment as the host computer If not TCP IP communication will not work Problems with time stamps Set the correct time by creating a clock configuration file TIME TXT Make sure you have not disabled...

Page 32: ...llow to not obeying it A good example is the U S Department of Justice Letter on Keystroke Monitoring and Login Banners according to which a clear notice should be displayed warning that user keystrok...

Page 33: ...eeLog 33 Notes European Office KeeLog Lekcyjna 42 PL 51 169 Wroclaw Poland http www keelog com keelog keelog com U S Office Aqua Electronics 1550 Louis Ave Elk Grove Village IL 60007 U S A RoHS Copyri...

Reviews: