background image

b

a

3.4

Assembly

3.4

Stage 4 – cont’d

4.

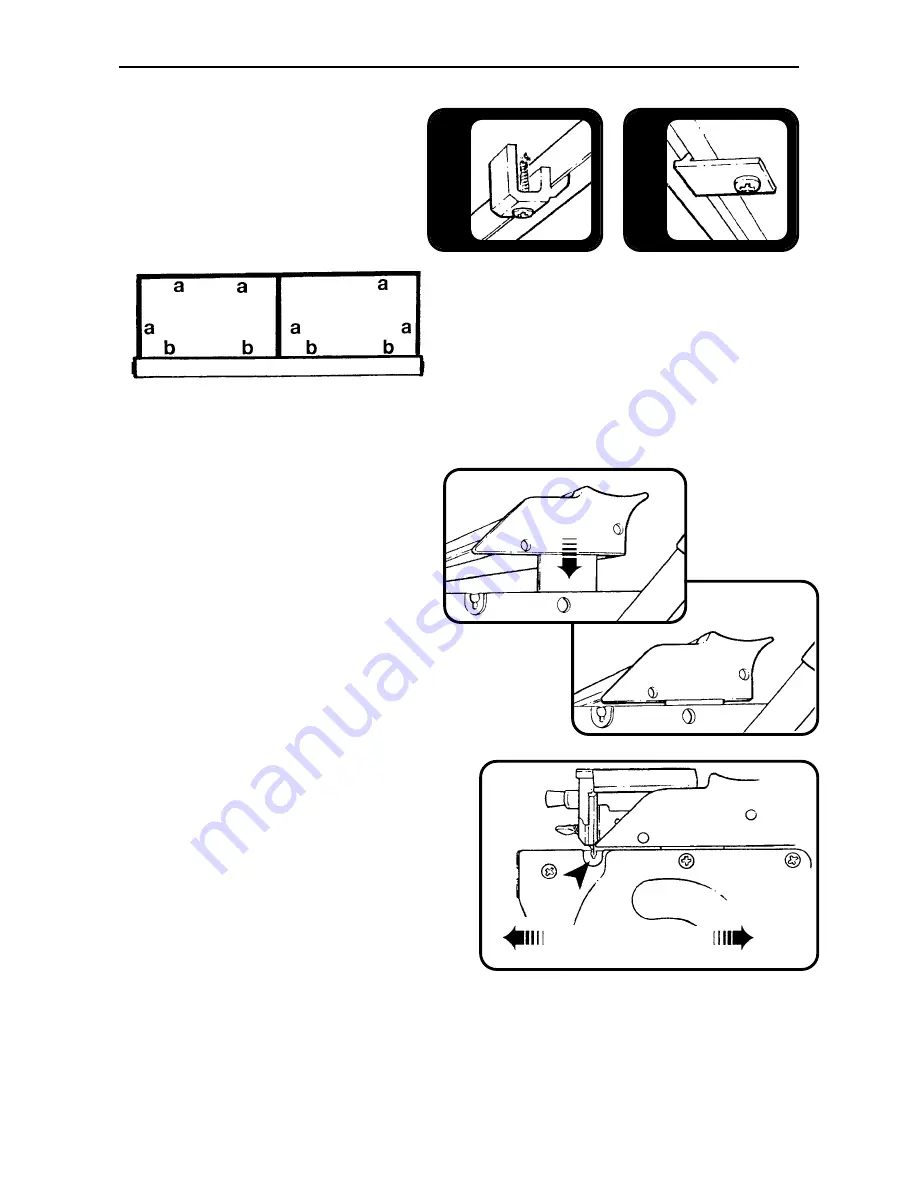
Fix the Worktop in place using

a)  The large workshop fixing and large 

screws as shown.

b)

the small screws to fix the worktop 

fixing plates.

5.

Position the Javelin cutter onto the two 
lift & hold mechanisms by sliding the 
tongue into the slot inside the end caps 
of the Javelin.

6.

Move the cutting head to one end of 
the Javelin and depress the blade, 
adjust the position of the lift & hold 
mechanism so the blade runs centrally
in the slot on the base extrusion, 
tighten the three screws to fasten the 
lift & hold. 

Repeat for the other end.

Move lift & hold to align 

blade in slot

Position brackets approximately
as shown 

NOTE: 
The friction knob on each mechanisms can 
be adjusted to hold the Javelin at any height 
which makes accurate lining up easier when 
in use.

7.

Position the bench in place and using an accurate spirit level adjust the feet to ensure the top 
surface of the table is flat.  If the table is not flat, particularly along it’s length, there may be difficulty
in holding the workpiece in place along the full cut length.

Plan View

Summary of Contents for Big Bench

Page 1: ...EMBLY INSTRUCTIONS Thank you for choosing the Keencut Big Bench Every effort has been made to bring you a superbly built product with the promise of many years of good service Keencut the world s fine...

Page 2: ...exagon Wrench 1 1 1 1 Spacer 1 1 1 1 QUANTITY FOR BIG BENCH ITEM 1 0 1 5 2 0 2 5 3 0 3 5 4 0 4 5 5 0 Packed in the TUBE Lift Hold Left Right 1 1 1 1 1 1 1 1 Base Extrusion 1 1 1 1 Large Screw 6 6 6 6...

Page 3: ...please disregard the middle pair of legs x1 x1 x1 Stage 2 Construct the end frames Disregard the middle frame if you are building a 1 0m or 1 5m Big bench 2 0m 2 5m 3 0m Big bench x2 3 5m 4 0m 4 5m B...

Page 4: ...frame a 2 Using the spacer fit the brackets to the top of each leg as shown ensure a The brackets are fitted the correct way round b The spacer is slightly above the top level of the leg so when const...

Page 5: ...or 3 0m Big bench over the beams and tighten the grub screws ensuring there are no gaps between the beam ends and the legs 3 2 0m 2 5m or 3 0m Big bench only Stand the frame onto its feet and position...

Page 6: ...ing plates into their groove and position them at approximately equal spaces along the base extrusion 2 Using the 5mm hexagon wrench fix the base extrusion in place on the bench with the base clamps a...

Page 7: ...the blade runs centrally in the slot on the base extrusion tighten the three screws to fasten the lift hold Repeat for the other end Move lift hold to align blade in slot Position brackets approximate...

Page 8: ...e cutter not grip adjacent to a bench leg adjust the foot to slightly raise that part of the bench and test again Should the paper not be gripped by the cutter bar between the legs place a levelling b...

Page 9: ...0 1536 204227 E mail info keencut co uk KEENCUT INC North American Sales 366 3560 Pine Grove Ave Port Huron Michigan 48060 USA Toll Free 1 800 240 KEEN 5336 Tel 1 519 652 0970 Fax 1 519 652 0396 E ma...

Reviews: