background image

·

18

·

Transport robots

Therobotis valuableequipment, pleasestrictly followthe below

instructionsto operate whenneed manual transport robots.

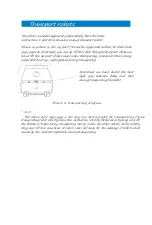
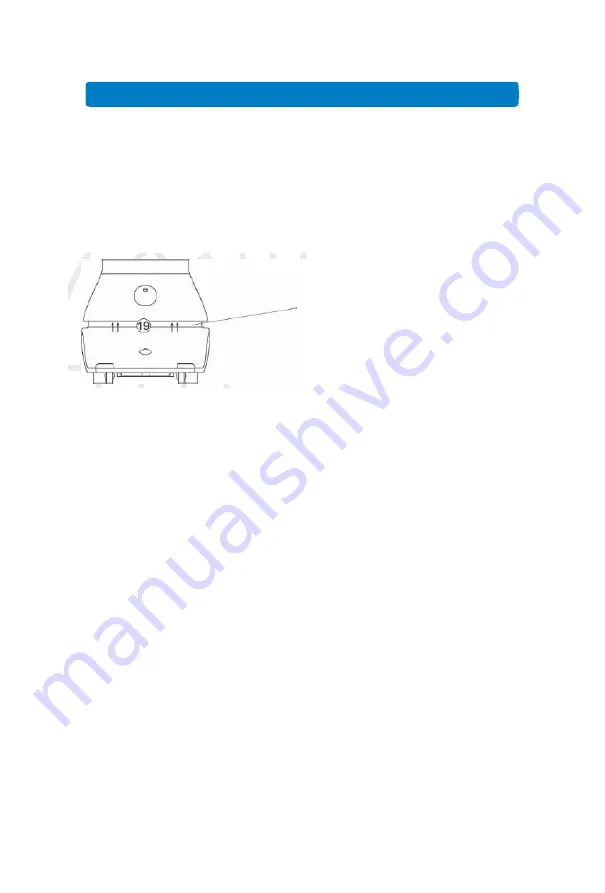
Shown as picture 6, the up part (The arrow appointed surface) at robot laser

layer gap can be stressed, you can up lift the robot through these part. Please use

hand lift the up part of laser layer when transporting, please note that always

keep robot be at up-right gesture during transporting.

Note:should use hand buckle the laser

layer gap between body and base

during transporting the robot.

Picture 6 Transporting diagram

* Note:

The above laser layer gap is the only one stressed part for transporting. Please

transporting robot strictly follow the instruction. Strictly forbid directly drag and lift

the bottom o

f robot during transporting; strictly incline the robot; strictly forbid directly

drag and lift face and head of robot. Users self duty for the damage of robot which

caused by the incorrect operation during transporting.

Summary of Contents for PEANUT

Page 1: ...PEANUT intelligent transporting robots Product specification...

Page 2: ...permission of Shanghai Keenon Robotics Co Ltd and can t purpose to benefit through disseminate at any way electric photo printing record etc This specification mentioned product specification and info...

Page 3: ...s This specification contain the below contents 1 Robot introduce Briefly describethe basicfunction characteristicsof robot and detailed exhibit the structure information ofrobots 2 Operating steps In...

Page 4: ...introduce 7 Main body structureof robot 7 Operatingsteps Userobot 8 Dispatching 13 Charging 14 Sound talking 15 Emergencyhandle 15 Transport robots 17 Appendix 18 Abnormal Listand troubleshooting 18...

Page 5: ...h edge 12 Universal wheel 13 Drive wheel 14 Touch screen 15 Sound microphone 16 Emergency stop switch 17 Handle chargingport 18 Rear turn lamp 19 Up pallet 20 Middle pallet 21 Down pallet 22 Infrared...

Page 6: ...7 to...

Page 7: ...8 the entity...

Page 8: ...Same hardware configuration at T1 and T2 but part different software because different application scene The software operating introduce of this specification mainly described asT1 Main body structur...

Page 9: ...ional technicians needn t user self operating When indoor environment of robot happened important changes example newly decorate transport the robot to new running field or goodsin room place again pl...

Page 10: ......

Page 11: ...layergap lighting Thesystemstartand need waiting about 40sthen can normally use When need closethe power supply of robot pleaseclosethe power supply switch asthe same method The machine power off imm...

Page 12: ...ng process as below click Power supply management menu indicate power supply management setting menu upward sliding page find and click Automatically return capacity enter into value and save Robot Th...

Page 13: ...everydayworkingreachtofinishtime canselecttheworkingdayaccordingto requirements if select One then machine only working at Monday automatically return to charging pile charging after every day working...

Page 14: ...PPwill not automatically open after closed must handle click APP icon then can start running 6 Start machine self start setting operate processas below Under the default situation the system will auto...

Page 15: ...espectively then can enter into the corresponding pages Select table number on the Hall page select roomnumber on the Balcony page the corresponding label will blue highlight indicate after selected t...

Page 16: ...will startselfmatchconnectingchargingpileafter the robot arrived the position of chargingpiles Robotstartchargingafter matchingconnectedthepower pile thepagejump to be charging indicate page Theusers...

Page 17: ...ter and fill in the silica gel cover outside the chargingport of robot well Sound talking The robot can do intelligent interactive with people through sound the process as below Click the robot icon o...

Page 18: ...ver of emergency stop switch Theemergencystopswitch ofrobotat the backofrobot meansthe marknumber 16in picture indicated position start emergencystopswitch need firstly outward openthe exterior cover...

Page 19: ...t be at up right gesture during transporting Note should use hand buckle the laser layer gap between body and base during transporting the robot Picture 6 Transporting diagram Note The above laser lay...

Page 20: ...piles Please contact customer service staff handle if other reasons Robot can t do motion navigation When robots are in map blind area please close the robot and push to nearby the charging pilesand s...

Page 21: ...pe 5 WIFI function Support 802 11b g n transporting agreement Battery volume DC 48V 12Ah Rated power 500W Standby current Standby current 0 5A Duration Continue working 8h Standby time Standby time 48...

Page 22: ...don t move machine freely please strictly follow the user instruction manual transporting when move robot Please clean and maintain main machine and charging piles under the close machine or power off...

Page 23: ...riod of guarantee maintenance Main machine charging piles 1 year Clauses of non guarantee maintenance Theserviceofguaranteemaintenanceonlyvalid limitedat thenormallyuse artificial reason damage and th...

Reviews: