F96VTN and G96VTN: Installation, Start-up, Operating and Service and Maintenance Instructions
Manufacturer reserves the right to change, at any time, specifications and designs without notice and without obligations.
16
A11038
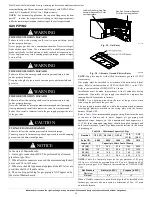
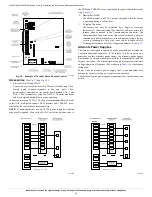
Fig. 23 – Horizontal Return Air Configurations
and Restrictions
Bottom Return Air Inlet
These furnaces are shipped with bottom closure panel installed in bottom
return-air opening. Remove and discard this panel when bottom return
air is used. To remove bottom closure panel, see
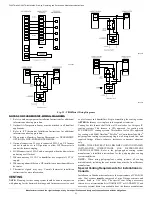
A170123
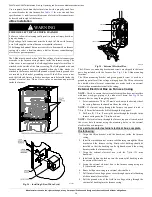
Fig. 24 – Removing Bottom Closure Panel (2 Screws)
Side Return Air Inlet
These furnaces are shipped with bottom closure panel installed in bottom
return-air opening. This panel MUST be in place when only side return
air is used. Where required by code, seal bottom closure to furnace with
tape, mastic or other durable sealing method.
NOTE:
Side return-air openings can be used in UPFLOW and some
HORIZONTAL configurations. Do not use side return-air openings in
, and
.
Downflow Installation
NOTE:
The furnace must be pitched as shown in
for proper
condensate drainage.
Supply Air Connections
NOTE:
For downflow applications, this furnace is approved for use on
combustible flooring when any one of the following accessories are
used:
• Manufacturer’s downflow combustible floor subbase
• Manufacturer’s cased evaporator coil
• Manufacturer’s evaporator coil casing
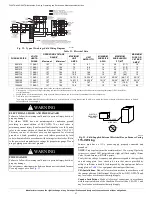
1. Determine application being installed from
.
2. Construct hole in floor per
.
3. Construct plenum to dimensions specified in
.
4. If downflow subbase is used, install as shown. If manufacturer’s
cased evaporator coil or coil casing is used, install as shown in
NOTE:
It is recommended that the perforated supply-air duct flanges be
completely removed from furnace when installing the furnace on a
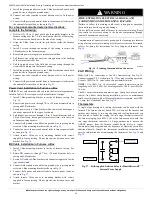
factory-supplied cased coil or coil box. To remove the supply-air duct
flange, use wide duct pliers or hand seamers to bend flange back and
forth until it breaks off. Be careful of sharp edges. See
Connect supply-air duct to supply-air outlet on furnace. Bend flange
inward past 90° with wide duct pliers See
. The supply-air duct
must be connected to ONLY the furnace supply outlet or air conditioning
coil casing (when used). When installed on combustible material,
supply-air duct must be connected to ONLY the factory-approved
accessory subbase, or a factory-approved air conditioning coil casing.
DO NOT cut main furnace casing to attach supply side air duct,
humidifier, or other accessories. All supply-side accessories MUST be
connected to duct external to furnace casing.
WARNING
!
FIRE AND PROPERTY HAZARD
Failure to follow this warning could result in equipment damage,
personal injury, or property damage.
When furnace is installed in a downflow application, make sure water
lines and other sources of water cannot drip or fail in such a way that
water can collect on the blower motor, wiring, and furnace control
board.
HORIZONTAL TOP
RETURN NOT
PERMITTED FOR
ANY MODEL
1.
Lay furnace on the back or side
2.
Remove the two (2) screws that secure the bottom
closure panel to the furnace casing and remove the
panel
SCREWS (2)
BOTTOM
CLOSURE
Representative drawing. Models may vary.
CAUTION
!
CUT HAZARD
Failure to follow this caution may result in personal injury.
Sheet metal parts may have sharp edges or burrs. Use care and wear
appropriate protective clothing, safety glasses and gloves when
handling parts, and servicing furnaces.


