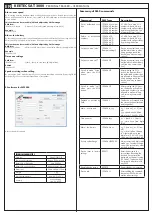
SMS COMMANDS
Set authorized phone numbers
SMS format
123456A1,phone_num - first authorized SOS phone number
123456A2,phone_num - second authorized SOS phone number
123456A3,phone_num - third authorized SOS phone number
123456A4,phone_num - CALL1 phone number
123456A5,phone_num - CALL2 phone number
Example
12421911111111
The default access code is 123456. Phone number must be in international format (do not use „00“
instead of +XXX). There is no need to set all of the numbers, but for proper functionality of the device
at least one number must be entered. The device will receive SMS commands only from authorized
numbers.
Delete authorized phone numbers
SMS format
123456A1,D
- delete first authorized SOS number
123456A2,D
- delete second authorized SOS number
123456A3,D
- delete third authorized SOS number
123456A4,D
- delete CALL1 number
123456A5,D
- delete CALL2 number
Example
123456A4,D
Change of access code
SMS format
123456H******
- change of access code
Example
123456H999999
Access code will not change by SIM card exchange. Always enter the 6 digit code made up of num-
bers, the device will not accept any other symbols or forms. Keep new access code in a safe location.
If you lost the code, contact your dealer - it is necessary to reinstall the device firmware.
Finding the position of the device
a, Using SMS
SMS format
123456F
- device location demand
Device responds with SMS message with GoogleMaps link - current location.
b, Device dialing
You can use the authorized number to dial the device. End the call before device responds to it (let call
active for about 2 seconds). Then device sends you SMS message with link to GoogleMaps.
c, By pressing On/Off button
To send SMS message with the location of the device, press the On / Off button for 2 seconds. SMS
will be sent to the authorized phone numbers.
SOS function
When you press the SOS button for 3 seconds, the device will send an SMS with the text „Help me“
with link to GoogleMaps to all of the authorized number (A1, A2, A3). After sending the SMS, device
calls to the first authorized number (A1). If that number is not reachable, the device dials the second
authorized number (A2). If the second number is not reachable, calls the third, if not the third, call the
first number, and so on. . This process is repeated cyclically until the device successfully call to one of
authorized numbers.
Settings of call type by SMS:
SMS format
123456U3
- classic call (two-way communication)
123456U2
- authorized number can only listen (one-way communication)
Call to authorized numbers CALL1 (A4) and CALL2 (A5)
After push the CALL1 button for 3 seconds device automatically call to the stored phone number. For
second stored phone number, press CALL2 button for 3 seconds.
Call to random phone nuumber
By sending SMS message with following form you can call to any of phone number from device with-
out need to push any button on device.
SMS form
123456V30,phone_number - classic call (two-way communication)
123456V31,phone_number - authorized number can only listen (one-way communication)
Example
123421911111111
Direct call to the device
If you call directly to the device from any of the authorized numbers, device recieve the call.
Settings of call type by SMS:
SMS format
123456U0
- classic call (two-way communication)
123456U1
- authorized number can only listen (one-way communication)
keetec sat 3000
personal tracker User ManUal
eN
WARNING: Before use, read the instructions and recommendations in this man-
ual. The device must be used in accordance with these instructions. The manufacturer
or seller are not reliable for any damages resulting from improper use or opera-
tion. Unprofessional operation or modification of the system can damage the system
alone, and leads to warranty loss.
DEVICE DESCRIPTION
KEETEC SAT 3000 is used to ensure emergency localization of persons, vehicles, animals, mobile
property etc.. In case of theft just call the device phone number and the SAT 3000 responds with SMS
about current location. Also contains two CALL buttons for quick dialing two stored numbers. In an
emergency, a person may use the SOS button located in the center of the device. Then device sends
SMS to the authorized numbers with the text „Help me“ and with link contains current position of the
device. Via mobile phone capable of Internet connection you can easily view current location of your
device using Google Maps service. Device also try to make call at least one authorized number. If the
first number is not available, the device calls for a second, if the second number is out of range too,
called the third. This situation is repeated cyclically until the SAT 3000 successfully has invoked one of
the authorized numbers. Call type is adjustable - one-way communication (you are allowed to listen to
what is happening around the device - interception) or two-way communication (normal call). It is also
possible to use some of the alarms, such as. speeding. In case of triggering the alarm device will send
current location to your mobile phone with a description of the caused alarm. In the GPS locator unit
SIM card of GSM mobile operator is inserted (locator has its own phone number). You can use a flat
rate or a prepaid SIM card. KEETEC SAT 3000 will communicate with you by SMS, so it is necessary
when choosing a mobile operator to pay attention to the price rates for SMS service. We recommen-
ded to activate roaming service for the SIM card in case of the abroad localization. The device has a
built-in battery which is recharged via a miniUSB connector.
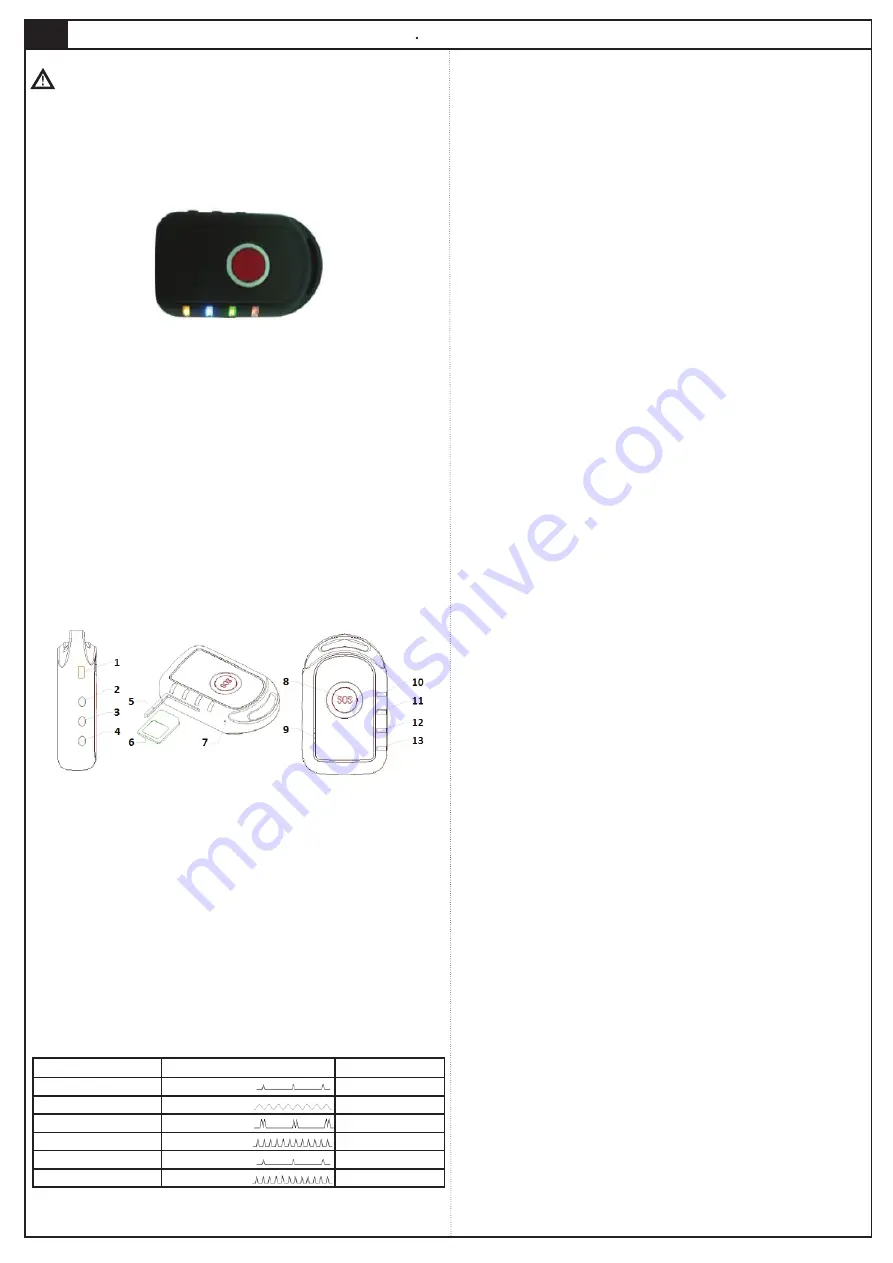
Description of each part:
1 - USB port
2 - On/Off button
3 - Call2 button
4 - Call1 button
5 - SIM card cover
6 - SIM card (not included)
7 - Microphone
8 - SOS button
9 - Speaker
10 - Indicator LED diode - device on/off (red)
11 - Indicator LED diode - demand on GPS position (green)
12 - Indicator LED diode - recieving GPS signal (blue)
13 - Indicator LED diode - GSM/GPRS signal (orange)
When you turn on the device alll four LEDs light up simultaneously. In the first three uses of the device
battery charging time is from 8 to 12 hours. After the first three uses, the battery is fully charged in 3-5
hours. Use the included original charger.
Description of LED diodes:
You can turn on device by pressing the On/Off button for 3 seconds. Turn off the device by press the
same button for 5 seconds.
All LED diodes
Turn ON permanently
Device is starting up
Orange LED (GSM)
Flashes intermittently
Working in GSM mode
Orange LED (GSM)
Flashes intermittently
Connecting to GPRS
Orange LED (GSM)
Flashes intermittently
GPRS connected
Red LED (On/Off)
Flashes intermittently
Device working
Blue LED (GPS)
Flashes intermittently
GPS active
Green LED (GPS location)
Flashes intermittently
GPS location


