background image


Installation Guide for


HOT DRAFT®


https://kegco.com/pages/patents


8510 Miralani Dr.  

San Diego, CA 92126 

(888) 980 - 4810 

support@kegco.com 


12 

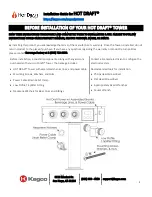
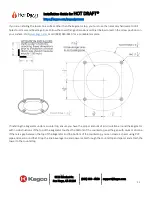
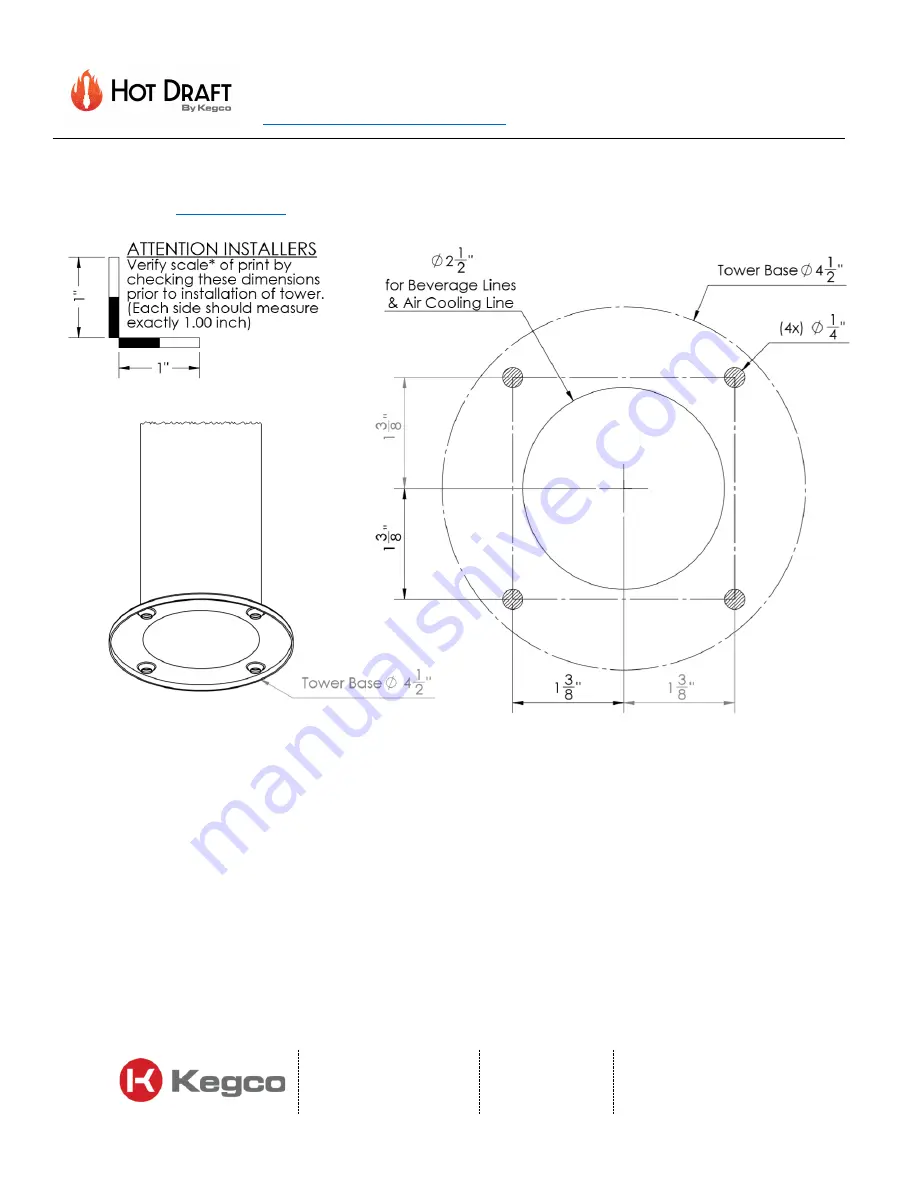
If you are installing the tower on a surface other than the kegerator top, you must use the necessary hardware to drill 
holes for screws and beverage lines. Follow the tower flange dimensions outlined below to match the screw positions on 
your surface. Visi

www.kegco.com

 or call (888) 980-4810 for a printable template.  


If installing the kegerator under a countertop, ensure you have the proper amount of air circulation around the kegerator 
with no obstructions. If the top of the kegerator touches the bottom of the countertop, seal the gap with caulk or silicone. 
If there is a gap between the top of the kegerator and the bottom of the countertop, you can create a spacer using PVC 
pipe and seal around that. Drop the line beverage line and power cable through the countertop and spacer and attach the 
tower to the countertop. 


Summary of Contents for Hot Draft KC HDT301

Page 1: ...Installation Guide Model KC HDT301...

Page 2: ...Gas Connection 14 Coupler Connection 15 Setting Pressure 18 Setting Kegerator Temperature 18 ELECTRICAL CONFIGURATION 19 Electrical specifications 19 Electrical Plug Installation 19 Voltage Setting C...

Page 3: ...pling the keg so that pressure is eliminated during the cleaning inspection THIS PRODUCT SHOULD BE INSTALLED BY A QUALIFIED ELECTRICIAN AND A QUALIFIED PLUMBER IN ACCORDANCE WITH ALL NATIONAL STATE PR...

Page 4: ...hat is within sight of the appliance or a circuit breaker lockout must be used Ref NEC 422 31 7 If the Tower is installed in a location where liquid damage could occur in the event of a leak it is rec...

Page 5: ...he beverage is at its original maximum quality without the degradation of heretofore constant reheating What does this mean The HOT DRAFT Tower delivers constant freshness with zero waste Inside the k...

Page 6: ...Amperage 4 8 kW 240 V 60 Hz 20A 4 4 kW 230 V 60 Hz 20A 3 6 kW 208 V 60 Hz 18A Operating Pressure Range Optimal Operating Pressure Range 20 PSI 40 PSI 25 PSI 35 PSI Minimum Flow Rate 0 15 GPM Minimum...

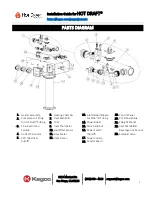
Page 7: ...triction Spindle 4 Outlet Thermistor 5 ECO Electrical Cutoff 6 Heating Chamber 7 Inlet Manifold 8 Triac 9 Inlet Thermistor 10 Hall Effect Sensor 11 Flow Meter 12 Inlet Screen 13 Inlet Barbed Nipple fo...

Page 8: ...oduct to the place of purchase If you have any questions regarding the warranty or product return policies please contact Beverage Factory at 1 800 710 9939 Before installation inspect all components...

Page 9: ...f the tank falls on it Secure the Nitrogen tank 7 If it becomes difficult to breathe and your head starts to ache high levels of Nitrogen may be present LEAVE THE ROOM IMMEDIATELY 8 Pressures above 50...

Page 10: ...wer cable is inside the kegerator cabinet a guide the cable through the knockout in the back wall and b out the other side 3 a Align the tower flange with the holes on top of the kegerator Insert the...

Page 11: ...nto the tower 5 Install the Power Cable Strain Relief Clamp a Slip the Clamp around the power cable b Pinch the ends of the Strain Relief Clamp close together c Align the holes with the back right Tow...

Page 12: ...urface Visit www kegco com or call 888 980 4810 for a printable template If installing the kegerator under a countertop ensure you have the proper amount of air circulation around the kegerator with n...

Page 13: ...ing the Faucets When attaching the faucet to the tower a line up the teeth on the inside of the faucet with the teeth inside the shank b Screw the coupling nut onto the faucet and tighten with the fau...

Page 14: ...n an upright manner 1 Attach the regulator to the Nitrogen tank If there is a washer built on to the end of your regulator you do not need to use any additional washer a Hand tighten the coupling nut...

Page 15: ...ng the provided Low Profile T Splitter Fitting 1 a Place a neoprene washer between the T Splitter and the top of the coupler b Attach the T Splitter to the top of the coupler Do not overtighten the T...

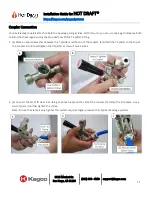
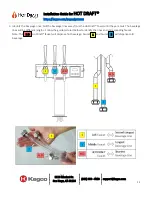
Page 16: ...Identify the beverage lines Pull the beverage lines away from the Hot Draft Tower until they are taut The beverage lines will be different lengths Follow the guide pictured below to identify the line...

Page 17: ...o insert a neoprene washer into the Beer Nut before attaching to the T splitter b Attach the Hot Draft Beverage Line to one end of the T Splitter c Attach Beverage Line or Beverage Line to the other e...

Page 18: ...ainer under the faucet and open the valve at the bottom of the regulator Turn the dial clockwise with the faucet open and beverage will start to pour Stop turning when you get the best flow rate This...

Page 19: ...URY OR DEATH COULD OCCUR IF YOU IGNORE THIS WARNING All wiring wire gauge and circuit protection breakers must comply with the U S National Electrical Code NEC in the USA or the Canadian Electrical Co...

Page 20: ...he unit must be configured for your specific voltage supply Configure the unit by setting a DIP Switch located inside the unit behind the Control Panel The lid must be removed to access the DIP Switch...

Page 21: ...ge of the backside of the Control Board b Use a Flathead Screwdriver or suitable tool to adjust the DIP Switch 3 Configure the DIP Switch for your electrical supply according to the guide below This i...

Page 22: ...Installation Guide for HOT DRAFT https kegco com pages patents 8510 Miralani Dr San Diego CA 92126 888 980 4810 support kegco com 22 Electrical Diagram...

Page 23: ...you must navigate to either the FLOW PWM IN OUT or VERSION screens and press SEL You cannot exit the Service Menu from the SETPOINT PURGE or CLEAN screens SETPOINT SETPOINT will display and allow you...

Page 24: ...u NOTE If you exit the Service Menu and return to the Main Screen the Main Screen will display the status message Cleaning FLOW PWM IN OUT VERSION FLOW displays the flow rate of the Hot Draft line dis...

Page 25: ...he Main Screen will display the messages Please Wait and Unit Heating This indicates that your Hot Draft Tower is heating the beverage up to the setpoint temperature Keep the faucet open while the uni...

Page 26: ...ntil the beverage is pouring accurately to the setpoint temperature For a 208V electrical system we recommend tuning the Compensation Factor between 10 18 Flow Rate Fine tuning the Flow Rate may be re...

Page 27: ...Flow Rate is to adjust the Flow Adjustment Spindle see 7 in Parts Diagram To access the flow adjustment spindle the lid must be removed ENSURE THE UNIT IS UNPLUGGED AND TURNED OFF BEFORE REMOVING LID...

Page 28: ...se the flow rate tighten the flow adjustment spindle by turning clockwise as shown below After adjusting the flow adjustment spindle check the flow rate by plugging in the unit navigating to FLOW in t...

Page 29: ...used in the Hot Draft heating components from potent acids found in this product To clean lines used to dispense beverages such as beer or kombucha we recommend Kegco Beer Line Cleaner This solution w...

Page 30: ...tructions on connecting to a dispense system Some disassembly may be required 4 Place a bucket or pitcher under the faucet corresponding to the beverage line connected to your cleaning container Open...

Page 31: ...ol Board Contact customer service Underheated Beverage Pour The unit is not supplied with enough voltage Verify power supply voltage Ensure DIP Switches are correctly configured as shown in section El...

Page 32: ...or door supports o Light bulbs and or plastic housing o Plastic cabinet liners o Punctured evaporator that voids the warranty on the complete sealed system o Repairs performed by unauthorized servicer...

Reviews: