


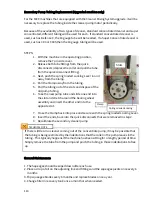


107
Press the SQUEEGEE LIFT TEST BUTTON once. The squeegee motor will activate and rotate
180°, this will lower the squeegee. If the squeegee does not stop in the down position, check
the condition of the Squeegee Down Switch.
With the squeegee down, take a straight edge and rest it on the squeegee blade across the
main drive wheels to the rear drive wheels. The gap between the straight edge and the drive
wheels should be about 3/16" to 1/4" (3.18 mm to 4.76 mm) on each side.
If the distance is more or less, loosen the bolts (two on
each side) that hold the squeegee pivot in place. Move
the pivot mount until the squeegee height is correct. This
should be done for both the left and the right side.
Tighten the bolts after the adjustment
is acceptable.
The tilt or pitch of the squeegee may
also need adjustment to ensure that
both blades are contacting the lane squarely. If a pitch
adjustment is necessary, follow the steps below to make
the adjustment. Make sure the squeegee motor does not bind up when making an
adjustment. If the link is too short the motor cannot rotate 360
.
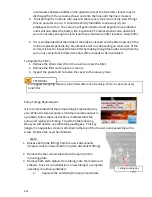
1.
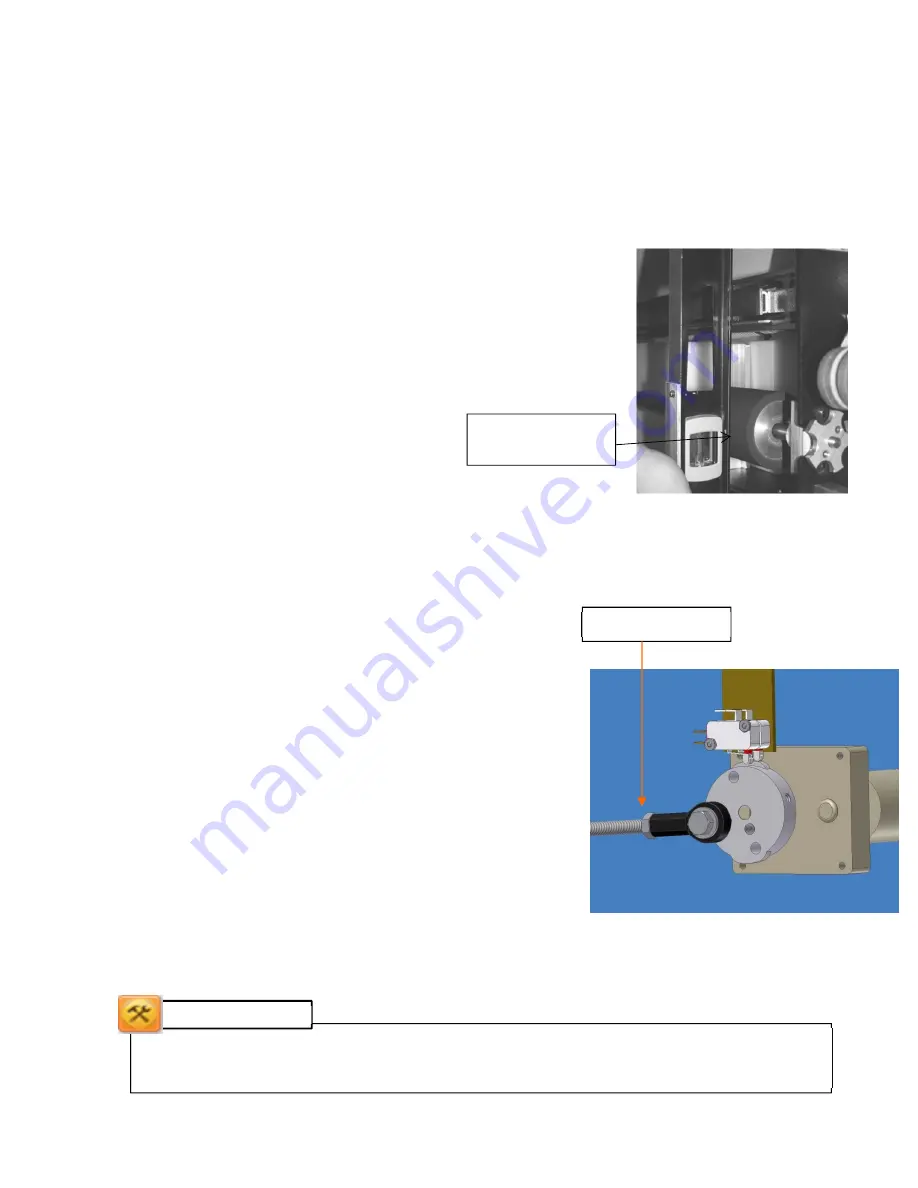
Locate the squeegee motor on the right side plate of
the machine. Mounted to the motor shaft (inside the
machine) is a cam. Mounted to the cam is a rod end
and rod. This rod lifts and lowers the squeegee (see
diagram on the following page).
2.
Loosen the jam nut between the rod end and the
rod.
3.
Remove the bolt that connects the rod end to the
cam.
4.
Rotate the rod end as needed to increase or
decrease the pitch. DO NOT; make the linkage too
short.
5.
Re-install and tighten the bolt to connect the rod
end to the cam.
6.
Re-check the gap between the straight edge and the drive wheels.
7.
Tighten the rod end to the rod with the jam nut.
8.
Check cleaning to ensure adjustment is adequate.
Pitch Adjustment
Excessive crush on the squeegee will not allow the machine to clean properly and will
cause stress on the assembly.
TECHNICAL NOTE
Gap should be
3/16” to 1/4”
Summary of Contents for FLEX 17-5801
Page 1: ...OPERATORS MANUAL Edition 03 18...
Page 2: ......
Page 12: ......
Page 16: ...4 Wah lah I did them the same...
Page 51: ...39...
Page 171: ...159...
Page 172: ...160 CHAPTER 7 Miscellaneous Parts Stickers and Decals...
Page 173: ...161...
Page 174: ...162...
Page 176: ...164...
Page 178: ......
Page 181: ......
Page 183: ......
Page 185: ......
Page 187: ...7 7...
Page 189: ......
Page 191: ......
Page 193: ......
Page 195: ......
Page 197: ......
Page 199: ...14 15 16 17 18 19 5 4 7 6 13 8 9 10 2 12 11 9 3 8 10 9 1 3 9 10 12...
Page 201: ......
Page 203: ......
Page 205: ...7 7...
Page 207: ......
Page 209: ......
Page 211: ......
Page 213: ......
Page 215: ...7 5 7...
Page 217: ......
Page 219: ......
Page 221: ......
Page 223: ......
Page 225: ......
Page 227: ...7 7...
Page 229: ......
Page 231: ......
Page 233: ...7...
Page 235: ......
Page 237: ......
Page 239: ...3 2 9...
Page 241: ......
Page 243: ......
Page 245: ......
Page 246: ...235...
Page 248: ...230...
Page 249: ...231...
Page 250: ...232...
Page 251: ...233...
Page 252: ...234...
Page 253: ...235...
Page 254: ...236...
Page 255: ...237...
Page 256: ...238...
Page 257: ...239...
Page 258: ...240...
Page 259: ...241...
Page 260: ...242...
Page 261: ...243...
Page 262: ...244...
Page 263: ...245...
Page 264: ...246...
Page 265: ...247...
Page 266: ...248...
Page 267: ...249...
Page 268: ...250...
Page 269: ...251...
Page 270: ...252...
Page 271: ...253...
Page 272: ...254...
Page 273: ...255...
Page 274: ...261...
Page 276: ...257...
Page 277: ...258...
Page 278: ...259...
Page 279: ...260...
Page 280: ...261...
Page 281: ...262...
Page 282: ...263...
Page 283: ...264...
Page 284: ...265...
Page 285: ...266...
Page 286: ...267...
Page 287: ...268...
Page 288: ...269...
Page 289: ...270...
Page 290: ...271...
Page 291: ...272...
Page 292: ...273...
Page 293: ...274...
Page 294: ...275...
Page 295: ...276...
Page 296: ...277...
Page 297: ...278...
Page 298: ...279...
Page 299: ...280...
Page 300: ...281...
Page 301: ...282...
Page 302: ...283...
Page 303: ...290...


