

59
Adjustments
Buffer Brush
The buffer brush is made of a long-lasting synthetic bristle, which
under normal circumstances, can be expected to last approximately
18 months. However, changing this annually before each league
season is recommended to ensure consistency throughout the year.
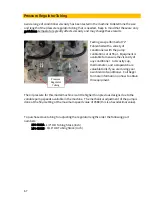
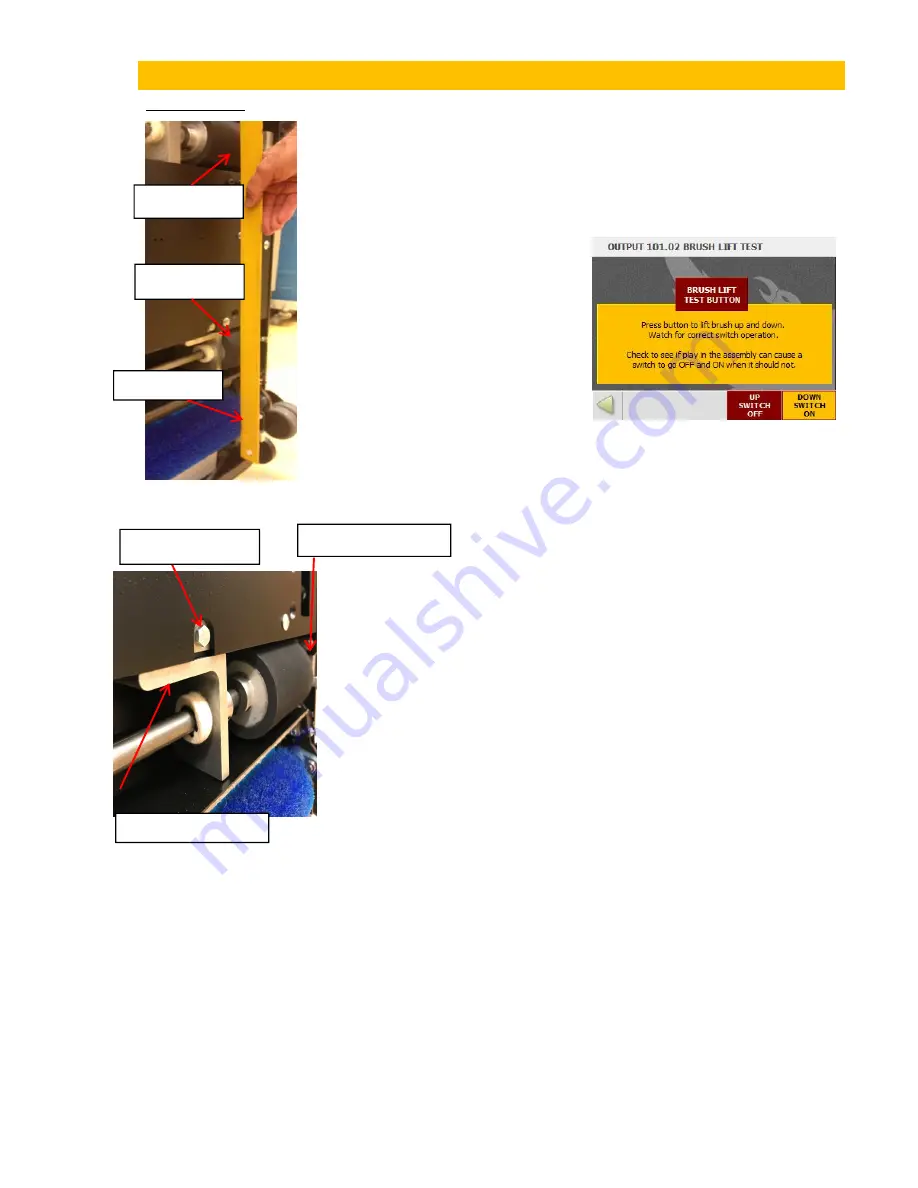
To check the buffer brush
adjustment, the brush must first be
in the down position. This is done
at the INPUT/OUTPUT TEST menu.
If the brush is not already down in
the "zero" position, press BRUSH
LIFT.
Press TEST BUTTON to activate this output. This will lower the buffer
brush into the operating position. If the brush does not stop in the
down position, check the condition of the Brush Down Switch.
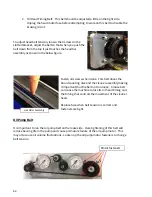
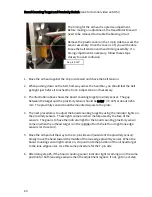
With the brush down and the machine standing in the transport
position hold a level or straight edge across the front drive wheels
and rear drive wheels (shown above). The buffer brush material
should extend approximately 3/32" to 3/16" (2.38 mm to 4.76 mm)
beyond the straight edge for proper adjustment. The buffer brush
is factory adjusted prior to being shipped at approximately 1/8" (3.2
mm).
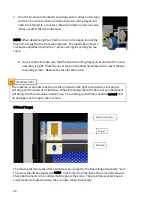
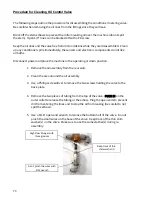
If an adjustment is needed, loosen the four (two on each side)
mounting angle bolts as shown in the picture to the left and the
two mounting plates on the shaft ends.
Then turn the adjusting bolt to set the buffer brush crush by turning clockwise for less or
counter clockwise for more.
Once the buffer brush adjustment has been made, fasten the four mounting angle bolts
tightly and end mounts.
NOTE: When cleaning the buffing brush, NEVER use any type of cleaner on the brush. Use of
cleaners will decrease the brush’s ability to hold conditioner and greatly affect the
lengthwise taper of the conditioner pattern. All that you need to clean the buffer brush is a
clean, soft, dry towel.
Front wheel
Rear wheel
3/32 – 3/16
Mounting Plate
Mounting Angle
Adjusting Bolt
Summary of Contents for FLEX 17-5801
Page 1: ...OPERATORS MANUAL Edition 03 18...
Page 2: ......
Page 12: ......
Page 16: ...4 Wah lah I did them the same...
Page 51: ...39...
Page 171: ...159...
Page 172: ...160 CHAPTER 7 Miscellaneous Parts Stickers and Decals...
Page 173: ...161...
Page 174: ...162...
Page 176: ...164...
Page 178: ......
Page 181: ......
Page 183: ......
Page 185: ......
Page 187: ...7 7...
Page 189: ......
Page 191: ......
Page 193: ......
Page 195: ......
Page 197: ......
Page 199: ...14 15 16 17 18 19 5 4 7 6 13 8 9 10 2 12 11 9 3 8 10 9 1 3 9 10 12...
Page 201: ......
Page 203: ......
Page 205: ...7 7...
Page 207: ......
Page 209: ......
Page 211: ......
Page 213: ......
Page 215: ...7 5 7...
Page 217: ......
Page 219: ......
Page 221: ......
Page 223: ......
Page 225: ......
Page 227: ...7 7...
Page 229: ......
Page 231: ......
Page 233: ...7...
Page 235: ......
Page 237: ......
Page 239: ...3 2 9...
Page 241: ......
Page 243: ......
Page 245: ......
Page 246: ...235...
Page 248: ...230...
Page 249: ...231...
Page 250: ...232...
Page 251: ...233...
Page 252: ...234...
Page 253: ...235...
Page 254: ...236...
Page 255: ...237...
Page 256: ...238...
Page 257: ...239...
Page 258: ...240...
Page 259: ...241...
Page 260: ...242...
Page 261: ...243...
Page 262: ...244...
Page 263: ...245...
Page 264: ...246...
Page 265: ...247...
Page 266: ...248...
Page 267: ...249...
Page 268: ...250...
Page 269: ...251...
Page 270: ...252...
Page 271: ...253...
Page 272: ...254...
Page 273: ...255...
Page 274: ...261...
Page 276: ...257...
Page 277: ...258...
Page 278: ...259...
Page 279: ...260...
Page 280: ...261...
Page 281: ...262...
Page 282: ...263...
Page 283: ...264...
Page 284: ...265...
Page 285: ...266...
Page 286: ...267...
Page 287: ...268...
Page 288: ...269...
Page 289: ...270...
Page 290: ...271...
Page 291: ...272...
Page 292: ...273...
Page 293: ...274...
Page 294: ...275...
Page 295: ...276...
Page 296: ...277...
Page 297: ...278...
Page 298: ...279...
Page 299: ...280...
Page 300: ...281...
Page 301: ...282...
Page 302: ...283...
Page 303: ...290...