Verifying frequency
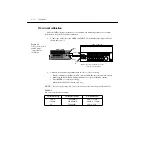
Follow the steps below to verify the Model 2010 frequency function.
1.
Connect the frequency synthesizer to the Model 2010 INPUT jacks. See
2.
Set the synthesizer to output a 1kHz, 1V RMS sine wave.
3.
Select the Model 2010 frequency function by pressing the FREQ key.
4.
Verify that the Model 2010 frequency reading is between 0.99992kHz and 1.00008kHz.
Verifying ratio
CAUTION
When verifying ratio or using sense volts, the SENSE LO terminal must be
referenced to INPUT LO. Exceeding 350V DC from SENSE HI to SENSE
LO will cause instrument damage.
1.
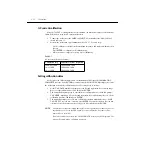
Connect SENSE HI to INPUT HI, and connect SENSE LO to INPUT LO.
2.
Connect the DC calibrator output HI and LO terminals to the Model 2010 HI and LO
terminals respectively, as shown in
3.
Select the Model 2010 DCV function, and select the 1V range.
4.
Set the DC calibrator output to +1.000000V DC, and turn on its output.
5.
Press SHIFT then RATIO, then select and enable both RATIO:ON and SENSEIN:ON.
6.
Verify that the ratio reading is between 0.9999460 and 1.0000540.
2000 MULTIMETER
!
R
Model 2010
BNC-to-Dual
Banana Plug
Adapter
50
Ω
BNC Coaxial Cable
Model 3930A or 3940 Synthesizer
Main
Function
Output
Figure 1-7
Connections for
frequency verification
Model 2010
2010 MULTIMETER
RANGE
!
F
500V
PEAK
FRONT/REAR
3A 250V
AMPS
HI
LO
INPUTS
350V
PEAK
1000V
PEAK
SHIFT
LOCAL
POWER
RANGE
R
SHIFT
CH1
REM
TALK
LSTN
SRQ
STAT
REL
FILT
4W
BUFFER
MATH
REAR
SCAN
TIMER
STEP
CH2
CH3
CH4
CH5
CH6
CH7
CH8
CH9
CH10
HOLD
TRIG
FAST
MED
SLOW
AUTO
ERR
INPUT
SENSE
Ω
4 WIRE
AUTO
EXIT
ENTER
DIGITS RATE
REL
FILTER
TRIG
EX TRIG
STORE
RECALL
OPEN CLOSE
DCV
DCI
MX+B
%
dBm
ACV
ACI
Ω
2
Ω
4
FREQ
TEMP
dB
CONT
PERIOD SENSOR
LIMITS
ON/OFF
DELAY
HOLD
SAVE
SETUP
CONFIG
HALT
TYPE
RS232
GPIB
RATIO
STEP
SCAN
DRYCKT O COMP
CAL
TEST
SENSE HI
LO
SENSE LO
HI
Model 5700A
Short SENSE HI to INPUT HI
Short SENSE LO to INPUT LO
Figure 1-8
Verifying ratio
1-14
Performance Verification
Summary of Contents for 2010
Page 14: ...1 Performance Verification 1 Performance Verification...
Page 28: ...2 Calibration 2 Calibration...
Page 53: ...3 Routine Maintenance 3 Routine Maintenance...
Page 56: ...4 Troubleshooting 4 Troubleshoot ing...
Page 74: ...5 Disassembly 5 Disassembly...
Page 83: ...CONFIDENTIAL PROPRIETARY...
Page 84: ......
Page 85: ......
Page 86: ......
Page 87: ...6 Replaceable Parts 6 Replaceable Parts...
Page 98: ...CONFIDENTIAL PROPRIETARY...
Page 99: ...CONFIDENTIAL PROPRIETARY...
Page 100: ......
Page 101: ...A Specifications A Specifications...
Page 107: ...B Calibration CommandReference B Calibration CommandRef erence...


