background image


STEP D. 

Remove packaging attachments from the log 

set.                                                                                   

1.Remove the front grass.


2.Remove the pear cotton block. 


3.Remove the log set

s packaging bag. 


STEP E. 

Have two person to take the glass panel out of the 

fireplace box. Place it to a soft and clean place.

 Figure (E)


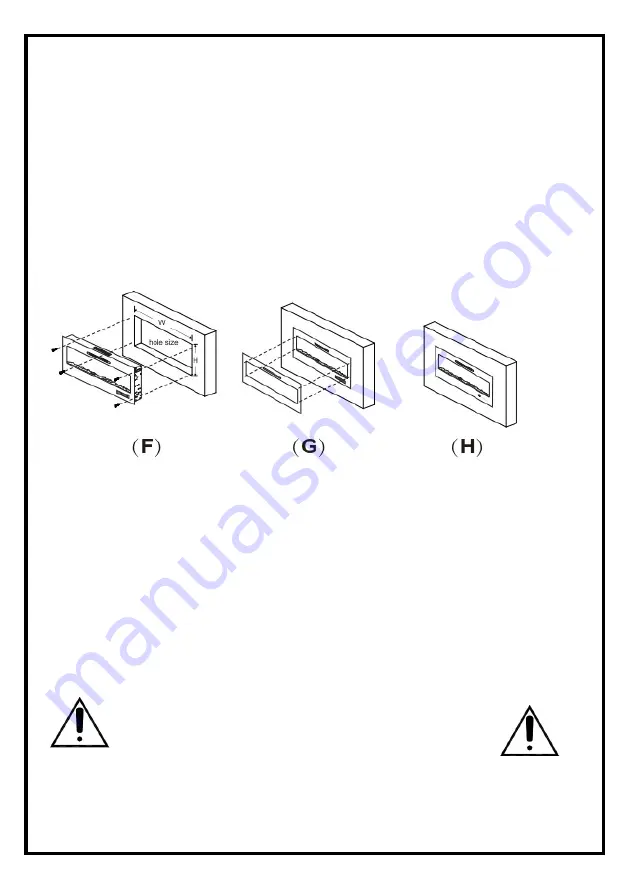
STEP F. 

Take off the two screws in both sides of fireplace. Figure 

(C) If the appliance is fully recessed into the wall:


Use the 4 screws(provided) to lock the appliance into wall with 

the existing two side flanges,

 see Figure(F)


Install the media and re-install the glass front.


STEP G. 

Place the front panel lock the appliance. 

See Figure (G) 


STEP H.

 Fireplace will be like this after installation 

Figure (H)


Wall Mounted installation   


WARNING


ONLY QUALIFIED PERSON CAN PERFORM THE INSTALLATION. 
 

Due to the many different materials used on different walls, it is 

highly recommended that you consult your local builder before 

Summary of Contents for Oregon KT0940

Page 1: ...Manual de instrucciones Instruction manual REF KT0940 CHIMENEA ELECTRICA C EFECTO LLAMA 3D Y SALIDA DE AIRE FRONTAL 2000W OREGON ...

Page 2: ...tentamente el manual del usuario antes de utilizar el equipo y utilícelo siguiendo las instrucciones de funcionamiento de este manual para evitar incendios u otros peligros accidentales Guarde este manual en un lugar seguro para consultarlo más adelante Si tiene cualquier problema para comprender el contenido de este manual póngase en contacto con su distribuidor ...

Page 3: ...imiento de este manual 2 El calefactor de su chimenea eléctrica puede emitir un olor leve e inofensivo cuando se usa por primera vez Este olor es una condición normal causada por el calentamiento inicial de las piezas internas del calefactor y no volverá a suceder 3 La información sobre el modelo de su chimenea eléctrica se puede encontrar en la placa de características situada en la parte posteri...

Page 4: ...niños no deben jugar con el aparato La limpieza y el mantenimiento llevados a cabo por el usuario no deben ser realizados por niños sin supervisión Los niños menores de tres años deben mantenerse lejos del aparato a menos que estén constantemente supervisados Los niños de entre tres y ocho años solo deben encender y apagar el aparato siempre que se haya colocado o instalado en la posición de funci...

Page 5: ...3 Todos los calefactores contienen piezas calientes que producen arcos eléctricos o chispas No lo utilice en espacios donde se use o almacene gasolina pintura o líquidos inflamables o donde la unidad estará expuesta a vapores inflamables 14 No modifique la chimenea eléctrica Utilícelo siempre siguiendo las indicaciones de este manual Cualquier otro uso no recomendado por el fabricante puede provoc...

Page 6: ...nto Si el electrodoméstico comienza a sobrecalentarse por cualquier motivo todas las funciones calefactoras del aparato se apagarán automáticamente Deberá restablecer el aparato antes de seguir utilizándolo Para restablecer el dispositivo de seguridad de protección contra el sobrecalentamiento encienda todos los controles vuelva a enchufar el aparato y enciéndalo GUARDE ESTAS INSTRUCCIONES INSTRUC...

Page 7: ...ción locales y otras normativas aplicables para reducir el riesgo de incendio descarga eléctrica y lesiones a las personas No intente conectar sus propios circuitos o enchufes nuevos Para reducir el riesgo de incendio descarga eléctrica o lesiones a personas recurra siempre a un electricista cualificado PREPARACIÓN Este producto incluye un panel de CRISTAL Tenga siempre mucho cuidado cuando manipu...

Page 8: ...DEL PRODUCTO Número de modelo A B C D E F G EF 2050FU 50 19 6 46 7 18 10 6 43 7 127 cm 48 cm 15 2 cm 118 6 cm 45 9 cm 27 cm 111 cm A Chimenea B Tornillos de madera C Taco de anclaje D Cristales decorativos E Juego de leños Mando a distancia DIMENSIONES DEL PRODUCTO ...

Page 9: ... los códigos eléctricos nacionales y locales DISTANCIA MÍNIMA DE LOS COMBUSTIBLES Medidas obtenidas del cristal frontal Parte inferior 0 Parte superior A 11 8 300 mm de la repisa Laterales 0 Parte superior A 11 8 300 mm de la repisa Parte trasera 0 ESPACIOS MÍNIMOS DE LA REPISA ADVERTENCIA SI UTILIZA PINTURA O LACA PARA EL ACABADO DE LA REPISA ESTAS DEBEN SER RESISTENTES AL CALOR PARA EVITAR LA DE...

Page 10: ... SOLO UNA PERSONA CUALIFICADA PUEDE REALIZAR LA INSTALACIÓN PASO A Seleccione una pared seca y practique un orificio para la caja de la chimenea El tamaño del agujero debe ser como se muestra en el siguiente gráfico Tamaño del orificio ...

Page 11: ...a Figura C Anclajes a la pared 4 uds El cuarto tornillo de arriba abajo Tamaño del orificio del marco Número de modelo An Al EF 2050FU 47 3 120 14 cm 18 8 47 75 cm PASO B Practique 4 orificios alrededor de la pared e instale los 4 tacos de anclaje pieza C Encaje la pieza C completamente en la pared ...

Page 12: ...ASO F Retire los dos tornillos de ambos lados de la chimenea Figura C Si el aparato está completamente empotrado en la pared Utilice los cuatro tornillos incluidos para fijar el electrodoméstico en la pared con las dos bridas laterales existentes consulte la Figura F Instale el soporte y vuelva a instalar el panel frontal de cristal PASO G Coloque el bloqueo del panel frontal del equipo Vea la Fig...

Page 13: ...a la amplia variedad de materiales que se utilizan en las diferentes paredes se recomienda encarecidamente que consulte a su constructor local antes de instalar este equipo en la pared 1 Puede ver los dos pasadores en la parte trasera del dispositivo 2 Instale los dos tacos de anclaje en la pared ...

Page 14: ...os para madera con cuidado de no atornillarlos del todo Atornille la cabeza que sobresale a 0 12 0 19 in de distancia 4 Se debe levantar la chimenea entre dos personas y colgarla de los dos pasadores de detrás de los dos tacos de anclaje B Tornillos para madera D Tacos de anclaje 0 12 0 19 in 1 Retire los tornillos el cuarto tornillo de arriba abajo de ambos lados del dispositivo para retirar el c...

Page 15: ...e el enchufe a una toma entonces oirá una señal acústica larga que indicará que la chimenea eléctrica está en modo de espera Pulse el botón POWER encendido del teclado para que se muestre en rojo el resto de la pantalla no se mostrará En este momento la chimenea eléctrica está en modo de espera Nota los iconos del teclado tienen la misma función que los iconos del mando a distancia 2 Retire el jue...

Page 16: ...erá rojo y se mostrará todo Entonces el ventilador de dentro de la chimenea eléctrica seguirá funcionando durante 10 segundos Después la chimenea eléctrica entrará en estado de espera Ajuste de calefacción alta y calefacción baja Si pulsa el botón HEATER calefactor del teclado durante 3 segundos puede cambiar entre y tenga en cuenta que esta función no está disponible en el mando a distancia La te...

Page 17: ...configurar entre 0 12 horas cuando se enciende el tiempo predeterminado de la chimenea eléctrica es de 0 horas Puede modificar la configuración del temporizador con el botón TIME tiempo del teclado o del mando a distancia Una vez que la chimenea eléctrica esté en funcionamiento pulse el botón TIME del teclado o del mando a distancia seguidamente la pantalla de temperatura de la ventana de visualiz...

Page 18: ...de visualización volverá a mostrar la temperatura de la estancia y quedará permanentemente iluminada REGULADOR DE LA LLAMA En el primer uso el brillo de la llama está en el nivel más alto El brillo de la llama tiene cinco niveles Si desea ajustar el brillo de la llama cada vez que pulse el botón DIMMER regulador el brillo de la parte frontal y trasera de la lámpara led se oscurecerá cada vez que p...

Page 19: ...ón una vez para adelantar una hora el rango de ajuste de horas es de 00 23 Ajuste de los minutos pulse el botón una vez para adelantar un minuto el rango de configuración de minutos es de 00 59 Ajuste del día de la semana cada vez que pulse el botón el icono de la semana se moverá de izquierda a derecha y se iluminará Función de ajuste del temporizador semanal la chimenea eléctrica tiene la funció...

Page 20: ... y no debería volver a pasar a menos que el calefactor no se utilice durante un largo periodo de tiempo AVISO Para mejorar el funcionamiento apunte con el mando a distancia a la parte delantera de la chimenea NO pulse los botones demasiado rápido Deje tiempo para que la unidad responda a los comandos Control de limitación de la temperatura Este calefactor está equipado con un control de limitación...

Page 21: ...ANCIA Cuando el mando a distancia deja de funcionar o se reduce su alcance es hora de cambiar la pila por una nueva 1 El compartimiento de la pila se encuentra en la parte posterior del mando a distancia 2 Presione y deslice la puerta de la pila para abrirla y retire la pila vieja 3 Introduzca una pila CR2025 comprobando que los terminales y de la pila coincidan con el interior del compartimento 4...

Page 22: ... con un paño limpio y seco Para eliminar huellas dactilares u otras marcas la puerta transparente se puede limpiar con un paño húmedo La puerta transparente debe secarse completamente con un paño sin pelusa para evitar que queden manchas de agua PRECAUCIÓN No use limpiadores abrasivos en la superficie del cristal ni rocíe líquidos directamente sobre ninguna superficie LIMPIEZA DE LA SUPERFICIE DE ...

Page 23: ...la chimenea boca abajo retirar los tornillos que sujetan la parte inferior de la placa del marco y colocar la vara de la llama correctamente 3 La llama no es visible 1 El cableado está suelto 1 Desconecte el aparato de la fuente de electricidad y revise si el cableado tiene conexiones sueltas realice las reparaciones y sustituciones necesarias 2 Pulse el botón de la llama para definir el modo alto...

Page 24: ...amente 3 El mando a distancia y o el sensor son defectuosos 1 Cambie las pilas del mando a distancia 2 Apunte con el mando hacia el sensor situado directamente detrás de la pantalla de cristal en el centro de la unidad justo encima de los leños 3 Sustituya el mando a distancia y o el sensor ...

Page 25: ...products and service Please read the user manual carefully before using the appliance and operate following the operation instructions in this manual in order to prevent fire or other accidental danger Keep this manual in a safe place for future reference Any understanding problem relates to this manual please contact your dealer ...

Page 26: ...light bulbs under the maintenance section of this manual 2 The heater on your electric fireplace may emit a slight harmless odor when first used This odor is a normal condition caused by the initial heating of internal heater parts and will not occur again 3 The information regarding the model of your electric fireplace can be found on the rating plate located on the back of the unit 4 If you have...

Page 27: ...all not play with the appliance Cleaning and user maintenance shall not be made by children without supervision Children of less than 3 years should be kept away unless continuously supervised Children aged from 3 years and less than 8 years shall only switch on off the appliance provided that it has been placed or installed in its intended normal operating position and they have been given superv...

Page 28: ...t use in areas where gasoline paint or flammable liquids are used or stored or where the unit will be exposed to flammable vapors 14 Do not modify the electric fireplace Use it only as described in this manual Any other use not recommended by the manufacturer may cause fire electric shock or injury to persons 15 To reduce the risk of electric shock this appliance has a polarized plug one blade is ...

Page 29: ...l heater functions of the appliance off The appliance will have to be reset prior to continuing use To reset the overheat protection safety device turn all controls plug the appliance back and turn on SAVE THESE INSTRUCTIONS IMPORTANT INSTRUCTIONS NOTE Procedures and techniques that are considered important enough to emphasize CAUTION Procedures and techniques which if not carefully followed will ...

Page 30: ...ring must comply with local building codes and other applicable regulations to reduce the risk of fire electric shock and injury to persons Do not attempt to wire your own new outlets or circuits To reduce the risk of fire electric shock or injury to persons always use a licensed electrician PREPARATION This product includes a GLASS panel Always use extreme caution when handing glass Failure to do...

Page 31: ...PARTS HARDWARE SPECIFICATION AND DIMENSION PRODUCT DIMENSIONS ...

Page 32: ... location that is not susceptible to moisture and is away from drapes furniture and high traffic areas NOTE Follow all National and local electrical codes MINUMUM MANTEL CLEARANCES WARNING WHEN USING PAINT OR LACQUER TO FINISH THE MANTEL THE PAINT OR LACQUER MUST BE HEAT RESISTANT TO PREVENT DISCOLOURATION ...

Page 33: ...RECESSED TO WALL INSTALLATION WARNING ONLY QUALIFIED PERSON CAN PERFORM THE INSTALLATION STEP A Selection a dry wall to open a hole for fireplace box Size of hole as below chat ...

Page 34: ...STEP C Take off the screws The fourth screw from top to bottom in both sides of fireplace Figure C ...

Page 35: ...e appliance is fully recessed into the wall Use the 4 screws provided to lock the appliance into wall with the existing two side flanges see Figure F Install the media and re install the glass front STEP G Place the front panel lock the appliance See Figure G STEP H Fireplace will be like this after installation Figure H Wall Mounted installation WARNING ONLY QUALIFIED PERSON CAN PERFORM THE INSTA...

Page 36: ...you install this appliance on the wall Log set Crystal Ember Installation WARNING ONLY QUALIFIED PERSON CAN PERFORM THE INSTALLATION ...

Page 37: ...RNING Read and understand this entire owner s manual including all safety information before plugging in or using this product Failure do to so could result in electric shock fire serious injury or death ...

Page 38: ...a short buzzer sound the electric fireplace starts to work the POWER button on the keyboard with blue color other keys with white color the LED lights on the front and back start to light up the display window shows the room temperature turn off operation click the POWER button on keyboard or on remote control with a short buzzer sound the LED light will be turned off the electric fireplace will b...

Page 39: ... time you press the button will have a short buzzer sound if you want to turn off the electric fireplace heating function you also can operate on the keypad or remote control setting temperature DOWN button Make the setting temperature is lower than the room temperature then you can shut off the electric fireplace heating function When the heating is turned off the fan which inside the electric fi...

Page 40: ...nue to decrease until the minimum Note that this long press function is not available on the remote control When on temperature setting the temperature display window is in a flickering state After 10S no operate the set temperature button then the display window will be turned back to the room temperature display and in a constantly bright state DIMMER FUNCTION The flame brightness is on the brig...

Page 41: ...r to the hour the setting range of hours is 00 23 Minute setting press the key once add 1 minute to the minute the setting range of minutes is 00 59 Week of Day Setting Press the button every time the icon of Week will move from left to right in turn and light up Weekly timer setting function The electric fireplace has the programming function of weekly timer on off time setting Edit weekly timer ...

Page 42: ...emperature Limiting Control This heater is equipped with a Temperature Limiting Control Should the heater reach an unsafe temperature the heater will automatically turn OFF To reset 1 Turn the ON OFF switch on the CONTROL PANEL to OFF Wait 5 minutes 2 Unplug the power cord from the outlet 3 Inspect the fireplace to make sure no vents are blocked or clogged with dust or lint If they are use a vacuu...

Page 43: ...remove the old battery 3 Insert a CR2025 battery checking that the and terminals of the battery matches the inside of the battery compartment 4 Replace the battery compartment door DO NOT mix old and new batteries DO NOT use rechargeable silver oxide cell batteries with remote control unit DO NOT mix alkaline standard Carbon Zinc or rechargeable Nickel Cadmium batteries DO NOT dispose of batteries...

Page 44: ...e can be removed by dusting lightly with a clean dry cloth To remove fingerprints or other marks the clear door can be cleaned with a damp cloth The clear door should be completely dried with a lint free cloth to prevent water spots CAUTION Do not use abrasive cleaners on glass surface or spray liquids directly onto any surface FIREPLACE SURFACE CLEANING Use a cloth dampened with warm water only t...

Page 45: ......

Page 46: ...as Moreras 1 Naves 7 10 Pol Ind Camporrosso Sur 28350 Madrid Oficina Tel 34 911 34 50 46 Email info kovyx com Servicio Post Venta Tel 34 918 09 62 29 Email spv kovyx com Av de Andalucía 208 28341 Valdemoro Madrid www kovyx com ...

Reviews: