background image

6

INSTALLATION

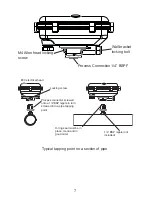
The E30 consists of two separate parts, the process connection and the electrical 
housing.  The two parts are locked together by an Allen screw located under the 
electrical housing.  As supplied, the two parts are separate allowing the process 
connector to be screwed onto pipework using a suitable 1/4” BSP pipe nipple (not 
included).   The provision of a separate process connector means the E30 can be 
easily installed in awkward locations  particularly when the tapping point is located 
close to pipe bends or other obstructions.  In effect, the process connection acts 
as a union and can be screwed onto a pipe nipple and  installed in the pipework.  
The electrical housing can then be 

fi

 tted onto the process connection and locked 

in place with the Allen screw.  

To lock the two parts of the E30 together, with the electrical housing located on 
the spigot and in position, press down with the 

fl

 at of your hand on the top face of 

the lid of the electrical enclosure.  While pressing down, screw the 4mm Allen 
screw fully through the housing using the 3mm Allen Key (supplied).  Tighten the 
screw and then release your hand from the top of the housing.   Pressing down 
with your hand on the housing preloads the O-ring seal between the housing and 
the process connection.  It enables the M4 Allen screw to easily screw fully through 
the side of the housing.  Do not screw the Allen screw through the housing without 

fi

 rst preloading the O-ring in the manner described above.  To do so will result in 

the Allen screw cutting a thread through the housing and reducing the designed 
preload against the O-ring.  This in turn will compromise the seal between the two 
parts of the pressure switch.

Summary of Contents for E30

Page 1: ...KELCO E30 DIGITAL PRESSURE SWITCH INSTALLATION PROGRAMMING MANUAL KELCO Engineering Pty Ltd Sydney Australia www kelco com au Version 181017...

Page 2: ...to run for 5 seconds held on by the E30 s run on timer If pressure fails to return the pump will be shut down after the run on period Pressing and releasing the R button on the E30 will repeat this ba...

Page 3: ...e menu at any time by pressing and releasing the R button Any settings you have made up to that point will be retained There is no need to step all the way through the menu when making a change to a s...

Page 4: ...k that is subject to partial vacuum negative pressures Do not install the E30 in the suction pipework of a pump The tapping point should be in a location that is away from valves elbows and concentric...

Page 5: ...re in the larger pipe where the velocity is lower In sketch B both the pressure gauge and the E30 will read the same pressure since the velocity is constant between the two tapping points In sketch C...

Page 6: ...n place with the Allen screw To lock the two parts of the E30 together with the electrical housing located on the spigot and in position press down with the flat of your hand on the top face of the li...

Page 7: ...nnection 1 4 BSPF Locking screw O ring seal must be in place clean and in good order Process connector screwed onto a 1 4 BSP nipple in turn screwed into a pipe tapping point E30 electrical head 1 4 B...

Page 8: ...body of the process assembly that keys the electrical housing onto the process assembly and aligns it correctly To secure the electrical housing onto the process adaptor an Allen head cap screw is su...

Page 9: ...sing Using a suitable tube adaptor terminate the capillary tube at the pipe system s tapping point If water hammer or violent pressure surges are likely coil the capillary tube between its two termina...

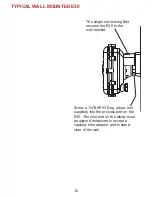
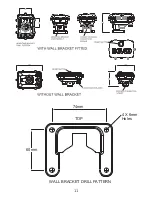
Page 10: ...E30 to the wall bracket Screw a 1 4 BSP 90 Deg elbow not supplied into the process port on the E30 The inlet port on the elbow must be aligned downward to accept a capillary tube adaptor and to stand...

Page 11: ...11 74mm 60mm 4 X 6mm Holes TOP WALL BRACKET DRILL PATTERN...

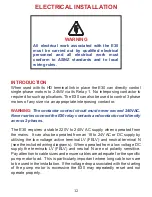
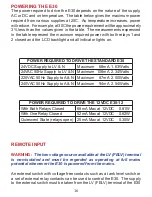
Page 12: ...C Never series connect the E30 relay contacts and contactor coil directly across 2 phases The E30 requires a stable 220V to 240V AC supply when operated from the mains It can also be operated from an...

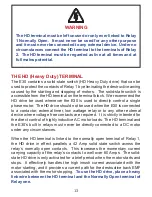
Page 13: ...D terminal is linked to the normally open terminal of Relay 1 the HD drive in effect parallels a 42 Amp solid state switch across the relay s normally open contacts This increases the momentary curren...

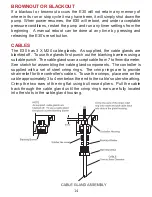
Page 14: ...he cable glands are blanked off To use the glands first punch out the blanking barriers using a suitable punch The cable glands can accept cable from 7 to 9mm diameter See sketch for assembling the ca...

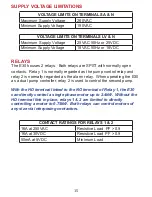
Page 15: ...relay and relay 2 is normally regarded as the alarm relay When operating the E30 as a dual pump controller relay 2 is used to control the second pump With the HD terminal linked to the NO terminal of...

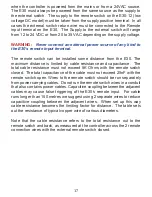
Page 16: ...ated and must be regarded as operating at full mains potential whenever the E30 is powered from the mains An external switch with voltage free contacts such as a tank level switch or a set of external...

Page 17: ...ce The total cable resistance must not exceed 5K Ohms with the remote switch closed The total capacitance of the cable must not exceed 25nF with the remote switch open Wires to the remote switch shoul...

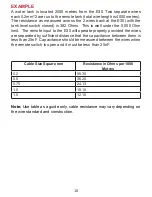
Page 18: ...oss the 2 wires back at the E30 with the tank level switch closed is 382 Ohms This is well under the 5 000 Ohm limit The remote input to the E30 will operate properly provided the wires are separated...

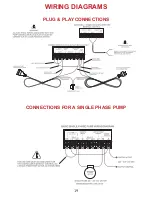
Page 19: ...19 WIRING DIAGRAMS PLUG PLAY CONNECTIONS CONNECTIONS FOR A SINGLE PHASE PUMP...

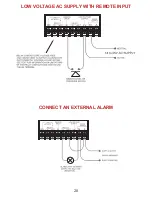
Page 20: ...20 LOW VOLTAGE AC SUPPLY WITH REMOTE INPUT CONNECT AN EXTERNAL ALARM...

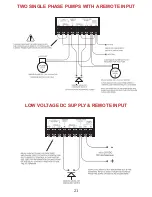
Page 21: ...21 TWO SINGLE PHASE PUMPS WITH A REMOTE INPUT LOW VOLTAGE DC SUPPLY REMOTE INPUT...

Page 22: ...ating must not exceed 240VAC BASIC 3 PHASE PUMP CONTROL 3 PHASE CONTROL WITH ALARM REMOTE INPUT SEE NOTES LINK HD C NO RELAY 1 R REMOTE INPUT LOW VOLTAGE NO C RELAY 2 LV SUPPLY MAINS SUPPLY A N PUMP A...

Page 23: ...LAY 1 R REMOTE INPUT LOW VOLTAGE NO C RELAY 2 LV SUPPLY MAINS SUPPLY A N L1 L2 L3 PUMP 1 PUMP 2 COIL COIL A1 A2 A1 A2 N CONTACTOR No 2 CONTACTOR No 1 WARNING Contactor coil rating must not exceed 240V...

Page 24: ...nd a negative terminal Supply voltage across the positive and negative terminals must never exceed 24VDC or the flow switch will be damaged The supply terminals are reverse polarity protected however...

Page 25: ...ctory in an unlocked state and can be programmed using its buttons To prevent unauthorised personnel from altering its settings the programming button P can be locked LOCKING THE E30 To activate the l...

Page 26: ...mp or pumps in a variety of ways The functions are divided into sections called modes In addition to the operating modes the E30 includes functions common to most modes and functions specific to indiv...

Page 27: ...rotect systems against over and under pressure conditions Mode 2 allows you to set a high and low pressure limit and a trip pressure The pressure guard functions as a protection device for systems tha...

Page 28: ...a second pump If you select yes to this question you are presented with the first option in a list of ways the alarm relay can be configured Use the and buttons to step through the list Press and rele...

Page 29: ...TIMER Modes 1 2 4 The E30 includes a start up timer The purpose of the start up timer is to ignore any initial lack of pressure and allow time for the system pressure to rise above your set trip pres...

Page 30: ...he pump will only restart when conditions are suitable for example in mode 1 when the system pressure is below the set cut out pressure In this situation the pump would not normally start until the pr...

Page 31: ...will remain closed at all pressures that are less than your set high pressure cut out If no pressure is present in the system the contacts of relay 1 will be closed No loss of pressure protection will...

Page 32: ...pressure Within the defined pressure zone and for a limited time the pump can be allowed to continue to run thus preventing the pump from cycling on and off on a low discharge flow WARNING Never apply...

Page 33: ...te a shut down pressure band rather than a single shut down point The pump can continue to operate on a low draw off while in this band for a set period of time using the high pressure run on timer AN...

Page 34: ...nd the pump would be shut down In a conventional pressure system the anti cycling function can be used to protect the pump from damage in the event of the system s air cell losing its air charge If ai...

Page 35: ...your low pressure trip point the E30 will run its run on timer and if pressure fails to rise above the low pressure trip point by the end of the run on the E30 will shut the system down and display a...

Page 36: ...ve If you choose normally open the contacts of the relay will remain open until the system pressure reaches the set snap pressure at which point the contacts will change state and close NORMALLY CLOSE...

Page 37: ...ng a countdown of the pump alternations The count starts at whatever number was entered for alternations and reduces by one each time the pump stops When the count reaches zero the second pump starts...

Page 38: ...with pump one Pump one will be the pump controlled by relay 1 in the E30 The pressures you set will depend on the application Generally pump one should be considered the main pump In a line boosting o...

Page 39: ...lect yes to confirm all your previous settings or use the buttons to select no to return to the top of the menu If you accept yes and press P you are then asked to press R to start the pump The F60 wi...

Page 40: ...nty statement can be downloaded from http www kelco com au menu information warranty statement If a warranty issue arises with this product contact your supplier or Kelco Engineering Pty Ltd You will...

Page 41: ...Head Office and Factory 9 9 Powells Road Brookvale 2100 Australia Postal Address PO Box 7485 Warringah Mall NSW 2100 Phone 61 2 99056425 Fax 61 2 99056420 Email sales kelco com au Web www kelco com au...

Reviews: