background image

©2014 4Front Engineered Solutions, Inc.

14  

6004752K — aFX-C Dock Leveler — Safe

T

Frame

®


March 2014

probLeM

possibLe CaUse

soLUTion

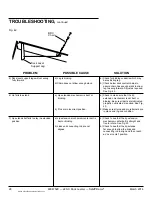
1) Leveler will not fit properly in pit.

a) Pit is out of square with the sides.

b) One side and rear angle is out of 

square.

c) Pit floor irregular in rear.

d) Pit is too deep.

a1) Align the sides parallel and equally 

spaced with the rear frame angle 

touching the rear curb angle in one 

place. Fill the gap between the rear 

curb angle and rear frame angle using 

shims in weld noted in Fig. 10. See 

Fig 20.

b)   Align the leveler with the two square 

edges. The gap on the sides should 

be even in the most narrow section 

(1/2" Max. per side). See Fig. 21.

c)   If large deformations exist in the 

concrete work, attempt to flatten 

out the rough surface using a chisel 

or grinder to take out the large 

obstructions. The rear leveling legs 

can be installed on out of plane 

surfaces up to 1/8" at each leg. See 

Fig. 22.

d)   Weld 4" x 4" shims to the bottom of 

the adjustable legs as shown in Fig 4.

insTaLLaTion, 

continued

insTaLLaTion TroUbLesHooTing

The following procedures apply after the leveler is level in 

the pit.

Shim and weld flush

Equal

gap

1/2" max.

Fig. 21

1/8" MAX

Allowable Step

No Greater than

1" x 3" in size

6"

Contact

Zone

Fig. 22

Fig. 20

Summary of Contents for aFX-C

Page 1: ...u have read and understand the Safety Practices Warnings Installation and Operating Instructions contained in this User s Manual Failure to do so could result in death or serious injury This User s Ma...

Page 2: ...icates an imminently hazardous situation which if not avoided will result in death or serious injury Indicates a potentially hazardous situation which if not avoided could result in death or serious i...

Page 3: ...restraining device and set brakes before loading or unloading Visually check that lip is supported by the vehicle platform or the ramp is supported by both dock level supports before driving on the r...

Page 4: ...that are structurally damaged or have experienced a sudden loss of support while under load such as might occur when a transport vehicle is pulled out from under the dock leveling device shall be remo...

Page 5: ...4 20 2 23 0 25 9 0 5 1 6 3 6 5 7 7 8 9 9 12 0 14 1 16 2 18 3 20 4 22 5 0 4 1 2 2 9 4 6 6 3 7 9 12 1 13 8 15 5 17 1 18 8 20 5 Optional 7 lip bend 16 lip VEHICLE PLATFORM POSITION from DOCK in RAMP and...

Page 6: ...at the rear of the leveler are in place and undamaged prepare site Place barricades around pit on dock floor and drive while installing maintaining or repairing dock leveler 1 The control station Use...

Page 7: ...s are in good condition and have a rated capacity of at least 3 500 lbs for the lifting angle used Never allow anyone to stand on or near the dock leveler when it is lifted or placed into the pit Stan...

Page 8: ...it floor Repeat on each leg until the transition angle is flush with the rear curb angle See Fig 8 The rear edge of the dock leveler should be level or slightly 1 16 maximum below dock level The top s...

Page 9: ...impact tool turn each leveling screw counter clockwise until the top of the leveler is flush with the finished floor pit curb steel where the overhead door meets the floor See Fig 11 finish welding re...

Page 10: ...NOTE The following procedure requires two persons to lockout and secure the leveler for maintenance 12 Return power to the leveler control Using the aFX push button control or mechanical support rais...

Page 11: ...ly lower lip onto lip lock See instruction label on dock leveler beam near lip lock 14 Disconnect power 15 Finish welding both of the adjusted front dock leveler supports in all locations shown in Fig...

Page 12: ...re storing the maintenance strut Stand clear of the ramp and lip when air pressure or the mechanical lift is applied or removed The ramp and lip are free to move downward when the support is removed R...

Page 13: ...or serious injury It is sometimes necessary to install lip deflector plates to avoid any chance of the pendant lip supporting the weight of the dock leveler either near dock level or during a below do...

Page 14: ...20 b Align the leveler with the two square edges The gap on the sides should be even in the most narrow section 1 2 Max per side See Fig 21 c If large deformations exist in the concrete work attempt t...

Page 15: ...ts to be connected to the 120 volt motor circuit Damage to motor push button air bag and serious personal injury or death may result Optional Blue Contact Block Normally Closed Field Installed Low Vol...

Page 16: ...el stored position before allowing the vehicle to leave the dock If the vehicle pulls away from the dock before the dock leveler is stored the lip will fall to its pendant position and the ramp will d...

Page 17: ...Fig 24 NOTE If the vehicle is to be serviced for a below dock end load see operation instructions for Below Dock Control on page 19 5 To extend the dock leveler lip into the vehicle 5 1 Push and hold...

Page 18: ...om the trailer s air ride suspension before deploying the dock leveler 5 4 Proceed with loading or unloading 6 To return the dock leveler to the stored position when loading or unloading is complete o...

Page 19: ...tion 5 1 Push and hold the control button until the ramp raises above dock level 5 2 Release the control button before the ramp reaches its highest position The ramp will lower to its stored position...

Page 20: ...x2 6008485 x2 6001952 921 070 x2 921 074 Danger and operation placard mounted on wall near leveler 6015283 Fig 29 Every 90 days quarterly inspect all safety labels and tags to ensure they are on the d...

Page 21: ...visually inspect all welds under the leveler for fatigue or failure Particularly the lip plate hinge and top plate beams and front hinge lugs Every 90 days visually inspect dock bumpers Four inches 4...

Page 22: ...Torque Torque Noted Cleaning Location Frequency Rear Hinge Pins Air Bag Bolts 29 31 Ft Lbs Pit 90 Days Gas Spring Pins Leg Pivot Pins Cam Lip Rods Swing Link Pins Connecting Rod Pins NOTE Use only lu...

Page 23: ...hold the raise button until dock leveler reaches its highest position and hold dock leveler in its highest position b The second person positions the maintenance strut into the bracket located on the...

Page 24: ...See page 23 for instructions 1 2 Position pan lifting tool part number 908 773 in pit and hook tool on pan axle in the center of the pit See Fig 32 1 3 Using both hands pull down on handle This will r...

Page 25: ...s 19 from front edge as shown in Fig 36 1 3 Lower front of bag pan assembly by raising pan lifting tool as shown in Fig 37 Pan rollers will be supported on frame side angles 1 4 Push down on front of...

Page 26: ...to push button c Push button is broken d Fan plug loose or unplugged in receptacle e Loose wires in control panel or junction box f Fan assembly damaged broken a Replace fuse or reset breaker b Check...

Page 27: ...correct position See Fig 41 and both pins are in good condition 4 Dock level support legs will not retract for below dock operation a Check connection of dock level control chain to the dock level sup...

Page 28: ...is not bent or binding Be sure all parts are lubricated properly Lubricate as required See Fig 40 b Make sure all pins and pin retrainers are in place and in good condition 7 Lip extends but fails to...

Page 29: ...re proper function durability and safety of the product only replacement parts that do not interfere with the safe normal operation of the product must be used Incorporation of replacement parts or mo...

Page 30: ...Frame March 2014 parts list DOCK LEVELER Ramp Lip Toe Guards and Lip Lock Assemblies Fig 45 2 3 19 17 16 16 19 6 5 4 18 Note Rivets Item 40 Attach Bag Shield Item 39 To Brackets Welded On Bottom Of Ra...

Page 31: ...T WIDE 40K 45K and 50K CAPACITY 16 x 6 w 4 BEND 711 864 16 x 6 w 7 BEND 711 863 18 x 6 w 4 BEND 711 866 18 x 6 w 7 BEND 711 865 20 x 6 w 4 BEND 711 868 20 x 6 w 7 BEND 711 867 LIP 6 1 2 WIDE 40K 45K a...

Page 32: ...138 837 16 2 Label Warning 6008485 17 1 Label Lip Lock 6015283 18 1 Bag Shield 6 Lg Dock Leveler All Capacity 155 295 8 Lg Dock Leveler 30k 45k Capacity 155 295 8 Lg Dock Leveler 50k Capacity 155 400...

Page 33: ...uctions 6001952 2 1 MAINTENANCE STRUT ASSEMBLY 6 LG DECK IN 20 PIT 710 042 6 LG DECK IN 24 PIT 6013620 8 LG DECK IN 20 PIT 708 883 8 LG DECK IN 24 PIT 6013621 10 LG DECK IN 24 PIT 712 537 3 4 Pin Hing...

Page 34: ...6004752K afx c Dock Leveler SafeTFrame March 2014 parts list Optional Subframe Riser Kit and Cap Plug 1 2 4x 4x 2x 2x 6x 6x 6x Item Quantity Description Part Number 1 1 Riser Kit FIELD INSTALLED 60046...

Page 35: ...1 849 10 Lg Dock Leveler 712 462 3 1 Lever Lip Lifter 6 Lg Dock Leveler 711 998 8 And 10 Lg Dock Leveler 711 999 4 1 Lever Lip Assist 155 811 5 3 Pin Clevis 1 2 Dia X 1 3 4 035 010 6 1 Pin Clevis 3 8...

Page 36: ...lamp Bar 157 747 4 2 Pan Outer 156 352 5 1 Pan Inner 156 350 6 9 Nut Nylok 3 8 16 000 253 7 4 Wheel 711 846 8 1 Axle Front 712 745 9 1 Axle Rear 712 812 10 2 Pin Cotter Hair 035 200 11 9 Bolt Hex Hd 3...

Page 37: ...3 4 131 483 20 1 Nipple 155 578 A R Patch Kit Bag Not Shown 184 379 8 LG DOCK LEVELERS 30K 35K 40K and 45K CAPACITY ITEM QTY PART DESCRIPTION Part Number 1 BAG PAN FAN Assembly Includes items 1 20 712...

Page 38: ...4 For use with interlock applications on STAR 4 and AUTO CHOCK vehicle restraints Item Quantity Description Parts List 1 1 Motor Air 2 Stage 120V 6008185 2 1 Filter Housing 712 748 3 1 Filter Fan 712...

Page 39: ...p 77 1 2 2 2 2 6008177 Aluminum strip 101 1 2 2 2 2 6008179 5 6 Lower seal 2 2 2 6008168 8 Lower seal 2 2 2 6008170 10 Lower seal 2 2 2 6008172 6 Aluminum strip 6 upper 2 2 2 6008174 Aluminum strip 8...

Page 40: ...2014 4Front Engineered Solutions Inc 40 6004752K afx c Dock Leveler SafeTFrame March 2014 Notes...

Page 41: ...2014 4Front Engineered Solutions Inc March 2014 6004752K afx c Dock Leveler SafeTFrame 41 Notes...

Page 42: ...2014 4Front Engineered Solutions Inc 42 6004752K afx c Dock Leveler SafeTFrame March 2014 Notes...

Page 43: ...deficient portion s thereof without charge to the owner or 2 Alter or repair the DOCK LEVELER on site or elsewhere without charge to the owner This Limited Warranty does not cover any failure caused b...

Page 44: ...local distributor or to 4Front Engineered Solutions Inc Corporate Head Office 1612 Hutton Dr Suite 140 Carrollton TX 75006 Tel 972 466 0707 Fax 972 323 2661 Part No 6004752K 2014 4Front Engineered So...

Reviews: