background image

8

Table of contents 

8

SPREADING INSTRUCTION

If speed settings are not available, use the following procedure to calculate the setting.

• 

Determine how much material should be spread per 100m ²

• 

Measure a distance of 15 meters and mark, preferably on a paved surface such as a park-

ing space.

• 

Weigh enough of the material to be spread, fill the container at least half full. Note: Record 

the weight for future use.

• 

When the unit is mounted on the vehicle and the container is filled (at least half full) with 

material to be spread; position the vehicle far enough before the start of the test area so 

that the vehicle reaches the desired speed before reaching the starting line.

• 

Set the stop in the measurement scale to a position you feel would be a suitable setting.

• 

Start the vehicle, drive forward and when you pass the starting line move the lever to 

the open position. Important! Be aware of what is happening around you while driving.

• 

Continue driving until you reach the finish line, move the lever to the closed position.

• 

Stop the vehicle and note the width of the spread you just finished.

• 

Return to the starting point and empty the remaining material from the container and 

weigh again.

• 

Adjust the stop on the measuring scale depending on whether you want more or less 

spread.

AFTER USE

Rinse the machine with water and let it dry completely before storing it.

TRANSPORT AND STORING

Make sure that the area is free from persons, children and objects before transporting the prod-

uct. Always be extra cautious during transport. Ensure that the product is well anchored and 

the existing transport locking device is mounted (if there is any). Always place the load as low 

as possible. All cargo that sticks out should be firmly securely anchored. Respect the danger 

zones even during transport. When lifting, no one is allowed to stand underneath any suspend-

ed load. Trailer used for transport should have functioning brakes. When traveling on a public 

road, the SMV sign must be affixed.  Always keep the product in a dry place, preferably under 

cover when not in use. Make sure that equipment is stationary and does not run the risk of 

overturning. Never allow children to play at the storage area. Keep in mind the risk of tipping!

MAINTENANCE AND SERVICE

Ensure that the unit is stable and cannot tip over during maintenance and service. Replace 

damaged or worn parts immediately to reduce the risk of abrasion. Always perform mainte-

nance, service and inspection, as recommended. Use only original replacement parts or spare 

parts with equivalent performance to reduce the risk of damage.


ERROR

CAUSE

MEASURE

No materilas comes out of the 
spreader or the spreading is 
uneven

Packed fertilizer inside the container or 
stuced in the spreading plate or blades 
The opening is not completely open. 

Check the material inside the container, clean 
and take away stucked material.
Warning! Risk of injuries!  Never touch rotating 
part

RECYCLING

When disposing the product, this must be disassembled and

transported to the intended location of the municipality.

Contact your municipality for further information.

Summary of Contents for 33-JM40

Page 1: ...Read this manual carefully before using the product Translated from the original 33 JM40 SALT AND FERTILISER SPREADER ATV ...

Page 2: ... Surroundings 5 Warning labels 5 Personal protection 6 Steps before use 6 Use 7 Setting your spreader 7 Transport and storing 8 Maintenance and service 8 Recycling 8 Spreading instruction 8 After use 8 Assembly instruction 9 Installation of the spreader 9 Exploded drawing 10 Parts description 11 Warranty and condition terms 12 2 2 ...

Page 3: ...xible universal spreader with many applications Can be used all year round for spreading fertilizer salt and sand etc The machine is delivered with 12v electric motor rain cover and attachment for the ATV s package holder Note some ATVs the package carrier must be adapted for the machine TECHNICAL DATA 33 JM40 L x W x H 570 x 420 x 350 mm Weight 5 5 kg Maximum load 40 kg Power 12v electric motor S...

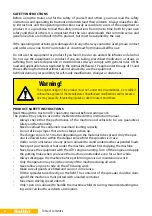
Page 4: ... approval of the manufacturer Unauthorised modifications and or accesso ries may cause life threatening injuries or death to users and others PRODUCT SAFETY INSTRUCTIONS Read through the tractor ATV s operating manual before starting work The product may only be use in the matter decribed in this instruction manual Always check that the performance of the machine and vehicle to be use guarantees s...

Page 5: ...lean Always respect the risk zone Warning Children in the area should be supervised Under no circumstances should young children be allowed to work with this equipment WARNING LABELS Make sure that the warning labels are always visible clean the warning labels if necessary Do not wash with high pressure washer directly on the warning label If any part of the decal is worn or label becomes frayed o...

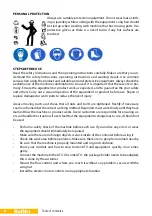
Page 6: ... risk of injury Grease moving parts and check that all nuts and bolts are tightened Rectify if necessary Learn and remember the correct working method Beginners must work slowly until they have learned how the machine or product works Users customers are responsible for ensuring us ers can handle the situation If users feel that the equipment is dangerous to use it should not be used Perform a saf...

Page 7: ...se the contents can get packed and affects and damaged the spreader plate and affect the ability to spread Be extremely careful if you spread herbicides when there is a risk if uncontrolled spread ing happens because of strong wind can lead to damaging the vegetation outside the area Always follow the instructions for the chemicals you use If there would be a stop in the spreader plate inside the ...

Page 8: ...jects before transporting the prod uct Always be extra cautious during transport Ensure that the product is well anchored and the existing transport locking device is mounted if there is any Always place the load as low as possible All cargo that sticks out should be firmly securely anchored Respect the danger zones even during transport When lifting no one is allowed to stand underneath any suspe...

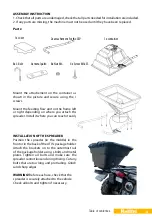
Page 9: ...they have been replaced Mount the attachement on the container as shown in the picture and secure using the 4 screws Mount the feeding flow unit on the frame left or right depending on where you attach the spreader Install it where you can reach it easily INSTALLATION OF THE SPREADER Position the spreader in the middle in the front or in the back of the ATV s package holder Attach the brackets on ...

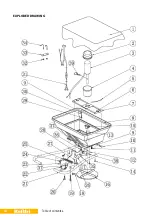
Page 10: ...10 Table of contents 10 EXPLODED DRAWING ...

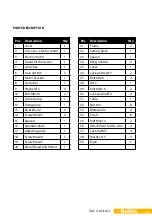
Page 11: ...2 4 14 Screw M5x35 4 15 Spacers 1 16 Spreader plate 1 17 Adjusting plate 1 18 Screw M4x20 1 19 Screw M6x45 1 20 Round head bolt M6x25 1 Pos Description Qty 21 Frame 2 22 Setting plate 1 23 Spacers 1 24 Wing nut M6 2 25 Lever 1 26 Lock washer Ø5 2 27 Bolt M5x6 2 28 Wire 1 29 Bolt M6x16 2 30 Lock washer Ø6 2 31 Cable 1 32 Nut M6 8 33 Metal plate 4 34 J bolt 8 35 Bolt M5x12 2 36 Attachment for the wi...

Page 12: ...h as hoses seals oils and mechanical belts CUSTOMER SERVICE You are always welcome to give your feedbacks reviews or ask us about our equipment and products Kellfri AB is constantly working on further developing their products and therefore reserves the right to modify among other things the design and appearance without further notice KELLFRI AB Phoneno 46 0 511 24250 Fax 46 0 511 16833 E post in...

Reviews: