background image

70

71

Changes to detector settings
(e.g. Volume, Tone and Sensitivity), 
are automatically saved. The detector 
remembers these settings when it shuts 
down. However, you may find that 
different locations require a separate 
combination of settings for maximum 
effectiveness. 

Two people may have different 
preferences (e.g. Threshold, Response) 
or perhaps you divide your time 
between a couple of very different 
detecting environments (e.g. the beach 
and a highly-mineralized battlefield). 

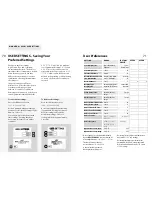
USER SETTINGS - Saving Your 
Preferred Settings

MAIN MENU > USER > USER SETTINGS

USER SETTINGS

 provides you with two 

sets of memorized settings, 

USER A

 and 

USER B

. These sets can be used as an 

alternative to the factory presets. 

USER 

SETTINGS

 allows you to load your own 

defined settings saving you from having 
to ‘set-up’ the detector every time you 
turn it on.

To load saved settings:

Press the shift button next to 

LOAD  USER A 

or

 USER B.

A screen prompt will appear asking 
if you want to discard your current 
detector settings and load the 
memorized settings. Select 

OK

.

Settings will load in approximately 
3 seconds.

Restoring Factory Presets will not delete 
any saved 

USER A 

or

 B

 settings.

Restoring factory presets discards all 
unsaved adjustments, except the saved 
Discrimination Patterns and 

USER A 

and 

USER B

 settings.

SETTING

RANGE

FACTORY 
PRESET

USER A

USER B

Sensitivity Mode

Semi-Automatic, 
Manual

Semi-

Automatic

Sensitivity Value

1 to 32

22

Threshold Volume

0 to 40

16

Discrimination Function

Discrim, Iron Mask

Discrim

Iron Mask Value

0 to 31, All Metal

22

Noise Channel*

1 to 11

5

x

x

Display Type

Smartfind, Digital

Smartfind

Display Size

Normal, Full Screen

Normal

Contrast

1 to 10

5

Learn Cursor Size

Small, Medium, 
Large

Large

Edit Frame Size

Small, Medium, 
Large

Small

Audio Volume Max Limit

0 to 10

10

Audio Volume Gain

1 to 10

8

Audio Threshold Tone 

1 to 10

5

Audio Tone Variability

1 to 10

8

Audio Tone Limits

1 to 10

10

Audio Sounds

CONST

CONDUCT

FERROUS

CONDUCT

Audio Response

NORMAL

LONG

SMOOTH

PITCH


HOLD

NORMAL

Options Recovery Fast

On, Off

Off

Options Recovery Deep

On, Off

Off

User Preferences

*  Noise Channel is selected automatically 

by the 

NOISE


CANCEL


shortcut button or 

manually through 

MAIN MENU > OPTIONS

  The Noise Channel cannot 

be saved into 

USER


A

 or 

USER


B

  Other selections not saved: 

Backlight status, Pinpoint.

To save current settings:

Press the shift button next to 

SAVE  USER A 

or

 USER B.


A screen prompt will appear asking if 
you want to save current settings in the 
memory. Select 

OK

You can now proceed to detect with 
these settings, knowing they have 
been saved for future use in similar 
conditions.

Summary of Contents for Explorer SE

Page 1: ......

Page 2: ...Quick Start Turn on the detector Press NOISE CANCEL After 30 seconds electrical interference will be reduced Go Detecting ...

Page 3: ...s sleek sturdy design innovative control panel lightweight coil and comprehensive targeting options set it apart from any other detector available today Congratulations on Purchasing Your The Explorer SE will locate valuable metal objects in a variety of ground conditions including extreme salt conditions and sea water wet beach sand and highly mineralized ground conditions This manual is designed...

Page 4: ...rns 42 SELECT Saving Discrimination Patterns 43 LEARN Creating a Discrimination Pattern with a Specific Target 44 LEARN Accepting a Target 46 LEARN Rejecting a Target 47 LEARN Saving Discrimination Patterns 48 EDIT Editing Discrimination Patterns 50 EDIT Editing Discrimination Patterns 52 EDIT Saving Discrimination Patterns 53 RECOVERY Enhancing Explorer SE Performance 54 CONTRAST Adjusting LCD Br...

Page 5: ...ll had an effect on how effective a detector transmitting a single frequency would operate Full Band Spectrum technology combines Minelab s existing multiple frequency BBS technology with a powerful new microprocessor to give greater detecting depth high sensitivity over a wide range of targets less interference from electromagnetic sources more accurate identification of target characteristics Th...

Page 6: ...2 Feed the coil cable up through the inside of the upper shaft 3 Ensuring that the camlock side of the shaft is facing the ground slide the upper shaft over the lower shaft so that the coil cable appears out the top 5 Insert the bolt through the lower shaft and the bracket on top of the coil 6 Fasten with the nut provided being careful not to damage the thread of the nut by over tightening This wi...

Page 7: ... the coil cable out from inside the lower shaft Do not attempt to remove the shaft assembly without first disconnecting the coil cable from the control box A range of accessory coils are available Accessories pg 74 Connecting the Shaft Assembly to the Handle Assembly 1 Fully unlock the control box camlock 2 Align and push the coil cable connector into the socket underneath the control box firmly t...

Page 8: ... One is a sealed rechargeable Nickel Metal Hydride NiMH battery pack It comes with a charger which plugs into a conventional wall socket The NiMH battery pack is supplied in the discharged condition and needs to be charged before operating the detector The other battery pack is a housing for 8 AA batteries It is normal for the tip of the rechargeable battery to get warm while charging because the ...

Page 9: ... lock the armrest into position Adjusting the Armrest Strap 1 Loosen strap by tilting the edge of the buckle out to release it from the armrest 2 Undo the Velcro and pull the buckle outwards towards yourself Clip the buckle back into place and tighten the strap to secure Adjusting the Detector for Comfortable Detecting Adjusting the Length of the Shafts The correct length of shaft should allow you...

Page 10: ...on next to an icon on the display will select this option BATTERY LIFE Indicates the battery charge available pg 72 BACK Retraces your steps back through the displays This is useful to alter the last adjusted setting The BACK button will retrace the last 3 steps pg 38 PINPOINT Turns Pinpoint on off pg 66 A black and flashing bar on the LCD above ON indicates Pinpoint is on A black bar on the LCD a...

Page 11: ...ng the Smartfind Detect Screen Decrease Sensitivity Arrow Depth Indicator pg 23 Smartfind Discrimination Pattern pg 28 Battery Life pg 72 Threshold Bar pg 24 Increase Threshold Arrow Iron Mask On Off Indicator pg 35 Pinpoint On Off Indicator pg 66 Sensitivity Value Semi Automatic Sensitivity Mode Indicator Decrease Threshold Arrow When you first turn on the Explorer SE the Smartfind display will a...

Page 12: ...l perform at its best when the coil is kept close and parallel to the ground at all times This will increase detection depth and response to small objects Avoid excessive brushing of the coil on the ground as this may result in false signals and inaccurate Target ID s Practise sweeping the coil over the ground in a side to side motion while walking forward slowly at the end of each sweep Slightly ...

Page 13: ...he surrounding environment You can overcome these false signals by performing a Noise Cancel or by reducing the Sensitivity of the detector Noise Cancel pg 56 Sensitivity pg 22 Sweep the coil across the objects one at a time and observe the LCD and the sounds of the detector as it detects each object A Simple Detecting Exercise The Target Response is the sound given by the detector when a target i...

Page 14: ...represents 300mm 12 inches from the coil The bar will be clear if the target is deeper than 12 inches or its depth cannot be accurately gauged Try to think of the clear area of the depth indicator as the amount of soil you will you have to dig to recover the target The depth indicator is also updated for rejected targets Depth To adjust Sensitivity Press the top left shift button to increase Sensi...

Page 15: ...e response to most target signals Since everyone s hearing is different so Minelab suggests that you set a level of Threshold that is a very low but still audible level for hearing Threshold also helps you distinguish the difference between accepted and rejected targets When a rejected target is detected the Threshold sound blanks becomes silent to indicate that a rejected target is underneath the...

Page 16: ...er and other screen elements The detection results information will be cleared as you switch between Normal to Full Screen until a new detection is made To switch between Normal and Full Screen Press the shift button next to the full screen icon at the right of the control panel These bars line up with the text on the control panel indicating whether Iron Mask and Pinpoint are on or off ...

Page 17: ...tfind graphically represents both of these target properties on the same display High conductivity targets e g large silver coins copper items will cause the Target Crosshair to appear at the top of the Smartfind screen Low conductivity targets e g small alloy coins foil 9ct and fine jewelry will cause the Target Crosshair to appear at the bottom of the Smartfind screen The size of objects will ha...

Page 18: ...Mask are still active and targets outside the accepted area will not produce a signal or indicate FER and COND numbers on the display The conductivity and ferrous information of the target will clear as you switch between Smartfind and Digital until a new detection is made The last used display will appear the next time you turn on the detector Any adjustments to Discrimination Patterns that are m...

Page 19: ...s and a target response will sound When a rejected target is detected not matching the conductive and ferrous characteristics of coins the Threshold will blank and the Target Crosshair will remain in the position of the last accepted target Explorer SE offers a range of Discrimination Patterns which may be used on their own or in combination Select pg 40 The default Discrimination Pattern represen...

Page 20: ... Discrimination Pattern similar to the Smartfind and a slider control to adjust the level of ferrous discrimination The level of ferrous discrimination can be adjusted using the shift buttons next to the slider control To accept more high ferrous objects e g war relics Reduce the level of ferrous rejection by pressing the bottom left shift button next to the slider control You will notice that the...

Page 21: ...M will appear in the box All Metal Accepting All Targets To save the All Metal Pattern 1 Access the SAVE DISCRIM screen MENU SAVE DISC 2 Press the shift button corresponding to the location you want to save it to e g S2 The All Metal Pattern can then be recalled from the Select List in the SELECT screen 2 To create an All Metal Pattern in the SELECT screen 1 Access the SELECT screen MENU SELECT 2 ...

Page 22: ...nsitivity and Threshold are located in the menu The menu can be accessed at any time during detecting 1 Press MENU 2 Press the shift button next to the menu option to select it pg 62 pg 58 pg 60 pg 64 pg 56 pg 54 pg 55 pg 70 pg 40 pg 44 pg 50 pg 43 48 53 ...

Page 23: ...attern Thumbnail to accept that target type By rejecting the Discrimination Pattern you are modifying the Discrimination Pattern Thumbnail to reject that target type A number of the Discrimination Patterns from the Select List can be accepted and rejected at the same time creating a custom Pattern that can be saved for future use If the SELECT screen is accessed while the Explorer SE is functionin...

Page 24: ...on Pattern Press the shift button next to the Discrimination Pattern until a cross is displayed Press the DETECT shortcut button to continue detecting in Smartfind Digital with your new Discrimination Pattern Once a new Discrimination Pattern has been created it can be saved in one of six places in the SAVE DISCRIM screen To save the new Discrimination Pattern into the SAVE DISCRIM menu Press the ...

Page 25: ...tion Pattern The black and clear areas of the screen schematically represent the current target Discrimination Pattern Accept All Reject All Allows you to switch between clearing or filling the whole Pattern in preparation for rejecting or accepting learnt targets Volume Icon This shortcut icon takes you to the VOLUME section of the AUDIO menu where you can adjust various Volume characteristics Sa...

Page 26: ...pg 48 Learn accept the target 1 Place the target on the ground 2 Press the upper left shift button next to the tick accept icon The tick icon will begin to flash indicating that the next detected target will clear an area of pixels creating a Discrimination Pattern that accepts that detected target 3 Wave the coil several times above the desired target until the detector learns it by clearing an a...

Page 27: ...iscrimination Patterns in the SELECT screen 3 Press DETECT to navigate to the EDIT screen where the Discrimination Pattern can be further edited in detail if required pg 49 or press DETECT again to return to Smartfind Digital Saved Patterns are not erased when factory preset settings are restored Be sure to save your new Discrimination Pattern otherwise all changes will be lost once the detector i...

Page 28: ...xcluded from or become part of your preferred target Pattern MAIN MENU DISCRIM EDIT Target Frame Size This allows you to select the size of the framed area you wish to accept or reject from the displayed Discrimination Pattern There is a choice of three sizes Accept or Reject Framed Area Instructs Explorer SE to accept the framed area on selection of the tick icon Selection of the cross icon will ...

Page 29: ...the framed area Press the center left shift button until a tick appears next to the button This instructs the Explorer SE to clear the framed area EDIT Editing Discrimination Patterns To save the edited Discrimination Pattern 1 Press the MENU shortcut button and select SAVE DISC from the menu 2 Press the shift button next to the location you want to save it to e g S2 The edited Discrimination Patt...

Page 30: ...he shift buttons next to the arrows of the slider control to adjust the contrast of the LCD Press DETECT to return to Smartfind and continue detecting CONTRAST In the DEEP setting there will be a slightly slower reaction in target signal and target ID due to the more detailed processing of the target characteristics To select a RECOVERY setting 1 Press the shift button next to the desired RECOVERY...

Page 31: ...fter an automatic Noise Cancel access the NOISE CANCEL screen and check the channel displayed It is best to select a channel with the coil in the detection position 30cm away from the ground and as still as possible This gives the detector the best chance of hearing all surrounding interference not from the ground or targets and selecting the quietest channel If you perform an Auto Noise Cancel wh...

Page 32: ...e Target Response Max Limit Threshold Threshold Max Limit When Volume and Threshold settings are used together there is a greater control over target audio response MAIN MENU AUDIO VOLUME Range 0 to 10 Factory Preset 10 GAIN This controls the amplification of target audio responses in respect to the strength of the original signal With a setting of 1 the target signal will be unamplified Weak targ...

Page 33: ...tone signals Minelab recommends setting the upper limit to the highest tone you are comfortable with Try testing LIMITS with a highly conductive object such as a large silver coin Range 1 to 10 Factory Preset 5 Range 1 to 10 Factory Preset 8 Range 1 to 10 Factory Preset 10 To adjust TONE settings Ensure that CONDUCT is selected from the SOUNDS screen pg 64 and that the Threshold Volume and the Vol...

Page 34: ...ts in areas littered with objects producing a target response LONG Offers an almost continuous audio response This setting is ideal for responding to several targets close together It is recommended for the experienced user who can pick the differences in tone between various targets LONG can be more confusing for the beginner but has the potential to offer greater accuracy and depth LONG audio la...

Page 35: ...ch as gold copper and silver coins will give a high tone signal response Compared to lower conductive junk targets such as foil and pull tabs FERROUS Selecting FERROUS emits the tone according to the target s ferrous content the horizontal axis of the Smartfind screen or the first number in the Digital display A low blaat tone denotes a highly ferrous object displayed on the left of the screen and...

Page 36: ...s target will produce a loud high tone sound this target will produce a quiet low tone sound Volume coil 66 1 Once the approximate target location is known move the coil away from that area and press PINPOINT 2 Sweep the coil slowly over the target location 3 Taking note of the response reduce the span of each successive pass of the coil until you are confident of the location of the target Make a...

Page 37: ... searching on private property be sure to check local regulations and always refill your holes If you leave the ground exactly as you found it you shouldn t have any problem detecting the same area in the future A trowel knife or small spade are good tools for recovering targets Once a target has been located clear the surface of loose material and check again for a signal If there is no signal th...

Page 38: ...saved adjustments except the saved Discrimination Patterns and USER A and USER B settings SETTING RANGE FACTORY PRESET USER A USER B Sensitivity Mode Semi Automatic Manual Semi Automatic Sensitivity Value 1 to 32 22 Threshold Volume 0 to 40 16 Discrimination Function Discrim Iron Mask Discrim Iron Mask Value 0 to 31 All Metal 22 Noise Channel 1 to 11 5 x x Display Type Smartfind Digital Smartfind ...

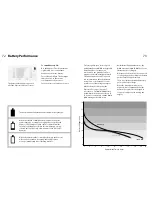
Page 39: ...depleted it is recommended that the batteries be replaced or recharged as soon as possible to avoid missing any targets The battery will be fully shaded at maximum battery charge When the alkaline or NiMH batteries approach the point at which they do not supply enough power to operate the Explorer SE a falling extended chord is emitted from the speaker or headphones When this low battery warning i...

Page 40: ...ck AA Housing Battery Pack Mains Charger 12V Car Charger Koss UR 30 Headphones RPG Headphones Carbon Fibre Lower Shaft Tall Man Lower Shaft Armrest Armrest Strap with Buckles Coil Nut Bolt pk of 5 Coil washers pk of 10 Control Box Cover Detector Carry Bag Instruction Manual Minelab Cap Minelab Polo Shirt Minelab Sleeveless Body Warmer Minelab Trash Bag Technical Specifications Length Unextended 43...

Page 41: ... or short circuit the battery pack Take precautions when transporting or storing the detector Although the detector is constructed from the highest quality materials and has undergone rigorous durability tests the display screen could be prone to scratching or serious damage if not treated with due care Troubleshooting Detector does not start at all Check the state of the batteries and battery con...

Page 42: ... iron A ferrous object is one that is predominantly or completely iron Ferrous objects e g nails are usually not desired by the detectorist Ferrous Content While metals are commonly divided between ferrous and non ferrous metals this usually refers to them being magnetic or non magnetic However most metals do have some ferrous content even when classed as non ferrous Except for the very purest of ...

Page 43: ...he three buttons at either side of the display screen They allow selection of adjacent menu items movement of screen slider controls and adjustment of settings Shortcut Buttons on the control panel offer quick access to the functions and settings most likely to be used during detector operation NOISE CANCEL IRON MASK PINPOINT and DETECT are all shortcut buttons Slider Control Visual representation...

Page 44: ...in an environmentally safe manner Disposal of unwanted electronic equipment in landfilled waste may contribute to adverse long term environmental effect due to the leaching of contaminating and toxic substances contained within some electronic equipment Working for a Cleaner Greener Future Disclaimer The Minelab metal detector discussed in this operating manual has been expressly designed and manufa...

Reviews: