background image

CAN SKIRT INSTALLATION INFORMATION

ACCESSORIES

69

11. Place product spacer  E  into the cabinet at center of

tank. Eight-hole and 12-hole assemblies have one
spacer bar; 16-hole has 2 spacer bars.

12. Can skirt is now installed.

Dipping Cabinet 1298.02  2/3/03  1:15 PM  Page 71

Summary of Contents for R-404A

Page 1: ...SERVICE INSTALLATION MANUAL DIPPING CABINETS R 404A Refrigerant 51 1298 02 by National Refrigeration Products...

Page 2: ...STRAIGHT 52 1802 38 KDC87 DL16C 16HR STRAIGHT EXPORT 220V 50HZ PART MODEL DATA PLATE STYLE 52 1901 35 ECKDC27 E4HC CURVED 52 1901 36 ECKDC47 E8HC CURVED 52 1901 31 ECKDC67 ECKDC 67 CURVED 52 1901 32 E...

Page 3: ...Introduction...

Page 4: ...trapped to the inner liner of the cabinet The condenser is a bare tube mounted on a pullout machinery compartment tray for ease of servicing All electrical controls are easily accessible for repair Th...

Page 5: ...30 Compressor Installation Diagnostics 32 Cleaning Maintenance 34 Cleaning the Lid Touch up Painting 35 Lid Seal Replacement 36 Lid Gasket Replacement 37 Lid Pivot Bushing Assembly Replacement 38 Cen...

Page 6: ...rant Control Capillary Tube Defrost System Manual Rated Amps 3 0 1 7 1 7 Electrical Specs 115V 60 Hz 1 Ph 220V 50 Hz 1Ph 220V 60 Hz 1 Ph Power Cord No 16AWG NSF Listing NSF7 Canopy Construction S S To...

Page 7: ...frost System Manual Rated Amps 4 0 2 1 2 1 Electrical Specs 115V 60 Hz 1 Ph 220V 50 Hz 1 Ph 220V 60 Hz 1Ph Power Cord No 16AWG NSF Listing NSF7 Canopy Construction S S Top with Glass ends Straight or...

Page 8: ...ary Tube Defrost System Manual Rated Amps 8 0 4 1 4 1 Electrical Specs 115V 60 Hz 1 Ph 220V 50 Hz 1 Ph 220V 60 Hz 1 Ph Power Cord Yes NSF Listing NSF7 Canopy Construction S S Top with Glass ends Strai...

Page 9: ...ary Tube Defrost System Manual Rated Amps 8 0 4 1 4 1 Electrical Specs 115V 60 Hz 1 Ph 220V 50 Hz 1 Ph 220V 60 Hz 1 Ph Power Cord Yes NSF Listing NSF7 Canopy Construction S S Top with Glass ends Strai...

Page 10: ...The electrical outlet should not be controlled by a wall switch which might be turned off accidentally UNCRATING THE CABINET The cabinet should be moved as close as possible to the operating location...

Page 11: ...nto a properly grounded three prong receptacle Where a two prong wall receptacle is encountered it must be replaced with a properly grounded three prong receptacle in accordance with the National Elec...

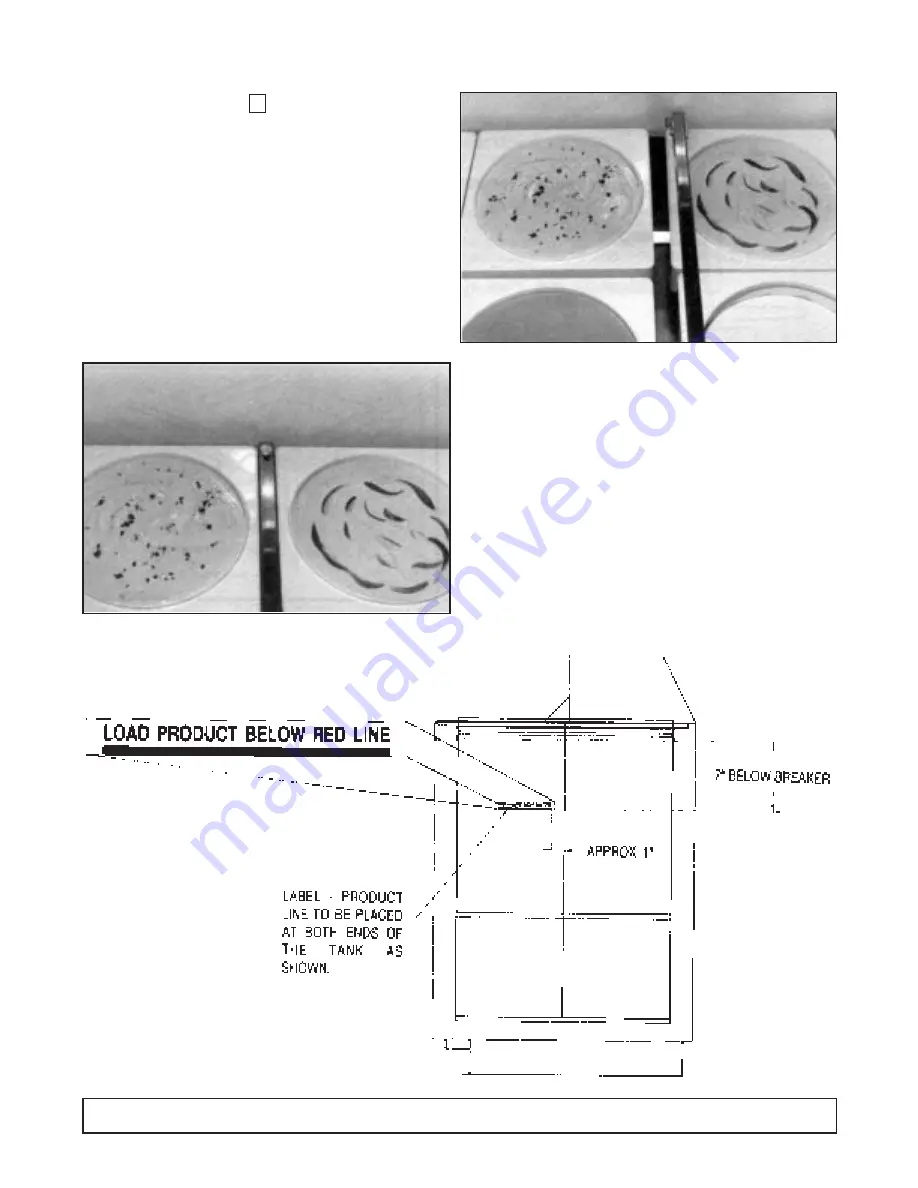
Page 12: ...PRODUCT LOAD LINE LOCATION 10 INTRODUCTION NOTE KEEP PRODUCT BELOW THIS LINE KEEP PRODUCT BELOW RED LINE 7 BELOW BREAKER...

Page 13: ...SECTION II Principles of Operation...

Page 14: ......

Page 15: ...er supply cord must be disconnected when cleaning or servicing these cabinets NOTE On initial cabinet pull down the bare tube condenser may become warm to the touch until the normal operating temperat...

Page 16: ...7845 Condenser Diameter 8 of Blades 3 Fan Blade Width of Blades 1 7 8 Power Cord A W G 14 A 15 125V Light Ballast Manufacturer G E Model 89G457 Fluorescent Manufacturer G E Lamp F20T12 CW Evaporator C...

Page 17: ...of Blades 3 Fan Blade Width of Blades 2 3 4 Power Cord A W G 14 A 15 V 125 Light Ballast Manufacturer G E Model 89G457 STD B232I120RH 3500K Fluorescent Manufacturer G E Lamp F20T12 CW STD F17T8 SP35 3...

Page 18: ...5 Blades 3 Fan Blade Width of Blades 1 29 32 Power Cord A W G 16 A 15 V 125 Light Ballast Manufacturer G E Model 89G457 STD B232I120RH 3500K Fluorescent Manufacturer G E Lamp F40T12CW STD F32T8 SP35 3...

Page 19: ...V 125 Light Ballast Manufacturer G E Model 8G3706 STD B232I120RH 3500K Fluorescent Manufacturer G E Lamp F40T12CW STD F32T8 SP35 3500K Evaporator Cold Wall Capillary Tube 7 of 042 Thermostat Manufactu...

Page 20: ...M51ECG3905 Condenser Diameter 8 of Blades 3 Fan Blade Width of Blades 1 7 8 Power Cord A W G 14 A 15 125V Light Ballast Robertson 02025 50Hz Robertson 02026 60Hz Fluorescent Manufacturer G E Lamp F20T...

Page 21: ...1ECG3905 Condenser Diameter 8 of Blades 3 Fan Blade Width of Blades 1 7 8 Power Cord A W G 14 A 15 125V Light Ballast Robertson 02026 Fluorescent Manufacturer G E Lamp F20T12 CW Evaporator Cold Wall C...

Page 22: ...705 Condenser Diameter 9 1 2 Blades 3 Fan Blade Width of Blades 1 29 32 Pressure Switch C O 350 C I 250 Power Cord A W G 16 Amp 15 Light Ballast VOSSLOH SCHWABE Model L36 291 50Hz Robertson 1 4026 60...

Page 23: ...G E 3ARR3CT3E5 Start Capacitor V 220 M F 145 174 Run Capacitor V 370 M F 10 Condenser Manufacturer Heatcraft Condenser Manufacturer G E Fan Motor Model KSM51GG3705 Condenser Diameter 9 1 2 Blades 3 F...

Page 24: ...AMP BALLAST BOARD SWITCH CONTROL POWER SUPPLY RUN CAP LAMP BALLAST CONTROL SWITCH TEMP LIGHT S PROTECTOR MOTOR FAN MOTOR S C R COMPRESSOR BLACK WHITE TERMINAL BOX 1 2 3 MOTOR PROTECTOR PTCR PTCR 4 STA...

Page 25: ...SSOR FAN MOTOR LAMP BOARD SWITCH CONTROL RUN CAP CONTROL TEMP PROTECTOR MOTOR FAN MOTOR S C R COMPRESSOR TERMINAL BOX 1 2 3 MOTOR PROTECTOR PTCR PTCR 4 START CAP START CAP 3 2 1 4 BALLAST BALLAST WHIT...

Page 26: ...5 2 1 RUN CAP START CAP LAMP BALLAST CONTROL SWITCH TEMP LIGHT S BLEED RESISTOR PROTECTOR MOTOR FAN MOTOR S C R COMPRESSOR SWITCH SUPPLY WHITE TERMINAL BOX CONTROL HIGH PRESSURE OPEN 350 20 CLOSE 250...

Page 27: ...WHITE YELLOW WHITE EXTRA WHITE BLACK RED BLACK BLUE BLACK BLACK 6 5 4 3 2 1 LAMP RUN CAP START CAP TERMINAL 115 VAC 60 Hz 10 SUPPLY LIGHT TEMP LAMP BALLAST BOARD SWITCH SWITCH CONTROL POWER SUPPLY LAM...

Page 28: ......

Page 29: ...SECTION III Maintenance Repair...

Page 30: ...WARNING To avoid the possibility of an electrical shock turn OFF thermostat and unplug the power cord of the cabinet before cleaning or touching electrical connections or parts...

Page 31: ...ter Supply Switch of cabinet is ON fuses are okay no switch in the supply is off and the cabinet is plugged in CUSTOMER COMPLAINT OR STORED PRODUCT 1 Check cleaning solutions used inside cabinet 2 Che...

Page 32: ...as in three to six hours or over a prolonged time as in three to five days 9 If the cabinet was running for a long time was the temperature recovery after entering the cabinet always within an hour or...

Page 33: ...onents have been replaced you are ready to initiate the final servicing procedures necessary to achieve proper cabinet operation Pull an evacuation to approximately 50 microns You can be sure that any...

Page 34: ...s are used The first type is connected directly to the compressor body or shell and back seats to connect gauges to the access port The second Schrader type is on the end of a process tube and require...

Page 35: ...ging leading or damaged should be replaced 5 Use a multimeter to check the run and start capacitors for shorts or open circuits With a good capacitor the indicator should first move to a reading and t...

Page 36: ...ove the can skirts 4 Defrost completely prior to cleaning 5 Wash the can skirts and the entire interior storage area with warm water and baking soda solution about a tablespoon of baking soda per quar...

Page 37: ...nd lacquer thinners since they attack the plastic part of the lid Do not use window sprays or kitchen scouring compounds TOUCH UP PAINTING INSTRUCTIONS SPRAY PAINT White 9 oz Touch up Paint Part No 26...

Page 38: ...cabinet 4 Slide the lid seal off of the top channel 5 Replace the lid seal with new correct art number Seal needs to be cut to fit the cabinet width 6 Replace the stainless steel top with the lid seal...

Page 39: ...from the cabinet 2 Set the lid on a flat protected surface 3 Rotate lid upside down 4 Slide old gasket from the aluminum lid frame 5 Install new gasket in the groove provided See end detail 6 Reinstal...

Page 40: ...proof washer flat washer pivot bushing retainer and pivot pin bushing 4 Replace assembly with the correct new part number 5 Replace the shake proof washer flat washer pivot bushing retainer and pivot...

Page 41: ...abinet Remove 2 mounting screws from the mounting bracket Replace the pivot bracket with correct new part number Reinstall lid assembly The 4 hole and 8 hole dipping cabinets have end pivot pins only...

Page 42: ...eel top off of the cabinet Set it aside FIG 1 6 For both the lamp holder and the starter socket remove the screws holding the part in place FIG 4 D Remove the tape holding the wires to the channel fra...

Page 43: ...to the cabinet push up an snap into place 8 Turn light switch back on BULB STARTER REPLACEMENT The fluorescent bulb starter is located on the lamp channel assembly One starter is necessary per bulb 1...

Page 44: ...into the machinery compartment Be very careful Do not kink the thermal bulb capillary tube 7 Reattach the thermostat screws to mounting holes 8 Replace the grill assembly 9 Reconnect the power to the...

Page 45: ...grill panel on the righthand server side of the unit 1 Disconnect the power to the cabinet 2 Remove the grill 3 Remove screws holding the switch in place 4 Detach the switch leads 5 Remove the lock n...

Page 46: ...power to the cabinet 2 Remove the grill panel 3 Remove the condensing tray hold down bolts 4 Pull the condenser tray out of the cabinet Disconnect the wire at the compressor 5 Remove the motor from t...

Page 47: ...box 1 Disconnect the power to the cabinet 2 Remove the front grill 3 Remove the electrical wiring box 4 Disconnect the leads to the ballast 5 Replace the ballast with correct part 6 Reconnect the lead...

Page 48: ...cabinet 6 Remove the capillary tube from the inside of the evaporator inlet tube 7 Connect the end of the capillary on the new heat exchanger to the evaporator inlet tube 8 Connect the suction line to...

Page 49: ...circuit overloaded either reduce load or have electrician install separate circuit If unable to remedy any other way install autotransformer Jumper across terminals of control If unit runs and connec...

Page 50: ...es around cabinet Check and make necessary adjustments Undercharge or overcharge check evacuate and recharge with proper charge Ventilate room as much as possible Check control if it allows unit to op...

Page 51: ...tector 2 Check for added fan motors and pumps connected to wrong side of protector 3 Suction pressure too high 3 Check compressor for proper application 4 Discharge pressure too high 4 Check ventilati...

Page 52: ...within 1 of lamp end Poor circuit contact likely at the lampholder Ballast improperly or incompletely connected Wrong type lamp used Wrong type of starter or defective starter causing on off blinking...

Page 53: ...rating Circuit voltage Ballast improperly or incompletely connected If open circuit is shown by continuity test or by viewing end of bulb against a pinhole of light Replace lamp Replace with lamp type...

Page 54: ...kets The Y 1 and Y 2 connections provide cathode heat and serve to connect the lamp ends together Because the leads between Y 1 and Y 2 are connected together by jumper leads they are always wired to...

Page 55: ...PARTS LISTING With Illustration Identification...

Page 56: ...CABINET PARTS EXPLODED VIEW 54 CABINET PARTS EXPLODED VIEW 2 1 3 4 7 9 8 6 10 11 5...

Page 57: ...02 1 03 1 03 1 04 1 04 1 01 1 02 1 03 1 04 5 05 1198 01 Outside Post RH EA 1 1 1 1 1 1 1 1 1 1 1 6 05 1198 02 Outside Post LH EA 1 1 1 1 1 1 1 1 1 1 1 7 10 1158 01 Pivot Bracket RH EA 1 1 1 1 1 1 1 1...

Page 58: ...CANOPY PARTS EXPLODED VIEW 56 CANOPY PARTS EXPLODED VIEW 1 2 3 4 6 7 6 6 8 15 6 9 22 10 11 12 17 14 13 18 20 21 23 24 5 19 25 16...

Page 59: ...Watt EA 1 2 1 2 19 1277 00 Lamp 34 Watt 3500K EA 2 2 19 1312 00 Lamp 17 Watt 3500K EA 2 11 26 1006 00 Tape Cush FT 2 25 4 4 5 5 5 5 7 25 7 25 2 25 4 5 5 7 25 19 0145 00 Starter FS4 EA 2 2 2 2 19 0144...

Page 60: ...CONDENSING UNIT EXPLODED VIEW 58 CONDENSING UNIT EXPLODED VIEW...

Page 61: ...late Weld As y EA 1 1 1 1 1 1 1 1 51 0709 Condenser Coil EA 1 01 1 02 1 02 1 03 1 01 1 02 18 0543 00 Condenser Coil EA 1 1 02 0274 00 Baffle RH EA 1 1 1 1 1 1 02 0275 00 Baffle RH EA 1 1 13 02 0851 00...

Page 62: ...ELECTRICAL PARTS EXPLODED VIEW 60 ELECTRICAL PARTS EXPLODED VIEW...

Page 63: ...7 00 Capacitor Start EA 1 1 17 0168 00 Capacitor Start EA 1 1 7 17 0306 00 Start Relay EA 1 1 1 1 8 43 0182 Grommet Temp Control EA 1 1 1 1 1 1 1 1 1 1 1 1 1 1 1 9 82 0141 Dial Plate Temp Control EA 1...

Page 64: ...1 6 7 2 4 3 5 LID EXPLODED VIEW 62 LID EXPLODED VIEW...

Page 65: ...1 01 1 02 1 03 1 04 3 23 0164 00 U Clip EA 6 10 10 10 4 08 0520 Lid Frame Handle EA 1 01 1 02 1 03 2 04 5 09 0219 00 Bumper Lid Front FT 1 73 3 46 2 49 3 66 6 10 1156 00 Pivot Bushing Male EA 2 2 2 2...

Page 66: ......

Page 67: ...ACCESSORIES...

Page 68: ......

Page 69: ...326 02 Gripper 09 0202 00 Can Skirt Only 10 0952 02 B Thumbscrew 22 1729 00 C Can Rack 15 0296 00 D Support Bracket Short 01 0930 00 Support Bracket Long 01 0931 00 E Thumbscrew 22 1729 00 F Product S...

Page 70: ...pper 50 3326 02 B Thumbscrew 22 1729 00 C Can Rack 15 0296 00 D Support Bracket Short 01 0930 00 Support Bracket Long 01 0931 00 E Product Spacer 05 1011 00 F Product Spacer Angle 05 1010 00 6 Clean a...

Page 71: ...INSTALLATION INFORMATION ACCESSORIES 69 11 Place product spacer E into the cabinet at center of tank Eight hole and 12 hole assemblies have one spacer bar 16 hole has 2 spacer bars 12 Can skirt is now...

Page 72: ...using 2 1 4 20 x 1 2 M S 3 Mounting plate must be under flange of stainless steel cap 4 Slide flange of dipperwell under stainless steel cap and line up hole in dipperwell to hole provided in cabinet...

Page 73: ...ADJUSTABLE LEG KIT 52 1831 01 ACCESSORIES 71...

Page 74: ...CASTER KIT 52 1830 01 72 ACCESSORIES...

Page 75: ...CESSORIES 73 1 Locate and drill a 5 16 313 dia hole 3 8 375 from the edge of the handle 2 Slip the hooked end of the lock bracket under the stainless steel top see end view above pull out to allow lid...

Page 76: ...CAN CLAMP INSTALLATION 74 ACCESSORIES...

Page 77: ...de Position 4 cans against front and rear clamp bodies 4 Drop in the center clamp section and turn cam about 90 degrees to lock in cans 5 If it is necessary to increase clamping pressure install plast...

Page 78: ...partment 2 Engage the shouldered rivets in each bottom angle in the keyhole slots of two vertical supports as illustrated note that in the deep section you have a choice of two locations For cans one...

Page 79: ......

Page 80: ...by National Refrigeration Products 563 Corbin Road Honea Path South Carolina 800 486 8369...

Reviews: