background image

Lubrication and Periodic Service

KM00321,0000A9A -19-15MAY20-1/1

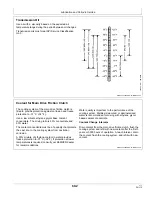
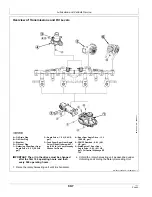
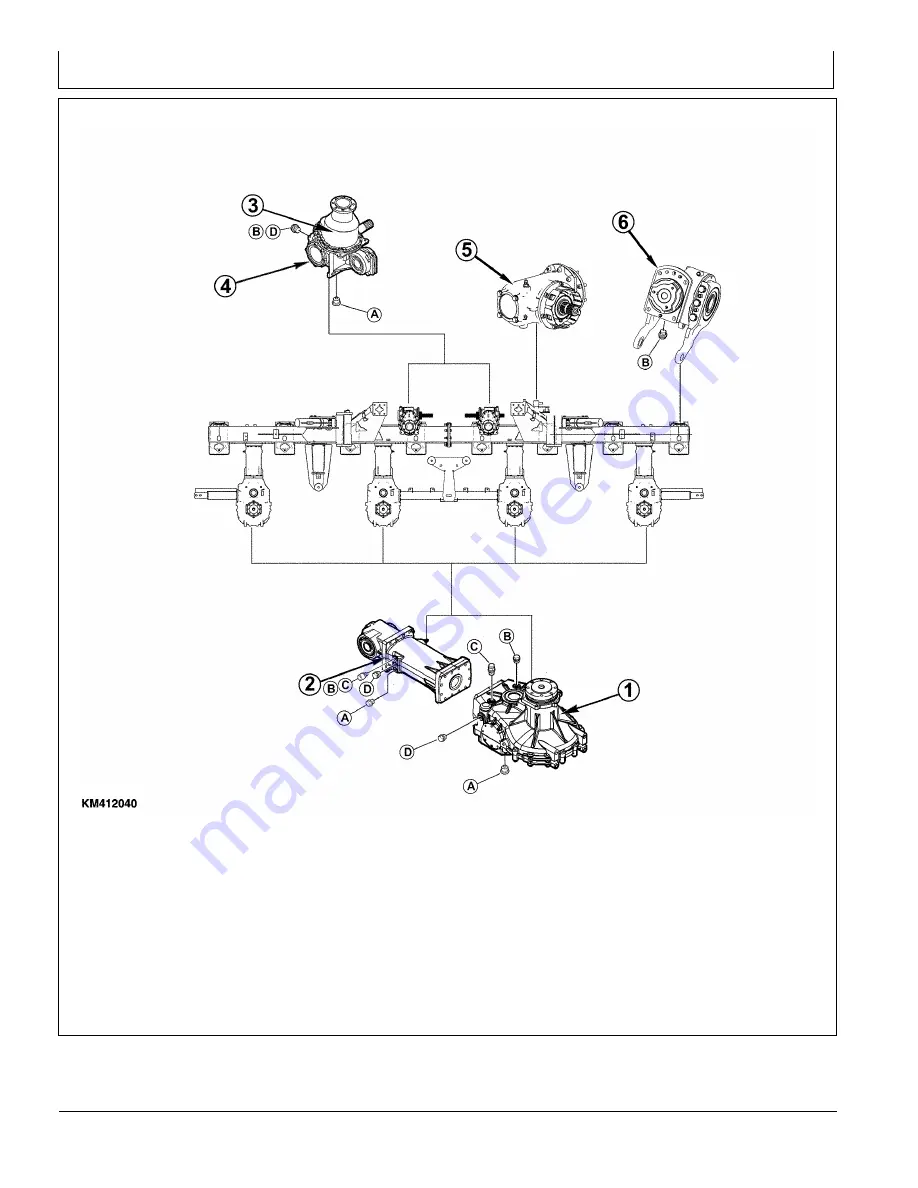
Overview of Transmissions and Oil Levels

KM412040

—UN—06MA

Y21

A—Oil Drain Plug
B—Oil Filler Plug
C—Breather
D—Oil Level Plug
1— Gathering Drum Spur Gear

Angle Drive - 8.5 L (2.25 US.
gal.)

2— Angle Drive - 1.5 L (0.4 US.

gal.)

3— Feed Drum Spur Gear Angle

Drive (Filled Lifetime with 1.1
kg (2.42 lb.) of Low-Viscosity
Grease for Gears)

4— Spur Gear Angle Drive - 1.1 L

(0.29 US. gal.)

5— FENDT Gearbox - 0.8 L (0.21

US. gal.)

6— StalkBuster™ Spur Gear

Angle Drive - 0.4 L (0.11 US.
gal.) Oil Castrol Alphasyn EP
150

IMPORTANT: The oil in the drives must be changed

after the first 100 operating hours and then
every 500 operating hours.

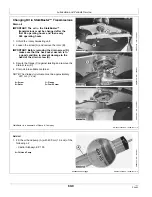
1. Raise the rotary harvesting unit until it is horizontal.

2. Unfold the rotary harvesting unit as described under

Unfolding and Folding the Rotary Harvesting Unit.

60-7

061721

PN=80

Summary of Contents for 460plus

Page 1: ...s StalkBuster Rotary Harvesting Unit OMKM128769 OPERATOR S MANUAL 460plus StalkBuster Rotary Harvesting Unit OMKM128769 ISSUE E1 ENGLISH Maschinenfabrik Kemper GmbH Co KG European Editions PRINTED IN...

Page 2: ...eds these numbers when you order parts File the identification numbers in a secure place away from machine BEFORE DELIVERING THIS MACHINE your dealer performed a predelivery inspection INTENDED USE TH...

Page 3: ...5 Input Transmission 10 6 Haulage Loading with a Crane 15 1 Secure the Rotary Harvesting Unit for Transport Lashing Points 15 3 Preparing the Rotary Harvesting Unit Unpacking 20 1 Working Under a Rais...

Page 4: ...it for AHC 50 1 Page Troubleshooting 460plus StalkBuster Rotary Harvesting Unit 55 1 Lubrication and Periodic Service Service Intervals 60 1 Grease 60 1 Low Viscosity Grease for Gears 60 1 Transmissio...

Page 5: ...s 65 11 Cleaning Rotary Harvesting Unit 65 12 Storage Storage at End of Harvesting Season 70 1 Start of New Season 70 1 Technical Specifications Machine Design Life 75 1 460plus StalkBuster Rotary Har...

Page 6: ...Contents iv 061721 PN 4...

Page 7: ...een advised that the life expectancy of this or any other machine depends on regular lubrication as described in this operator s manual Proper harvesting management practices have been discussed these...

Page 8: ...Identification View KM00321 0000A74 19 12MAY20 1 1 Identification View KM410707 UN 12MAY20 460plus StalkBuster Rotary Harvesting Unit 00 1 061721 PN 8...

Page 9: ...thorized modifications to the machine may impair the function and or safety and affect machine life If you do not understand any part of this manual and need assistance contact your KEMPER dealer TS20...

Page 10: ...child or an untrained person to operate the machine Instruct all operators not to give children a ride on the machine or an attachment Never operate machine when distracted fatigued or impaired Prope...

Page 11: ...Wear a suitable hearing protective device such as earmuffs or earplugs to protect against objectionable or uncomfortable loud noises Operating equipment safely requires the full attention of the oper...

Page 12: ...sting unit ES118704 UN 21MAR95 Keep Hands Away From Knives Never attempt to clear obstructions in front of or on harvesting unit unless main clutch is disengaged engine shut off and key removed Everyo...

Page 13: ...equipment disconnect battery ground cable before making adjustments on electrical systems or welding on machine On towed implements disconnect wiring harnesses from tractor before servicing electrical...

Page 14: ...lifted provide secure support for them If left in a raised position hydraulically supported devices can settle or leak down Do not support the machine on cinder blocks hollow tiles or props that may c...

Page 15: ...cted into the skin must be surgically removed within a few hours or gangrene may result Doctors unfamiliar with this type of injury should reference a knowledgeable medical source X9811 UN 23AUG88 Tra...

Page 16: ...tripper remove stripper with soap and water before welding Remove solvent or paint stripper containers and other flammable material from area Allow fumes to disperse at least 15 minutes before welding...

Page 17: ...everage containers Do not pour waste fluids onto the ground down a drain or into any water source Observe all national state and local laws regulations or ordinances governing the handling or disposal...

Page 18: ...k Machine Safely Before working on the machine Lower all equipment to the ground Stop the engine and remove the key Disconnect the battery ground strap Hang a DO NOT OPERATE tag in operator station TS...

Page 19: ...placement on the machine and a brief explanatory text are shown below TS231 19 07OCT88 Replace Safety Signs Replace missing or damaged safety signs Use this operator s manual for correct safety sign p...

Page 20: ...when the machine is shut down Rotating blades can catch arms legs or loose clothing as long as they are in motion and can cause serious injury KM377693 UN 26APR19 KM377694 UN 26APR19 StalkBuster Mulch...

Page 21: ...e Never reach into crushing danger area as long as the StalkBuster mulching units pivot Before carrying out adjustment repair and maintenance work release pneumatic pressure KM377696 UN 26APR19 Accumu...

Page 22: ...persons are standing within the folding area Before folding or unfolding ensure that all persons keep the required safety distance from the rotary harvesting unit KM377697 UN 26APR19 KM377698 UN 26APR...

Page 23: ...e rotating drums when in operation Always keep the required safety distance from the rotating drums Wait until all moving parts have stopped KM377701 UN 26APR19 KM377702 UN 26APR19 Foldable Frame Neve...

Page 24: ...ty Decals KM00321 000094C 19 26APR19 1 1 Input Transmission Input transmission can cause excessive heat Stay clear of hot surface Hot surface can cause serious burns KM334520 UN 16OCT17 10 6 061721 PN...

Page 25: ...from toppling over Make sure to use chains and hoisting devices that meet the weight requirements of the rotary harvesting unit see Specifications section IMPORTANT The lifting eye nuts in the gatheri...

Page 26: ...required This kit is mandatory and consists of two heavy duty lifting eye nuts A NOTE The kit is available through spare parts channel Contact your Kemper dealer 1 Remove the existing lifting eye nut...

Page 27: ...ed on next page KM00321 00006E3 19 24OCT17 1 2 Secure the Rotary Harvesting Unit for Transport Lashing Points KM334525 UN 24OCT17 Lashing Points KM334526 UN 24OCT17 Lashing Points A Tensioner Belts 15...

Page 28: ...Haulage KM00321 00006E3 19 24OCT17 2 2 Secure rotary harvesting unit with tensioner belts A on both sides as shown Secure accessories with an additional tensioner belt optional 15 4 061721 PN 28...

Page 29: ...l is removed check the unit for any damage that might have been incurred during transport Working Under a Raised Rotary Harvesting Unit CAUTION Before working under a raised rotary harvesting unit sec...

Page 30: ...ction 3 Remove the pins B on the front of the transport palette basket 4 Remove the transport pallet C using a lifting device D A Transport Straps B Pin C Transport Pallet D Lifting Device KM410703 UN...

Page 31: ...ve covers A are folded up for transport purposes 1 Remove screw B 2 Fold the outer protective cover A down in the direction of the arrow into the operating position A Protective Cover B Screw KM504745...

Page 32: ...OTE For transport reasons the scraper sheets A on the center StalkBuster mulching units are set to the highest position After the transport pallet has been removed the scraper sheets A must be adjuste...

Page 33: ...se The skid shoes A can be set in two positions see arrows Adjust the inner skid shoes CAUTION Secure the rotary harvesting unit against unintentional lowering See Working Under a Raised Rotary Harves...

Page 34: ...recommended for the forage harvester 930 980 series forage harvesters type 502 Front tire type Rear tire type 900 60 R 32 Mitas SFT 600 65 R 28 Mitas IMP 900 60 R 32 Trelleborg TM 2000 600 65 R 28 Mit...

Page 35: ...stment of the header speed is carried out via the Kemper multi speed gearbox NOTE For rotary harvesting units that are equipped for mounting a support wheel first it is necessary to delete the existin...

Page 36: ...ngs KM359967 UN 22FEB19 Rotary harvesting unit model Machine type Transmission Transport system 460plus StalkBuster with out chassis Orbis 600 3 speed transmission No transport system 460plus StalkBus...

Page 37: ...ipped for attachment of a support wheel at the factory NOTE Rotary harvesting units that have not been equipped for attachment of a support wheel at the factory have no adapter cable A 8 The adapter c...

Page 38: ...support wheel NOTE The additional wiring harness is required so that the rotary harvesting unit can be folded in the raised state The supplied wiring harness must be installed on the Claas forage harv...

Page 39: ...vester with screws B NOTE The mounting position of the socket outlet varies and depends on the model of the forage harvester A Socket Outlet B Screws KM371466 UN 08FEB19 Mounting position of the socke...

Page 40: ...connection cable B into the socket outlet and connect it to the main wiring harness C NOTE The socket outlet may be mounted on the forage harvester after the corn harvest The socket outlet does not f...

Page 41: ...nal additive plant is used The supplied wiring harness with the socket outlet A must be installed for this purpose The power supply to the wiring harness is established via the corresponding plug conn...

Page 42: ...cable binders behind the front cover and route it to behind the operator s cab A Cable KM510624 UN 11MAY21 4 Open the right side cover on the forage harvester 5 Connect the wiring harness to the 2 pi...

Page 43: ...hing hooks A protrude into brackets D of the mounting frame 2 Remove pins C on both sides 3 Lift front shield B up until latching hooks A of the rotary harvesting unit lie in brackets D 4 Secure upper...

Page 44: ...412052 UN 24JUN20 KM412053 UN 24JUN20 Connecting the Electrical Connectors to the Forage Harvester Connect the 13 pole connector A to the socket on the forage harvester Connect the hydraulic hoses B w...

Page 45: ...set screw E Tighten lock nut D Tighten screws C to specified torque Specification Screws C on Quick Coupler Torque 240 N m 177 lb ft A Attaching Claw on Rotary Harvesting Unit B Attaching Claw on Fora...

Page 46: ...harvesting unit make sure that rotary harvesting unit hydraulic functions are all released Follow the instructions below 1 Disconnect all plug connections from the forage harvester KM508704 UN 10MAY21...

Page 47: ...00BAF 19 10MAY21 4 5 KM00321 0000BAF 19 10MAY21 5 5 4 Remove pin A A Pin KM508706 UN 10MAY21 5 Lower the front shield of the forage harvester and move it out of the mounting frame of the rotary harves...

Page 48: ...ng Frame B Linear Module KM1002247 UN 23MAR12 Attach the Rotary Harvesting Unit to FENDT Forage Harvesters 1 Use tensioning lever A to open the lock A Tensioning Lever KM1002248 UN 23MAR12 2 Drive the...

Page 49: ...8 3 Raise the lifting gear until pins B engage in the lower latches A at left and right 4 Stop the engine 5 Apply the park brake A Latches B Pin KM1002305 UN 12JUN12 6 Use tensioning lever A to close...

Page 50: ...ed Pin C Protective Tube KM410711 UN 13MAY20 10 Connect the pneumatic hose to the outlet A A Outlet KM412035 UN 14MAY20 11 Connect Hydraulic Hoses and Wiring Harness The hydraulic outlets on the forag...

Page 51: ...e A Driveline B Header End C Forage Harvester End KM1002261 UN 29MAR12 Connect Driveline 1 Press sliding pin A and slide the joint onto the splined shaft on the rotary harvesting unit until sliding pi...

Page 52: ...joint onto the splined shaft on the forage harvester until sliding pin A engages in the ring shaped groove A Sliding Pin KM1002253 UN 29MAR12 Change the Hydraulic System Move ball cock A to position...

Page 53: ...the forage harvester and store them in the bracket provided B 4 Pull off the driveshaft NOTE Leave the rotary harvesting unit standing at a height that allows the unit to be re attached to a forage ha...

Page 54: ...atory If the rotary harvesting unit is to be transported fold it first Folding the Rotary Harvesting Unit CAUTION Risk of serious injury When unfolding or folding the rotary harvesting unit make sure...

Page 55: ...ds only if the comfort support wheel is actually attached See also supplementary Operator s Manual for comfort support wheel 400F When driving on public roads with the comfort support wheel attached t...

Page 56: ...and indicators As the side lamps and indicators on the forage harvester are usually covered by the intake drums in raised position the accident protection device features two duplicated position lamps...

Page 57: ...blades C cut all the stalks within the unit s operating width The slowly rotating gathering drums A pass the stalks along the gatherer points B The stalk is seized by the row of feed teeth F as if by...

Page 58: ...ive When changing forage wagon keep the rotary harvesting unit engaged This avoids unnecessary wear on the rotary harvesting unit drive Clear Blockages CAUTION Risk of serious injury Never attempt to...

Page 59: ...nd B force the crop inward and assure a better feed The height of the central feed bar A can be altered in the field to suit the prevailing crop conditions Slacken off the bolts C and D and adjust the...

Page 60: ...oes A and inner skid shoes B can be set in two positions see arrows Adjust outer skid Shoes A In order to comply with the transport width of 3 30 m the outer skid shoes A must be adjusted inwards If t...

Page 61: ...ollow the ground contours per unit Destroy the stubble from the top all the way down to the ground A ratchet clutch protects each unit individually Every unit lifts automatically up due to pneumatic p...

Page 62: ...19 06MAY21 2 2 The StalkBuster mulching units A are raised into park position or lowered into operating position by pneumatic pressure A StalkBuster Mulching Unit KM378473 UN 27MAY19 Park Position KM3...

Page 63: ...ing quality needs to be increased install scraper plates A to position 2 middle position 3 Adjusting scraper plates A in the position 3 brings the rotor as close as possible to the ground the StalkBus...

Page 64: ...tivate the StalkBuster Function on FENDT Forage Harvesters KM412038 UN 14MAY20 1 Softkey 2 Softkey 3 Softkey A Selection Point StalkBuster Existing 1 Press softkeys 1 2 and 3 to access the header sett...

Page 65: ...the Stalkbuster mulching units manually with lift button C Preconditons for the StalkBuster function Engine is switched ON Field mode is switched ON Main clutch is switched ON Cutterhead is switched O...

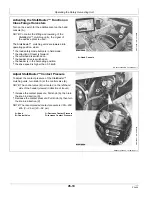
Page 66: ...he header drive is switched on the header is in the harvesting position the drive speed is higher than 0 5 km h KM412048 UN 15JUN20 A Hand Console Adjust StalkBuster Contact Pressure To adjust the con...

Page 67: ...hing units Insert a screw M16 X 70 B to protect the thread from dirt NOTE To protect the gear case flange D a cap C is available through spare parts channel Contact your Kemper dealer IMPORTANT Mainta...

Page 68: ...eed drive can be rotated so that 2 more speeds A can be selected With the drive in the position shown the first and second speeds can be selected A First and Second Speed Positions B Nut Second Speed...

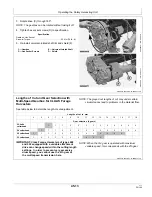
Page 69: ...ermine length of cut adjustment NOTE The grayed out lengths of cut may under certain circumstances lead to problems in the material flow Lengths of cut in mm 4 5 6 7 8 9 10 11 12 13 14 15 16 17 18 Gea...

Page 70: ...Run the forage harvester s engine at idle speed 2 Switch on the rotary harvesting unit 3 Wait until the gathering drums and rotating blades have reached their operating speed IMPORTANT In most cases...

Page 71: ...rdware for installation on rotary harvesting unit 1 assembly instructions Special Kit for AHC The AHC system is made of two sensors that are touching following the ground contours and maintain the rot...

Page 72: ...excessive vertical play Straighten the blades or install new blades Stalks are pushed to the front before they are cut long uneven stubble Leaves accumulated at the dividers Clean the dividers One of...

Page 73: ...Electrical connection of the valves failed Check and repair electrical connection StalkBuster units vibrate Rotors are unbalanced Replace rotors Covers are loose Fasten attaching screws of the covers...

Page 74: ...the grease passage is blocked Perform lubrication and maintenance work mentioned in this section before and after every harvesting season as well Grease Use grease based on NLGI consistency numbers an...

Page 75: ...0 water The coolant concentrate must be of a quality that protects the cast iron in the cooling system from cavitation corrosion A 50 mixture of ethylene coolant in water provides freeze protection to...

Page 76: ...pecifications and performance requirements Mixing different oils can interfere with the proper functioning of these additives and degrade lubricant performance Consult your KEMPER dealer to obtain inf...

Page 77: ...the cargo box power lift C with a padlock to prevent accidental activation of the pneumatic pressure 3 Disconnect the pneumatic hose C from the forage harvester A Knob B Control Valve C Lever D Pneuma...

Page 78: ...son Spherical Collar Bolts The torques of the spherical collar bolts A must be checked prior to each harvesting season and adjusted where necessary The torque setting is Specification Spherical Collar...

Page 79: ...s The torques of the flange screws A at gearbox mounting flanges of gathering drums must be retighten prior to each harvesting season and then retighten after 50 hours in service The torque setting is...

Page 80: ...ifetime with 1 1 kg 2 42 lb of Low Viscosity Grease for Gears 4 Spur Gear Angle Drive 1 1 L 0 29 US gal 5 FENDT Gearbox 0 8 L 0 21 US gal 6 StalkBuster Spur Gear Angle Drive 0 4 L 0 11 US gal Oil Cast...

Page 81: ...KM412051 UN 16JUN20 KM412050 UN 16JUN20 Oil Hand Pump for the Oil Change in StalkBuster Transmissions IMPORTANT An oil hand pump A with a minimum capacity of 500 mL 16 9 oz is required for the oil ch...

Page 82: ...removing the drain screw D make sure that the hex socket wrench is in a good condition to prevent damage to the head of the drain screw D 3 Secure the flange C against twisting and remove the drain s...

Page 83: ...the transmission ventilation first pump 400 mL 13 6 oz of oil into the gear case using the oil hand pump B This creates a slight overpressure inside the gear case and activates the breather A Adapter...

Page 84: ...nstall the rotor see Install Rigid StalkBuster Rotors or Install Articulated StalkBuster Rotors Option in Service Section A Drain Screw KM506470 UN 14APR21 KM504743 UN 14APR21 StalkBuster is a tradema...

Page 85: ...2 Check and clean the area between the square tube of the base frame and the covers of the StalkBuster mulching units KM409026 UN 27MAR20 3 Check and clean the area between the rotors and the covers o...

Page 86: ...ts see Service section A Cleaner B Blade Rotor Segment KM334539 UN 02NOV17 Every 10 Hours Balancing Weights Check balancing weights A under the rotating blades for signs of wear Replace damaged or wor...

Page 87: ...8MAY20 1 1 Every 10 Hours Drive Shaft Lubricate with grease KM412041 UN 15MAY20 Every 10 Hours StalkBuster Control Valve Turn reservoir A in direction of arrow Remove reservoir A from the control valv...

Page 88: ...ours StalkBuster Accumulators Pull ring A and drain condensation A Ring KM380928 UN 31MAY19 Every 50 Hours Claw Clutch Clean all the claw clutches see arrows Lubricate with grease Apply also a layer o...

Page 89: ...aulic Cylinder and Hinges of the Outer Units Lubricate with grease KM1000826 UN 25MAR09 Annually Check and Clean 1 Take off cover A 2 Clean the area around the breather behind the cover A 3 Reinstall...

Page 90: ...has cooled down First loosen plug B by one turn to relieve pressure The cavity of the friction clutch A can be drained and refilled This service work requires the friction clutch to be removed from th...

Page 91: ...the oil in all drives See General View of Drives and Oil Levels in the Rotary Harvesting Unit Lubricate all grease fittings Check the entire rotary harvesting unit for defective or worn components Ord...

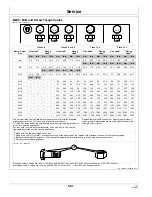
Page 92: ...840 1263 932 M30 932 687 1029 759 1327 979 1466 1081 1553 1145 1715 1265 M33 1258 928 1398 1031 1788 1319 1986 1465 2092 1543 2324 1714 M36 1617 1193 1789 1319 2303 1699 2548 1879 2695 1988 2982 2199...

Page 93: ...release the pneumatic pressure NOTE The control valve B is located on the right hand side of the header viewed in direction of travel 2 Pull the cargo box power lift C in the direction of the arrow S...

Page 94: ...The following steps must be taken before the rotary harvesting unit is put into service for the first time and between harvesting seasons as well 1 Remove cover A First take out screws B KM1000040 UN...

Page 95: ...cially the friction disks C E Replace worn parts 6 Reassemble all parts 7 Install bushing I as shown in Torque Settings below 8 Slacken off nuts A to the end of its thread 9 Reinstall clutches to harv...

Page 96: ...ating blades must be installed with their tips pointing in the direction of cut G 1 There are different blades In all 8 blades are installed on each rotating cutter 4 yellow blades A and 4 black blade...

Page 97: ...d E with their cutting edges facing in the direction of cut Tighten all attaching screws of blade segments and cleaners with the specified torque Specification M8 Screws Torque 28 N m 20 65 lb ft M10...

Page 98: ...rotor B 2 Install a new rotor 3 Secure rotors against each other by using a tube C with an inner diameter of 60 mm 2 36 in 4 Tighten hex socket screw to specification Specification Hex socket screw To...

Page 99: ...tor NOTE The rotors on the left and right are different Pin C prevents incorrect assembly 3 Secure the rotor against twisting by using a tube D with an inner diameter of at least 60 mm 2 36 in Lay the...

Page 100: ...Check hex socket screws B and bushing C for signs of wear Replace as required 3 Install a new impeller vane 4 Install and tighten the hex socket screws B to specification Specification Hex socket scr...

Page 101: ...see arrows Specification Gatherer Points and Big Drums Distance from Each Other 3 7 mm 0 12 0 27 in A Gatherer Point X 3 7 mm 0 12 0 27 in KM1000834 UN 27MAR09 KM1000165 UN 16OCT07 Checking Scrapers...

Page 102: ...if necessary Damaged or wrongly adjusted cleaners unnecessarily burden the drive and may cause malfunction of the rotary harvesting unit Set cleaner A as close as possible to the scraper B by bending...

Page 103: ...ing high pressure steam cleaners keep a minimum distance X of 250 mm 9 84 in Refer to specifications for the maximum temperature and maximum pressure Specification High pressure steam cleaner Max temp...

Page 104: ...ted Check the rotary harvesting unit for damaged or worn parts and replace them as necessary For more detailed checks see your KEMPER dealer Touch up the paintwork if required and clean the decals KM1...

Page 105: ...e missing or in need of service All missing or damaged safety related components including safety signs should be repaired or replaced before operating 460plus StalkBuster Rotary Harvesting Unit Drive...

Page 106: ...tive Agricultural Machinery Safety Part 1 DIN EN ISO 4254 1 Self certification Agricultural Machinery Safety Part 7 DIN EN ISO 4254 7 Self certification Machine safety DIN EN ISO 12100 Self certificat...

Page 107: ...roduct identification number D Weight E Year of construction F Model year KM1001134 UN 24FEB10 Serial Number When ordering parts always quote the rotary harvesting unit serial number The serial number...

Page 108: ...Serial Number 80 2 061721 PN 108...

Page 109: ...2 Driving with rotary harvesting unit attached 45 2 E End of season Storage 70 1 F Feed Bar Adjustment 45 3 Page G Gatherer Points Adjusting 65 10 Grease Extreme Pressure and Multi Purpose 60 1 Low v...

Page 110: ...2 Protect against noise 05 9 Safe maintenance practice 05 5 Safety Decals 10 1 Page Scraper adjustment 65 10 Serial number plate 80 1 Signal words understand 05 1 Skid Shoes Adjustment 45 4 Slip clutc...

Page 111: ...Index Index 3 061721 PN 3...

Page 112: ...Index Index 4 061721 PN 4...

Reviews: