18
Robot Gun Cleaning Station
© Kemppi Oy 2016
1616
OPERA
TING M
ANU
AL
10.5 Attaching the cutting prism
This section describes how to fasten the cutting prism in
place.
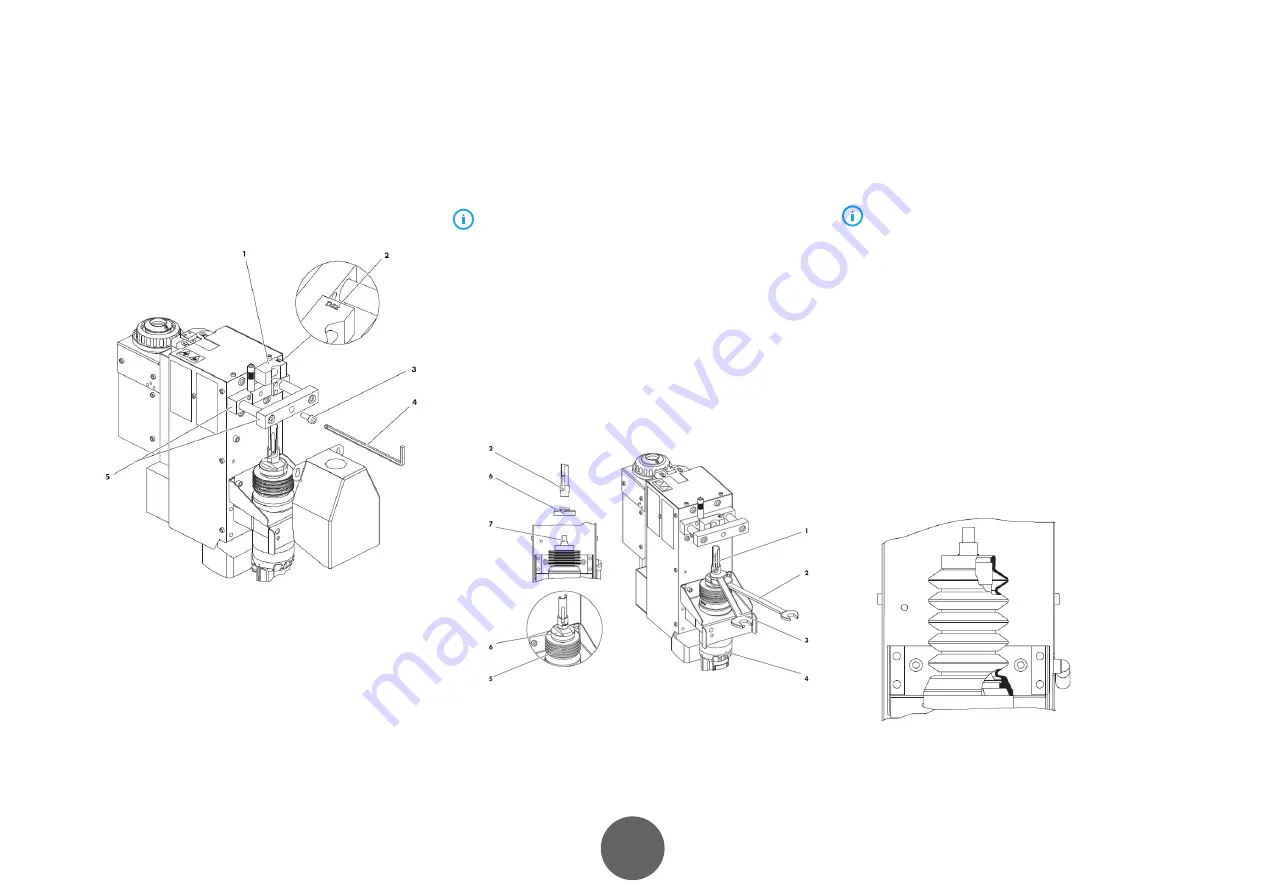
The parts of the system are depicted in the figure below.
Figure 15: Installing the wire-cutting device
1. Clamping prism
2. Mark for gas nozzle Ø
3. Cylinder screw, M8×20
4. Allen key, SW 6
5. Clamping device gas nozzle
Proceed as follows:
1. Mount the clamping prism (1) in the clamping
device (5) from above.
See that a clamping prism (1) that fits the gas nozzle
diameter is mounted. You can find the diameter of the prism
marked on the prism.
2. Attach the clamping prism with the cylinder screw
(3) (tightening torque: 20 Nm).
10.6 Mounting the milling cutter
This section describes how to mount the milling cutter.
The parts of the system are depicted in the figure below.
Figure 16: Mounting the milling cutter
1. Milling cutter
2. Wrench, SW17
3. Wrench, SW21
4. Compressed-air motor
5. Bellows
6. Motor protection cap
7. Motor output shaft
Use only tools with a suitable width across flats when
replacing the milling cutter. Motor protection cap (6): SW 21;
milling cutter: SW 17.
Ensure that the bellows (5) is in the right position.
Proceed as follows:
1. Mount the motor protection cap (6).
2. Mount the milling cutter (1) on the compressed-air
motor (4).
3. Tighten the milling cutter (1) by means of the
wrench, SW17 (2) (minimum tightening torque: 20
Nm), and hold with a wrench, SW21 (3).
For a better mounting, the compressed-air motor should
be in the lower clamping and stroke position.
Figure 17: Position of the bellows


