background image

38

KANGAROO 

R

R

e

Pump

English

English

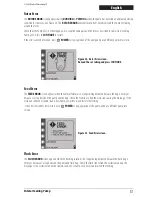
Battery Pack

See Section VIII for full instructions on replacing Battery Pack. 

During long-term non-usage or storage (greater than 9 months) of 

the pump, battery discharge and deactivation may tend to occur. It 

is recommended that the battery be disconnected during this time.  

The battery may need to be charged and discharged several times 

to restore optimal capacity.

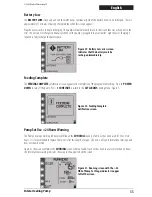
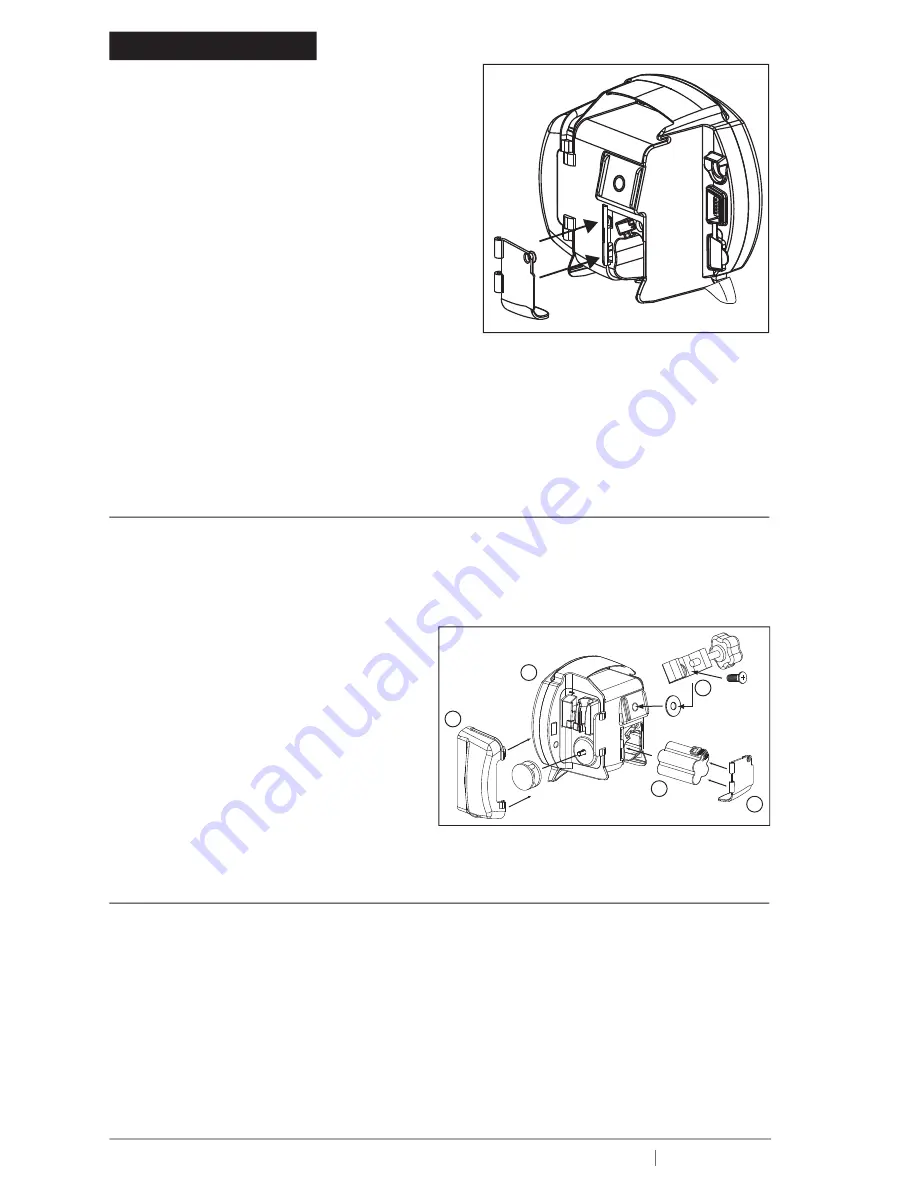
Battery Door

To replace Battery Door, see Figure 33 and do the following:

1.  Align the Battery Door Hinges with the long hinge pins.

  2.  Snap the hinges onto the hinge pins.
  3.  Screw down the door to hold in place.

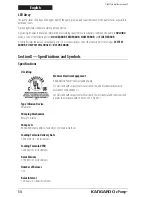
Power Cord

See Section IV for initial setup, including Power Cord attachment.

Pole Clamp

See Section IV for initial setup, including attachment of the Pole Clamp to the pump.

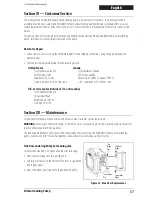
Section XIII – Service Part Numbers

To place an order for parts, or if technical assistance is required, call customer service.
The KANGAROO ePump enteral feeding pump contains a limited number of serviceable parts.  User maintenance is to be 

performed only by appropriately qualified technical personnel.
Visit our web site at: 

www.TycoHealthcare.com

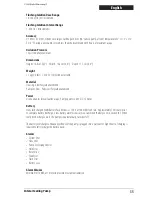
(1)   KANGAROO ePump  . . . . . . . . . . . . . . .  (US) 382400

. . . . . . . . . . . . . . . . . . . . . . . .(International) 482400

(2)   Main Door (Blue transparent door)  . . . . F31877WT
(3)   Battery Pack  . . . . . . . . . . . . . . . . . . . . . . F010484WT
(4)   Battery Door (with Screw)  . . . . . . . . . . . F31878WT
   Power Cord (with A/C Adapter)  . . . . . . . . . . 382491
(5)   Pole Clamp  . . . . . . . . . . . . . . . . . . . . . . . . . .  382492
   Electrical Plugs (Set of 4). . . . . . . . . . . . . . .  382493
 

Re-Certification Pump Set. . . . . . . . . . . . . . . 776150

Section XIV – Warranty

LIMITED WARRANTY:

  Kendall, a Tyco Healthcare Group LP company, warrants to the original purchaser (“Customer”) 

that this product will be free of defects in materials and workmanship, under normal use, for one (1) year from the 

date of original purchase from Kendall or its authorized distributor. If this product does not operate as warranted above 

during the applicable warranty period, Kendall may, at its option and expense, replace the defective part or product with 

a comparable part or product, repair the defective part or product, or, if neither replacement nor repair is reasonably 

available, refund to Customer the purchase price for the defective part or product. Dated proof of original purchase will 

be required. Kendall does not assume any liability for loss arising from unauthorized repair, misuse, neglect, or accident.

Removal, defacement, or alteration of serial lot number voids warranty. Kendall disclaims all other warranties, expressed 

or implied, including any implied warranty of merchantability or fitness for a particular purpose or application other than 

as expressly set forth in the product labeling.

1

3

2

Figure 34.  User Serviceable Parts.

4

5

Figure 33.  Battery Door Replacement.

© 2005 Tyco Healthcare Group LP

Summary of Contents for KANGAROO ePump

Page 1: ...гопитания Руководствопоэксплуатацииитехническомуобслуживанию Pompa żywienia dojelitowego Instrukcja obsługi i serwisowania Enteral Besleme Pompası Operasyon ve Servis Kılavuzu Enteral ernæringspumpe Bruker og vedlikeholdshåndbok Operation and Service Manual See Instructions 0123 Rx ONLY Trademark ofTyco Healthcare Group LP or its affiliate SPRAY NINE is a trademark of Spray Nine Corporation rademark...

Page 2: ...ttery Setup 9 Attaching Pole Clamp 10 SectionV Instructions for Use Quick Start 11 General Startup 12 Placement Mounting 12 A CPower Operation 12 Battery PowerOperation 12 Power On Off Power On Off Power On Off 12 LanguageSelection FirstPowerUp 12 KeeporClearPriorPumpSettings 12 Loading Pump Sets 13 Prime Pump 14 AutoPriming 15 Hold To Prime 15 Re primingafterBagEmpty Re primingafterBagEmpty Re pr...

Page 3: ...d Hold 21 FlushNow FlushNow FlushNow 22 More Options 23 BuzzerAlarmVolume 23 History History History 23 Language Selection 23 Continuous IntermittentMode 23 BioTech Menu 24 Accessingthe BioTechScreen 24 BioTechScreenData 24 LockSettingsFeature ProgramLocked 24 Lock Screen Feature 25 SectionVI Re Certification of Performance System Performance Re Certification 25 Certifying the Accuracy of Pump Flo...

Page 4: ...p Set Use 24 HoursWarning 33 LED Array 34 Section X Specifications and Symbols Specifications 34 Symbols on Pump and Accessories 36 Section XI Customer Service 37 Section XII Maintenance Side Door Enclosing Pump Set Loading Area 37 Battery Pack 38 Battery Door 38 Power Cord 38 Pole Clamp 38 Section XIII Service Part Numbers 38 Section XIV Warranty 38 Section XV Electromagnetic Conformity Declarati...

Page 5: ...egrated handle for easy transport Features MISTIC Magnetic Intelligent SetType Identification Connector Feed Only vs Feed Flush Set identification system to ensure match between the pump s user interface and Pump Set type Automatic Anti Free Flow AFF System Audible alarm to indicate errors or Pump Set loading conditions Attitude independent design eliminates need for drip chamber on pump set Senso...

Page 6: ...6 KANGAROO ROO R ePump English Figure 1A KANGAROO ePump features front and rear views 2005Tyco Healthcare Group LP ...

Page 7: ...tion see SectionVI Re certification of Performance For other integrity checks consult with a qualified Biomedical technician or contact the manufacturer Section XI Customer Service 7 For service or for technical information please contact Customer Service Section XI 8 Do not open the main housing as there are no user serviceable parts inside Opening may affect function of device and voids the warr...

Page 8: ...nnect to this port The accessory is specifically certified as complying with the safety requirements for accessories used with the pump whereas the safety certification of the accessory has been performed in accordance to the appropriate IEC 60601 1 and or IEC 60601 1 1 harmonized national standard Under no circumstances should the certified accessory be used while the pump is in use for enteral f...

Page 9: ...nocked out To remove the connector grasp the outer sliding sleeve member and pull Do not detach the connector by pulling on the cord only Battery Setup The battery pack is fully charged before shipping and is left unconnected to optimally preserve battery life WARNING The battery should be connected before using the pump It is also recommended that the battery charge be topped off before battery o...

Page 10: ...ole using the Pole Clamp included with the pump To attach the Pole Clamp to the KANGAROO ePump enteral feeding pump align the hole on the Pole Clamp with the mounting hole on the back of the pump Use a 3 8 16 bolt to fasten together as shown in Figure 3 Figure 3 Attaching and using the Pole Clamp 2005Tyco Healthcare Group LP ...

Page 11: ...ines 5 To directly control pump priming press4PRIME PUMP and then press and hold the HOLDTO PRIME button s 4 If a Feed Flush Set is used remember to first press4HOLDTO PRIME FLUSH until the flushing fluid has reached the valve and then press4HOLDTO PRIME FEED until the feeding fluid has reached past the valve and down to the distal end connector 6 Use buttons4on left side of LCD to set the feeding...

Page 12: ... option screen will appear Select the language Í Immediately after powering up the pump for the first time the language option screen will appear Select the language buttons When the language is selected push the fifth button Á to enter the language selection After the language is selected the first time the pump is powered up the language selection screen will not appear during future power up op...

Page 13: ...Pump Set loading area 2 Load the Pump Set by holding the finger tab on the valve and inserting the valve down into the slot on the left Figure 6A 3 Grasp the MISTIC retainer end black ring retainer and wrap the tubing counterclockwise around the rotor Figure 6B 4 Carefully pull the MISTIC retainer end upwards to position it over the slot on the right and then lower the retainer into the slot Figur...

Page 14: ...mp can also be primed in a more interactive method using the hold to prime feature After a Pump Set has been loaded and the status line shows SETLOADED press4PRIME PUMP in the opening menu Figure 7 to get one of the PRIMEPUMP menus shown in Figure 8 PRIMEPUMP menus shown in Figure 8 PRIMEPUMP Figure 7A Opening menu for Continuous Feed mode with a Feed Only set Figure 7B Opening menu for Continuous...

Page 15: ...et Feed Flush Pump Sets For Feed Flush Pump Sets the display will appear as in Figure 8B First press and hold4HOLDTO PRIME FLUSH to prime the flushing line and then press and hold4HOLDTO PRIME FEED to prime the feed line down to the stepped end connector at the end of the Pump Set If a Feed Flush Pump Set is used remember to first press4HOLDTO PRIME FLUSH until the flushing fluid has reached the v...

Page 16: ...and deliver the entire volume of the newVTBD HOLDING setting Figure 9A MOREOPTIONS menu MOREOPTIONS menu MOREOPTIONS Figure 9B SELECTMODE menu for SELECTMODE menu for SELECTMODE continuous or intermittent mode selection Selecting Continuous or Intermittent Feed Mode The KANGAROO ePump enteral feeding pump can be programmed to feed continuously or intermittently The continuous feeding mode will del...

Page 17: ...4FLUSH INTERVAL in Figure 11A to define the time interval between starts of flushing Press the4buttons in Figure 11C to program the time interval from 1 to 24 hours in increments of 1 hour Press4ENTER top button to exit the menu The pump will automatically limit flushing settings which exceed pump capabilities to deliver CAUTION The KANGAROO ePump enteral feeding pump flushes at a rate of 1960 mL ...

Page 18: ...which case the pump will run until the supply is exhausted Press4VOLUME PER BOLUS in Figure 12A to define theVolume to be delivered in each bolus Press the4buttons in Figure 12D to program the volume per bolus from 1 to 1000 ml in increments of 1 ml Press4ENTER top button to exit the menu Press4BOLUS INTERVAL in Figure 12A to define the time interval between starts of bolus deliveries Press the4bu...

Page 19: ... be used to deliver a bolus at a high rate similar to gravity feeding MAX Press4BOLUS MAX in the BOLUS RATE menu Figure 12B to program the BOLUS MAX mode The feeding rate for BOLUS MAX is 999 mL hr BOLUS MAX is 999 mL hr BOLUS MAX is 999 mL hr is 999 mL hr Intermittent Mode Flushing For INTERMITTENT feeding mode with a Feed Flush Set the opening menu shown in Figure 7D will show the ADJUST FLUSH o...

Page 20: ...pump capabilities to deliver CAUTION The KANGAROO ePump enteral feeding pump flushes at a rate of 1960 mL hr 32 7 mL minute Use care when programming the flush volume so that it matches the patient s need NOTE The pump will automatically flush an additional 25 ml of water after completing the programmed delivery of formula as long as at least one flush had occurred during formula delivery Run The ...

Page 21: ...hout further input It can be programmed to automatically restart after a specified time period by pressing the4RESUME IN ___ MIN button There are five options available during HOLDING See Figures 15A and 15B The RUN option can be selected from the following screens if the proper parameters are programmed and the Pump Set is loaded SETLOADED screens Figure 7 SETLOADED screens Figure 7 SETLOADED ADJ...

Page 22: ...vailable if the Pump Set is removed during HOLD View History Press4HISTORY to access the HISTORY to access the HISTORY HISTORY HISTORY HIST screen Use this screen to review feeding and flushing history See subsection ORY screen Use this screen to review feeding and flushing history See subsection ORY More Options below for further information Flush Now During the RUNNING mode the pump can be diver...

Page 23: ...r Intermittent Feed Mode for more information Press4DONE in the MOREOPTIONS menu to exit the menu MOREOPTIONS menu to exit the menu MOREOPTIONS Buzzer AlarmVolume Press4BUZZER in the MOREOPTIONS menu to access the MOREOPTIONS menu to access the MOREOPTIONS BUZZER screen and increase or decrease the alarm buzzer BUZZER screen and increase or decrease the alarm buzzer BUZZER volume The alarm will be...

Page 24: ...ked and a change is attempted the screen will indicate PROGRAM LOCKED and will not allow access to the parameters Figure 19 The pump can be PRIMED or set to RUN HOLD etc when settings are locked Press4DONE to exit the BioTech menu To re enter this menu screen power down the pump and then power it up again and hold the top4button as described above BioTech Menu The BioTech screen will show technica...

Page 25: ...ocedure while the pump is in RUNNING mode RUNNING mode RUNNING Press and hold the second4button from the top for at least 2 seconds and then release it Press and hold the third4button from the top for at least 2 seconds and then release it Press and hold the second4button again for at least 2 seconds To unlock the screen use the same procedure above SectionVI Re Certification of Performance System...

Page 26: ...in 10 or 0 5 ml whichever is larger RateSet AmountExpectedin30Minutes 75 mL hr 33 7 mL to 41 3 mL 150 mL hr 67 5 mL to 82 5 mL If the amount collected is outside the range load a new Pump Set and re run the test procedure to confirm results SectionVII Cleaning Cleaning should be performed as needed It may also be desireable to define cleaning intervals based on knowledge of the environment in whic...

Page 27: ...e Avoid excess moisture near pole clamp area Do not allow cleaning solution to enter the vertical vents in the housing underneath the handle Directions for Cleaning Pump Power Cord Refer to General Cleaning Directions before starting Unless soiling is observed the power cord should not be cleaned If cleaning of the power cord is necessary unplug from outlet and wipe the exterior surfaces of the wa...

Page 28: ... Open Battery Door and disconnect wire harness A small straight bladed screw driver may be needed to disconnect the connector tab Slide Battery Pack out of compartment Slide a new Battery Pack into compartment with wire harness extending out Align connector with red wire at upper right Push connector in until properly latched Tuck wires into slot between connector and battery to insure wires are n...

Page 29: ...or AUTOPRIMING or AUTOPRIMING RUNNING The Error Warning and Information Screens are described below System Error The system error screen is the most general form of error Figure 22 The only way to exit from a System Error is to power down No CONTINUE option is allowed because of the severity of the error An error number is also displayed on the screen for reference purposes This number should be r...

Page 30: ...old Error The HOLD ERROR screen will appear if the pump has been inactive without input for more than 10 minutes See subsection Hold for description of HOLDING mode HOLDING mode HOLDING Press4CONTINUE to return to the previous screen Where settings can be adjusted the pump can be set to run immediately or the pump can be set to run in a specified number of minutes See Figure 15 to see the options ...

Page 31: ...er being delivered because the bag is empty or because of a clog between the pump and the bag Check the feed line to find the occlusion causing the blockage If the occlusion cannot be cleared load a new Pump Set prime it and restart the feeding If the error still cannot be resolved press POWER to stop operation of the pump and put a different pump into service If the error still cannot be resolved...

Page 32: ...Pump Set prime it and restart the feeding If the error still cannot be resolved press POWER to stop operation of the pump and put a different pump into service If the error still cannot be resolved press If the error still cannot be resolved press Pump Set Dislodged Error The PUMP SET DISLODGED screen will appear if the black ring retainer MISTIC is not properly loaded in the MISTIC pocket in the ...

Page 33: ...ETLOADED opening menu Figure 7 SETLOADED Pump Set Use 24 HoursWarning The Pump Set usage warning indicator will blink on the RUNNING screen if a Pump Set has been used for 24 or more RUNNING screen if a Pump Set has been used for 24 or more RUNNING hours It is recommended to replace Pump Sets after this length of usage This icon is only an informational message and does not require action Figure 3...

Page 34: ...d mechanical hazards in accordance with UL60601 1 2 Classified with respect to electrical shock fire mechanical and other specified hazards in accordance with CAN CSA C22 2 No 601 1 LED Array The pump status LED array on the upper right of the pump gives a quick visual indication of the pump status especially in darkened rooms A green light status indicates normal pump operation A yellow light sta...

Page 35: ...lyester Polycarbonate blend Power Use AC adapter for wall outlet usage Pump operates on 9V DC 1 5 Amps Battery New fully charged NiMH Battery Pack delivers 15 hrs at 100 ml hr feed rate Approximately 15 minutes prior to complete battery discharge a low battery alarm will occur see subsection Battery Low in Section IX When complete discharge occurs the pump will automatically turn itself off The ba...

Page 36: ...ly Functional Ground Do not use Kangaroo ePump Feeding Sets for greater than 24 hours Do not use if unit package is open or damaged Flushing Solution Feeding Formula See Kangaroo ePump Manual for Feeding Set loading instructions VDE in Europe UL in USA and Canada Japanese Certification Maximum operating pressure 103 kPa Assure that the white cap and red stepped connector are securely tightened Oper...

Page 37: ...ce Center OutsideofU S andCanada Tyco Healthcare Group LP 20 Garryduff Road Ballymoney BT53 7AP 44 28276 61719 Section XII Maintenance For general maintenance issues not discussed below contact Customer Service Section XI WARNING Do not open the main housing as there are no user serviceable parts inside Opening of device may affect function of device and voids the warranty The following maintenanc...
Page 38: ...3 Battery Pack F010484WT 4 Battery Door with Screw F31878WT Power Cord with A C Adapter 382491 5 Pole Clamp 382492 Electrical Plugs Set of 4 382493 Re Certification Pump Set 776150 Section XIV Warranty LIMITEDWARRANTY Kendall aTyco Healthcare Group LP company warrants to the original purchaser Customer that this product will be free of defects in materials and workmanship under normal use for one ...
Page 39: ...Disturbance Immunity EN60601 1 2 IEC 61000 4 6 2001 Complies Power Frequency Magnetic Field Immunity EN60601 1 2 IEC 61000 4 8 2001 Complies Voltage dips and sags Immunity EN60601 1 2 IEC 61000 4 11 2001 Complies Electrical FastTransient Bursts Immunity EN60601 1 2 IEC 61000 4 4 2001 Complies Electrostatic Discharge Immunity EN60601 1 2 IEC 61000 4 2 2001 Complies Surge Immunity EN60601 1 2 IEC 61...

Page 40: ...The KANGAROO ePump AccuSystem feeding set manufacturing process parameters are tightly controlled atTyco Healthcare to minimize variation and produce consistent and reliable products The special grades of thermoplastic materials are also tightly controlled and are specifically chosen to deliver consistent quality and accurate flow delivery with the KANGAROO ePump enteral feeding pump The factory c...

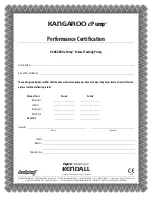
Page 41: ... LTD ROOSTRASSE 53 POSTFACH CH 8832 WOLLERAU SWITZERLAND Performance Certification 0123 KANGAROO ePump kENDALL tyco Healthcare KANGAROO ePump Enteral Feeding Pump Serial Number Date of Re Certification The undersigned hereby certifies that the above referenced pump has been tested per the pump s internal re certification protocol with the following results ManualTests Passed Failed BuzzerTest LEDTest ...

Page 42: ...rporation rademark of rademark of PHISOPHEX is a trademark of Smith Kline Beecham Corp rademark of rademark of HIBICLENS is a trademark ofTubifoam Ltd rademark of rademark of VESTA SYDE is a trademark of Steris In rademark of rademark of c TYCO HEALTHCARE GROUP LP MANSFIELD MA 02048 MADE IN U S A 2005TYCO HEALTHCARE GROUP LP ALL RIGHTS RESERVED 050310 PRODUCT INFORMATION IN U S 1 800 962 9888 www ...

Reviews: