background image

Summary of Contents for 110-62612101

Page 1: ...nstructions 29 Inch Wide ELECTRIC DRYERS IMPORTANT Read and follow all safety and operating instructions before first use of this product Sears Roebuck and Co Hoffman Estates IL 60179 U S A www sears com 3979089B PRINTED IN U S A 12 01 ...

Page 2: ...ormation about the care and operation of Kenmore appliances call your nearest Sears store You will need the complete model and serial numbers when requesting information Your dryer s model and serial numbers are located on the Model and Serial Number Plate Product Record Use the space below to record the model number and serial number of your new Kenmore dryer Model No Serial No Date of Purchase 2...

Page 3: ...this dryer Warranty Restriction If the dryer is subjected to other than private family use all warranty coverage is effective for only 90 days Warranty Service Warranty service is available by contacting your nearest Sears Service Center in the United States This warranty applies only while this dryer is in use in the United States This warranty gives you specific legal rights and you may also hav...

Page 4: ...n killor hurtyou and others All safety messages will followthe safety alert symbol and either the word DANGER or WARNING These words mean You can be killed or seriously injured if you don t immediately follow instructions You can be killed or seriously injured if you don t follow instructions All safety messages will tellyou what the potentialhazard is tell you how to reduce the chance of injury a...

Page 5: ...the door to the drying compartment Do not reach into the dryer if the drum is moving Do not install or store the dryer where it will be exposed to the weather Do not tamper with controls Do not repair or replace any part of the dryer or attempt any servicing unless specifically recommended in this Owner _ Manual or in published user repair instructions that you understand and have the skills to ca...

Page 6: ...ryer at least 18 inches 46 cm above the floor for a garage installation Failure to do so can result in death explosion or fire You will need A location that allows for proper exhaust installation See Venting Requirements A separate 30 amp circuit A grounded electrical outlet located within 2 ft 61 cm of either side of the dryer See Electrical Requirements A sturdy floor to support the total dryer ...

Page 7: ...er Dimensions 1 Small Opening Side Swing Doer 110 273 1_ 69 05 c __ 29 _ 3 Wide Opening Side Swing Doer 29 _ _7 73 66 era 2 Large Opening Side Swing Door 22_ Most installations require a minimum 51_2 in 14 cm clearance behind the dryer for the exhaust vent with elbow See Venting Requirements ...

Page 8: ...e as large as the dryer exhaust opening Electrical Requirements It is your responsibility To contact a qualified electrical installer To be sure that the electrical connec tion is adequate and in conformance with the National Electrical Code ANSl NFPA 70 latest edition and all local codes and ordinances A copy of the above code standards can be obtained from National Fire Protection Association Ba...

Page 9: ...ch power supply 4 wire or 3 wire and be Flexible armored or non metallic sheathed copper cable with ground wire All current carrying wires must be insulated 10 gauge solid copper wire Do not use aluminum At least 4 ft 1 22 m long GROUNDING INSTRUCTIONS For a grounded cord connected dryer This dryer must be grounded In the event of malfunction or breakdown grounding will reduce the risk of electric...

Page 10: ...inal block opening Fire Hazard Use 10 gauge solid copper wire Use a UL approved strain relief Disconnect power before making electrical connections Connect neutral wire white or center wire to center terminal silver Ground wire green or bare wire must be connected to green ground connector Connect remaining 2 supply wires to remaining 2 terminals gold Securely tighten all electrical connections Fa...

Page 11: ... terminals with upturned ends 6 3 _in 1 9 cm UL approved strain relief 7 Ring terminals 1 Remove center terminal block screw 2 Remove appliance ground wire green with yellow stripes from external ground connector screw Fasten it under center silver colored terminal block screw 1 2 0 3 1 External ground connector Dotted line shows position of NEUTRAL ground wire before being moved to center termina...

Page 12: ...al block place the hooked end of the wire under the screw of the terminal block hook facing right squeeze hooked end together and tighten screw 1 Remove center terminal block screw 2 Remove appliance ground wire green with yellow stripes from external ground connector screw Fasten it under center silver colored terminal block screw 1 2 12 3 1 External ground connector Dotted line shows position of...

Page 13: ...rear panel Secure cover with hold down screw 3 wire connection Direct Wire Use where local codes permit con necting cabinet ground conductor to neutral wire Direct wire cable must have 5 ft 1 52 m of extra length so dryer can be moved if needed Strip 31 2in 8 9 cm of outer covering from end of cable Strip insulation back 1 in 2 5 cm If using 3 wire cable with ground wire cut bare wire even with ou...

Page 14: ...iance ground wire green with yellow stripes from external ground connector screw Connect appliance ground wire and the neutral wire white or center wire of power supply cord cable under center silver colored terminal block screw Tighten screw 3 Connect the other wires to outer ter minal block screws Tighten screws 4 Tighten strain relief screws 5 Insert tab of terminal block cover into slot of dry...

Page 15: ...lect indoors which may result in Moisture damage to woodwork furniture paint wallpaper carpets etc Housecleaning problems and health problems Jse a heavy metal vent Do not use plas tic or metal foil vent Rigid metal vent is recommended to pre vent crushing and kinking Flexible metal vent must be fully extend ed and supported when the dryer is in its final position Remove excess flexible metal vent...

Page 16: ...rt Number 26 49904 18 in 45 72 cm to 29 in 73 66 cm mismatch Part Number 26 49905 29 in 73 66 cm to 50 in 127 cm mismatch Special provisions for mobile home installations The exhaust vent must be securely fas tened to a noncombustible portion of the mobile home structure Do not use screws or other fastening devices that extend into the interior of the vent to se ure vent Terminate the exhaust vent...

Page 17: ...e two or more people to move and install dryer Failure to do so can result in back or other injury 1 Place two of the carton corner posts on the floor behind the back of the dryer See illustration 2 Firmly grasp the body of the dryer not the top or console panel The chart below helps you determine your maximum vent length based on the number of 90 turns or elbows rOUwill need and the type of vent ...

Page 18: ...is not crushed or kinked 5 Check to be sure the dryer is level See Level Dryer 6 Plug into a grounded outlet Turn power on 7 Remove the blue protective film on the console and any tape remaining on the dryer 8 Read Dryer Use g Wipe the dryer drum interior thoroughly with a damp cloth to remove any dust 10 Set the dryer on a full heat cycle not the Air cycle for 20 minutes and start the dryer If th...

Page 19: ...aundry into dryer and shut door 3 Set Cycle Selector Control Timer O see Cycle Descriptions Fire Hazard No washer can completely remove oil Do not dry anything that has ever had any type of oil on it including cooking oils Items containing foam rubber or plastic must be dried on a clothesline or by using an Air Cycle Failure to follow these instructions can result in death or fire 4 Set FABRIC TEM...

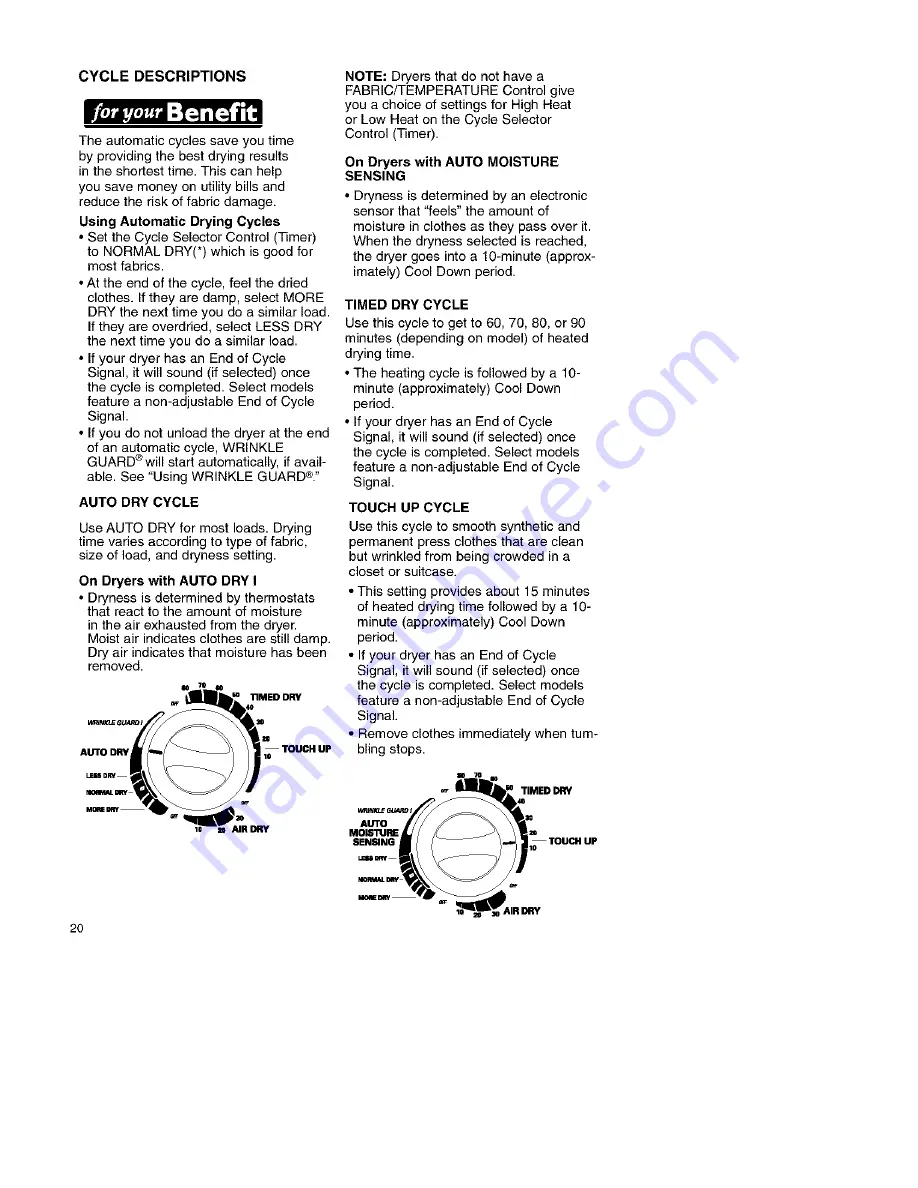
Page 20: ... selected is reached the dryer goes into a 10 minute approx imately Cool Down period TIMED DRY CYCLE Use this cycle to get to 60 70 80 or 90 minutes depending on model of heated drying time The heating cycle is followed by a 10 minute approximately Cool Down period If your dryer has an End of Cycle Signal it will sound if selected once the cycle is completed Select models feature a non adjustable ...

Page 21: ...vy Bedspreads mattress MORE DRY HIGH 70 80 min pads quilts Heavyweight Towels jeans corduroys MORE DRY HIGH 50 60 min work clothes Medium Weight Sheets cotton underwear NORMAL MEDIUM HIGH 40 50 min diapers DRY or MEDIUM Lightweight Batistes organdies lingerie NORMAL DRY LOW 30 40 min PERMANENT PRESS SYNTHETICS AND BLENDS Heavyweight Work clothes jackets NORMAL HIGH 40 50 min raincoats DRY Medium W...

Page 22: ... items that require drying without heat Use the AIR DRY Cycle or AIR FLUFF Setting depending on model or place the items on a line or rack to air dry OR TIMEDDRY FABRIC CARE 11EMPERATURE W_INKL_GUARDI F1ERM PRESS CASUAL AUTO _ u MOISTURE ULTRADEUCA11E II NORMAL SENSING B_ IJ_ LOW O MEDIUM _EqH LF S6DflY AIR FLUFF C OITONI NO _T TOWELS _H MOREDRY AIR DRY Cycle Type of Load AIR FLUFF Setting DELICAT...

Page 23: ...ps in the back of the dryer When the strips no longer feel any moisture in the clothes the dryer automatically turns off to prevent overdrying and shrinking COOL DOWN Approximately 10 minutes before the end of the AUTO DRY AUTO MOISTURE SENSING and TIMED DRY Cycles clothes are tumbled without heat to help reduce wrinkles and make clothes more comfortable to handle WRINKLE GUARD helps keep your per...

Page 24: ...containing foam rubber or plastic must be dried on a clothesline or by using an air cycle 4 Push the START button NOTE The rack must be removed for normal tumbling Do not use the automatic cycle with the dryer rack 2 Put the wet items on top of the rack Leave space between the items so air can reach all the surfaces Close the door This chart shows examples of items that can be rack dried and the s...

Page 25: ...ently set stains Check pockets before drying Sharp or metal objects can damage your dryer Do not lay these objects on your dryer they can damage the finish Turn pockets of heaw items inside out for even drying Place small items such as baby socks or hankies in laundry bag for easy removal Articles to be ironed should be removed while still damp Separate dark colors from light colors colorfast from...

Page 26: ... DRYER FABRIC SOFTENERS Dryer fabric softeners are recommended for reducing static cling Always follow package instructions carefully Put one fabric softener sheet on top of the load before starting the dryer Do not add a fabric softener sheet after the drying cycle has started Instant heat can cause the fabric softener to spot fabrics Remove fabric softener stains by wetting the stains and rubbin...

Page 27: ...arm water and apply to a soft cloth 2 Scrub area until all excess dye is removed 3 Wipe thoroughly with a damp cloth 4 Tumble a lead of clean towels for 20 minutes to dry NOTE Garments that contain unstable dyes such as denim blue jeans or brightly colored cotton items may discolor the drum interior These stains are net harmful to your dryer and will not stain future loads of clothes It is helpful...

Page 28: ...uildup To wash 1 Wet both sides of lint screen with hot water 2 Wet a nylon brush with hot water and liquid detergent scrub lint screen with the brush to remove residue buildup 3 Rinse lint screen with hot water 4 Thoroughly dry lint screen with a clean towel replace in dryer 3 Push the lint screen firmly back into place IMPORTANT Do not run the dryer with the lint screen loose damaged blocked or ...

Page 29: ...ase Use masking tape to secure dryer door VACATION CARE Disconnect power Wash lint screen TO CHANGE DRUM LIGHT The dryer light automatically turns on inside the dryer drum when you open the door 1 Unplug dryer or disconnect power 2 Open the dryer door Locate the light bulb cover on the back wall of the dryer Remove the screw located in the lower right corner of the cover Remove the cover 3 Tum bul...

Page 30: ...e Installation Instructions One fuse is blown or circuit Replace fuse or reset breaker breaker is tripped The dryer will appear to operate but you will not get any heat AIR DRY Cycle has been Select the right cycle for the types selected of garments being dried see Dryer Use Load not contacting the Level dryer see Installation sensor strips and automatic Instructions cycle ending early Fabric soft...

Page 31: ... caused by normal wear and laundering Stains on Load Improper use of fabric softener Use fabric softener sheets in dryer Add in washer at beginning of cycle when load is cold Drying soiled items Items need to be clean before being dried Items Overdrying Match dryer settings to fabric type Shrinking see Dryer Use Poor garment quality Check quality of garment before purchasing Manufacturer s care la...

Page 32: ...le operation Yet any major appliance may require service from time te time The Sears Maintenance Agreement offers you an outstanding service program affordably priced Sears Maintenance Agreements Is your way te buy tomorrow s service at today s prices Eliminates repair bills resulting from nermal wear and tear Provides fer nen technical and instructional assistance Even if you don t need repairs p...

Page 33: ...nd appliances In your own home no m_ter who made it no matter who sold _ 1 800 4 MY HOME _ Any_me day ornight 1 aoo 4_ 4_ u sA and Canada www seers com www sears ce www mara com 1 888 SU HOGAR _M 1 888 784 6427 I www sear_ G8 ...

Reviews: