background image

11

24

OPERACION DE SU CALENTADOR

CÓMO OPERAR EL CALENTADOR

NOTA: Este calentador puede emitir un poco de humo cuando se usa la primera vez. 

Este humo es una condición normal como resultado de la calefacción inicial del 

elemento infrarrojo. Esto sólo pasa brevemente y no es peligroso. 

1.    

Desempaquetar el calentador: corte la cinta, doble las aletas del cartón y levemente 

      gire la caja boca abajo. Retire la caja del envoltorio de espuma de poliestireno. 

      Saque la espuma de  poliestireno y gírelo bocarriba. Nosotros recomendamos que 

      guarde la caja para que pueda almacenar su calentador cuando no esté en uso o 

      si lo necesita transportar. 

2.    

Ubicación: busque un lugar que no esté obstruido y que esté a nivel para colocar 

      el calentador. 

3.    

Enchufar: enchufe el cable directamente a un tomacorriente que no esté en uso y 

      que tenga 120 voltios 15 amperios o un circuito más alto. 

4.    

Interruptor de Encendido: Presione el interruptor en la parte trasera de la unidad 

      para ponerlo en la posición de “on” antes de encender el botón en el panel LCD.
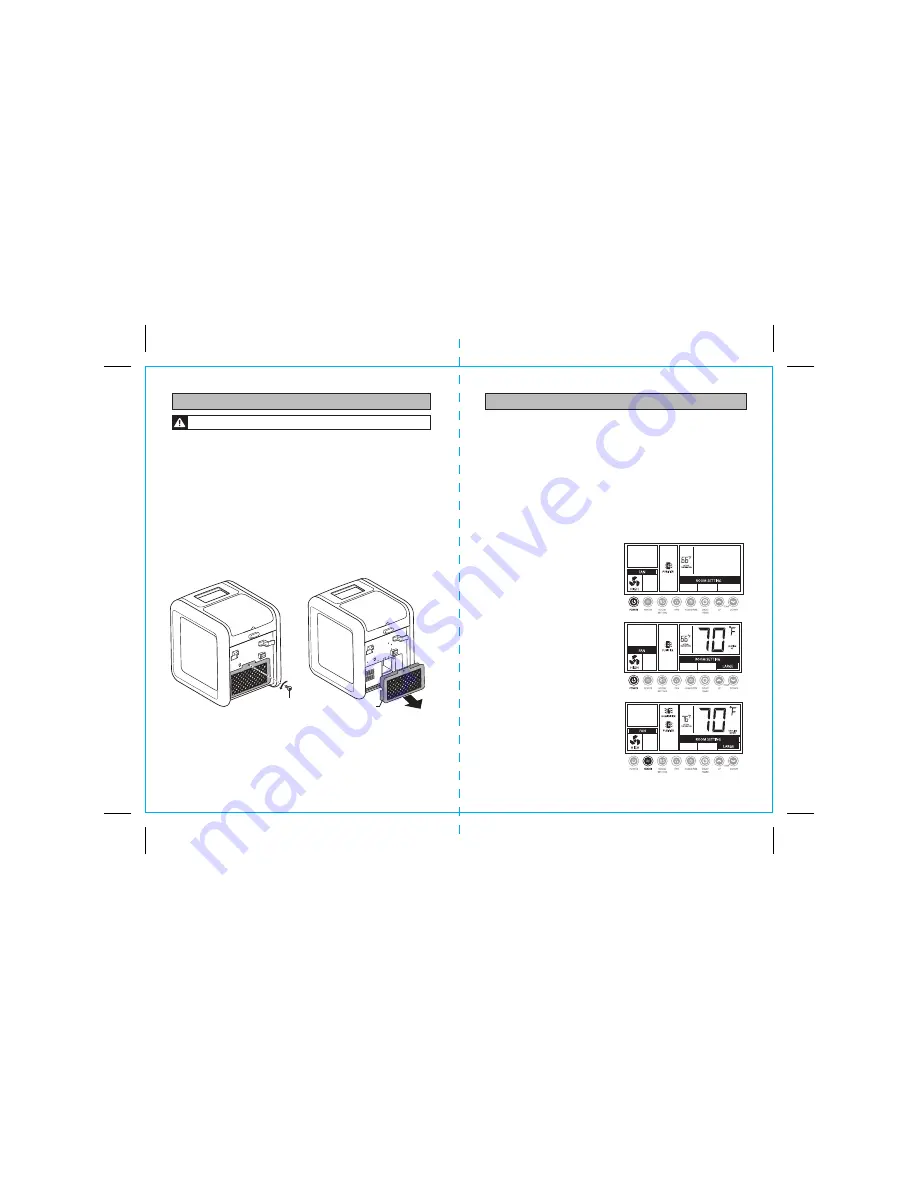
5.    

Encender la unidad: después de 

      presionar el botón de POWER, el 

      calentador estará en el modo de 

      Purificador de Aire cuando esté 

      encendido. El purificador de aire 

      funcionará para purificar la habitación. 

      El panel LCD indicará la temperatura 

      actual de la habitación, vea la Figura 4.

Calentador ON/OFF: 

Presione el botón de HEATER para encender


o apagar la función del calentador. El 

ventilador no funcionará hasta que el 

elemento de calefacción llegue a una 

temperatura lo suficientemente alta para 

empezar el proceso de calefacción. 

Durante este periodo cuando el ventilador 

no funciona, el panel LCD indicará HEATING 

UP que significa que el calentador se está 

calentando, vea la Figura 5.

Cuando el usuario presiona el botón de 

HEATER, si la temperatura actual es más alta 

que la temperatura por defecto de 70ºF, el 

calentador no empezará a calentar y el 

LCD indicará COOLING DOWN. Ajuste 

la temperatura deseada a un número más 

alto  que la temperatura actual, vea la 

Figura 6. 

Selección de la Habitación:


Presione el botón de ROOM SETTING para 

ajustar la potencia según el tamaño de la 

habitación. El calentador tiene 3 opciones y 

se puede usar para habitaciones pequeñas, 

medianas y grandes: 

Small = 500 watts; Medium = 1000 watts; 

Large = 1500 watts.

Fig. 4

Fig. 5

Fig. 6

CARE AND CLEANING

HOW TO CLEAN THE HUMIDIFIER


DO NOT USE VINEGAR TO CLEAN THIS HUMIDIFIER.  If you are not going to use 

the humidifier for an extended period of time (during warm weather), drain all water 

out of the bottle and chamber and dry it out as much as possible using a soft towel.  

Do not attempt to run humidifier without water as this will damage the unit and nullify 

the warranty.

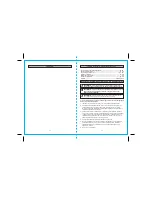
HOW TO CLEAN THE AIR PURIFIER FILTER

Your heater comes with a PCO (Photo-Catalytic Oxidation) air purifier that 

combines high-intensity UV light with superior activated carbon honeycomb filter 

technology

The lifetime washable air filter needs to be cleaned on a regular basis to ensure 

maximum performance of the air purifier and of the heater itself. To clean the Air 

Purifier, follow these simple steps:

1.    

Remove the filter by unscrewing screw and  opening the filter cover on the back 

     of the heater and carefully pulling the filter out.                                          

2.   Clean the filter by vacuuming it with an attachment, or run warm water over it to 


remove dust. Run the water in the opposite direction of the air flow until the water 

     runs clear.   

3.   The filter might excrete some filtered residue, so be cautious not to drip on any 


stainable surfaces such as carpeting. You can also soak the filter in water mixed 


with a small amount of mild dish soap (don't forget to rinse with water after 


soaking the filter). 

4.   Clean the air purifier filter every 30 days in order to maintain performance.

Fig. 14

Fig. 15

Screw

Filter Cover

CAUTION:


disconnect power cord before servicing.

Summary of Contents for 132.95203210

Page 1: ...product is ever used for other than private household purposes This warranty gives you specific legal rights and you may also have other rights which vary from state to state Sears Brands Management Corporation Hoffman Estates IL 60179 GARANTÍA DE KENMORE LIMITADA POR 1 AÑO Si este producto falla dado a un defecto en material o mano de obra dentro de dos años desde la fecha de compra devuélvalo con ...

Page 2: ...se only and all children must be supervised when using this product 4 Always unplug heater when not in use 5 Do not operate heater with a damaged cord or plug after the heater malfunctions or if the heater has been dropped or damaged in any manner Discard heater or return to a qualified service dealer for examination and or repair 6 Do not use outdoors Important Safety Instructions 2 4 Parts and Fe...

Page 3: ...low foreign objects to enter into ventilation opening as this may cause an electric shock fire or damage the appliance 12 To prevent a possible fire do not block air intakes or exhaust in any manner Do not use on soft surfaces like a bed where openings may become blocked 13 The heater has hot parts and sparking parts inside Do not use in areas where gasoline paint or flammable liquids are used or sto...

Page 4: ...se mueva mientras está operando Recomendamos que lo muevas después que el ventilador se apague completamente Qué es el calentamiento de zona El calentamiento de zona se trata en enfocar el calor hacia el área donde las personas pasan la mayoría del tiempo IMPORTANT SAFETY INSTRUCTIONS 22 Check your heater cord and plug connections a Faulty wall outlet connections or loose plugs can cause the outle...

Page 5: ...que la entrada de aire en la parte trasera del calentador no esté bloqueada Siga las instrucciones para limpiar el filtro El calentador ha entrado en el modo de auto recuperación Esto ocurre cuando la temperatura interna excede el límite predefinido Simplemente espere unos minutos para que los componentes interiores se enfríen y vuelva a encender el calentador Asegure que ningún otro aparato esté en...

Page 6: ...onde va a estar más tiempo Programe el calentador a su nivel de confort Esto ayudará a reducir el consumo de energía 9 Al calentar un área más grande coloque el calentador en un área central Si tiene un ventilador de techo en esa habitación úselo para distribuir el calor de manera más pareja 10 Si se usa el calentador en áreas muy sucias o de mucho polvo será necesario limpiar el filtro más a menud...

Page 7: ...impie el exterior del calentador con un paño húmedo no mojado y séquelo con un paño suave y seco Con el tiempo el polvo se acumula en la ventilación del calentador Esto se puede limpiar con un paño húmedo o cuidadosamente con una aspiradora No use líquidos abrasivos para limpiara su calentador ya que éstos pueden dañar su superficie Limpie el filtro en la parte trasera del calentador cada 30 días pa...

Page 8: ...re up to a number higher than the actual room temperature see Fig 6 Room Setting Press the ROOM SETTING button to adjust the power level based on the room size The heater has 3 power settings and can be used for Small Medium and Large sized rooms as follows Small 500Watts Medium 1000Watts Large 1500Watts Fig 4 Fig 5 Fig 6 CUIDADO Y MANTENIMIENTO CÓMO LIMPIAR EL HUMIDIFICADOR NO USE VINAGRE PARA LI...

Page 9: ... Press the power button to turn off all functions The fan will continue to run until all of the heat has been expelled and will then turn off The COOLING DOWN indicator will show on the LCD display to indicate that the heater is cooling down Auto Recover Feature Should the internal temperature of your heater exceed a pre defined limit the heater will automatically shut itself off and a red LED light w...

Page 10: ...l LCD indicará ADD WATER para que se añada agua Vea la Figura 8 Presione el botón dos veces y el humidificador se apagará Temporizador programable Presione este botón para seleccionar la cantidad de horas deseadas y la unidad dejará de funcionar y no comenzará de nuevo hasta que pase la cantidad de tiempo seleccionada vea la Figura 9 Por ejemplo programe el temporizador para 8 horas antes de acosta...

Page 11: ...a que la temperatura por defecto de 70ºF el calentador no empezará a calentar y el LCD indicará COOLING DOWN Ajuste la temperatura deseada a un número más alto que la temperatura actual vea la Figura 6 Selección de la Habitación Presione el botón de ROOM SETTING para ajustar la potencia según el tamaño de la habitación El calentador tiene 3 opciones y se puede usar para habitaciones pequeñas media...

Page 12: ...f the above instructions CAUTION AND REMINDER The heater grill is hot when in use To avoid burns do not let bare skin touch the hot surface Keep combustible materials such as furniture pillows bedding papers clothes and curtains at least three feet from the front of the heater and keep them away from the sides and rear Extreme caution is necessary when any heater is used by or near children or inv...

Page 13: ...esult do not locate the heater in an area with a high rate of air filtration and movement as the warm air will be exhausted 2 Try placing the heater near a warmer inside wall and direct the output towards a cooler outside wall The cooler outside wall will tend to draw the generated heat towards itself which will allow for more efficient heating 3 Placing the heater next to a cold air return will draw...

Page 14: ...her appliances are operating on the circuit used to run the heater as this could also cause overheating Once I initially plug the unit in and turn it on how long will it take to heat my room Generally it takes less than an hour Please remember that with any type of heating process there are many variables size of the room how well the room is insulated how many doors windows how much bare concrete...

Page 15: ...operación o mantenimiento de este producto llame al 1 888 424 8432 AYUDA CON EL USO Y CUIDADO TROUBLE SHOOTING QUESTION ANSWER My home is not insulated very well will this heater help me Yes but it will take a little longer to heat the room initially and the outside temperature will also have an impact on heating time Once the room has reached the desired temperature it will cycle on and off accord...

Page 16: ...ado Los tomacorrientes o receptáculos gastados se deben cambiar antes de usar el calentador Usar este calentador en un tomacorriente o receptáculo gastado puede resultar en el sobrecalentamiento del cable o en incendio 18 Asegúrese de que el enchufe esté completamente insertado en el tomacorriente Recuerde que los receptáculos se deterioran dado al tiempo y uso continuo revise el tomacorriente y e...

Page 17: ...visar siempre que usen este producto 4 Siempre desenchufe el calentador cuando no esté en uso 5 No use el calentador si el cable o enchufe están dañados o si el calentador ha fallado anteriormente o si se ha caído de alguna manera Deseche el calentador o llévelo a un proveedor de servicio capacitado para que lo examinen o reparen 6 No lo use a la intemperie Instrucciones Importantes de Seguridad 1...

Reviews: