background image

Summary of Contents for 15/I649

Page 1: ..._ N S T R U C T I O N S _dODEL 15 I649 ZRG ZAG SEWING MACHINE ...

Page 2: ... Bobbin Case Inserting Pattern Disc Inserting Removing Material Installing Machine Head 2 3 8 16 14 4 Needle Thread Table Needle Size Overcasting 23 Parts List 32 33 Picking up Bobbin Thread t0 _ Placement of Needle 5 Removing Bobbin Case fr om Shutt e 6 Reverse Stitching 11 Replacement of Belt 27 Setting Stitch Length I 1 Setting Stitch Width 16 Sewing Light _ 4 Sewing on Buttons 19 Sewing on Lac...

Page 3: ...uttonhole Reverse Stitch Length Control 20 Upper Thread Spool Pins 21 Pattern Disc Shaft Cover 22 Bobbin Winder Tension Disc 23 Upper Thread Guides 24 Presser Foot Knob 25 Presser Foot Lever 26 Needre Clamp Screw 27 Thread Cutter 28 Needle Plate ...

Page 4: ... accessory box SEWING LIGHT The sewing tight is located inside the face cover plate as shown tt may be turned on or off by pushing the light switch In order to operate the machine the switch must be on To remove bulb turn light switch off open the face cover plate by swinging it open push bulb in slightly turn bulb clockwise and remove from socket To repEace push in new bulb and turn counter clock...

Page 5: ...The size of the needle should conform to t_ size of the thread and both should be suitable to the material The same size thread shoutd be used in the bobbin as on the upper part of the machine for ordinary sewing Never use a bent needle or one with a b_unt point This is the exact length of the needle to be used in your machine Comparison with this illustration will determine whether the needte you...

Page 6: ...eedle at s highest osltiom Pull i out latch i _ i Pull bobbin case straight out REMOVING BOBBIN CASE FROM SHUTTLE ...

Page 7: ...elease clutch by turning clutch knob toward you Start machine Iif Wind thread around bobbin a few times m s 7 Z O When bobbin is full winding mechanism stops Place bobbin onto bobbin winder shaft Push bobbin winder latch until it clicks J Tighten clutch knob and remove bobbin _1 I ...

Page 8: ...G BOBBIN INTO BOBBIN CASE CASE INTO SHUTTLE O Guide bobbin onto center pin of bobbin case _1Pulf thread through slot Pull thread under tension spring Holding latch position case into shuttle release latch_ 0 0 ...

Page 9: ...m turning and by hotding the end Of the thread pull spring wire loop up and past the top hook until the thread can be slipped into the hook When thread tension is released the spring wire loop will return to poshlon as shown with the thread in proper place Re_easa spool of thread and continue to thread machine as ilrustrated 9 p ...

Page 10: ...ush down outer ring of presser foot knob See illustration This will release pressure of presser foot To increase pressure push down inner pin until suitable pressure is obtained For ordinary sewing the inner pin should be about half way down When sewing multiple thickness or heavy material reduce the pressure increase it when sewing sheer fabrics Insufficient pressure may cause skipped stitches or...

Page 11: ...itch width control on 0 setting and by removal of pattern disc REVERSE STITCHING Raise lever for reverse stitching Lower lever for forward stitching It is best to begin and end most seams with reverse stitching often called back tacking BASTING For accomplishing quicker more even and firmer basting we suggest you regulate the machine in the following manner Set stitch length at No 4 for the longes...

Page 12: ...ct stitch will have threads locked between the two layers of fabric with no loops on top or bottom Refer to page 34 Fig 1 PROBLEM REMEDY Fig Fig 3 Upper thread too tight Upper thread too loose Decrease Tension increase Tension 4 ...

Page 13: ...kered the cause may be tight tensions and both upper and lower may be adjusted See page 32 When adjusting the tension on the bobbin case make slight adjustments with a screwdriver See page 32 It is necessary to reduce the upper thread tension somewhat when doing decorative stitching As the stitch width is increased the tension should be decreased See page t7 INCREASE TENSION DECREASE TENSION Turn ...

Page 14: ...material under the presser foot insert the needle into the mater_al by turning the hand wheel toward you tower presser foot and start sewing To facil tate placement of heavy fabrics under the presser foot the presser foot lever can be raised beyond the normal up position To remove the work first turn hand wheel toward you until needle is at its highest position then raise the presser foot draw mat...

Page 15: ...both threads are drawn back under the presser foot Lower needle into fabric about inch from beginning of seam Push stitch length control lever up for reverse stitching Stitch in reverse until needle reaches beginning of seam Move stitch length control lever _lown for forward stitching and complete seam When you reach the end raise the stitch length control lever and sew back over _ inch of complet...

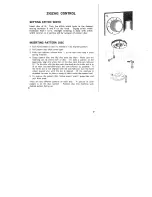
Page 16: ...onto the shaft Make sure the retaining pin _ enters hole in disc To start a pattern at the beginning align the white dot on the disc with the cam follower _ To do this slip the disc onto the shaft so the white dot is at or as near counterclockwise tbe cam foIlower as possible If the white dot is not aligned with the cam follower turn the hand wheel toward you until the dot is aligned if the machin...

Page 17: ... stitch iength at the red mark on the indicator plate The latter will vary slightly depending upon the type of material to be sewn Pattern wil be changed if using any other length or width AEt patterns also can be made with double needle See page 25 it is necessary to reduce the upper thread tension somewhat for decorative stitching As the stitch width is increased the tension should be decreased ...

Page 18: ...s to the previous stitching Use medium machine speed You can make any length stitches desired Slow movement of fabric wilt make short darning stitches Fast movement will make long stitches 5 When you finish darning raise presser foot and remove fabric Increase pressure for general sewing by pressing down inner pin of the presser foot knob Turn feed dog control to right 18 WITHOUT PRESSER FOOT 1 Tu...

Page 19: ...d tie securely tf us ng a 4 hole button repeat the _bove procedure NOTE To make e small thread shank when sewing on a flat button place a straight pin or needle between the holes of the button BLIND STITCHING Disc 1B Stitch width 3 May vary depending on type of materiel Stitch length 3 t Prepare the hem with e turned and edgestitched finish or 2 Apply seam tape along the jaw edge with either strai...

Page 20: ...ntical size buttonholes is facilitated with the aid of the graduations on the left side of the buttonhole foot These graduations are _ inch apart Just mark the starting points of the buttonholes let the needle pierce the fabric and set the index mark CA on the upper portion of the foot at the same graduation mark B as it was set for the first buttonhole Lower the foot Follow the procedures outline...

Page 21: ...Position 1 Step 1 Position 2 Step 2 2_ I ...

Page 22: ...ch width to 2 Set stitch length to 2 or 3 Place fabric under the presser foot and position lace 1_ inch from edge of fabric Position fabric and lace so that right stitch catches left edge of lace Centinue stitching so that edge of lace is overcast STRAIGHT OR THREE CORNERED TEAR Use disc 4A Stitch width 4 Stitch length at red mark Position tear under needle and stitch along the straight tear catch...

Page 23: ...s to be sewn on fabric and fit fabric into embroidery hoops Writing is done with either zigzag or straight stitching Remove presser foot Set stitch width for straight or zigzag stitches as desired Slip hoop and fabric under the needle lower presser bar and take one stitch to raise bobbin thread through fabrlc Using a medium speed stitch along marked outline guiding fabric carefully by hands iiiiil...

Page 24: ...per thread guides Pass a thread between each set of tension discs of the thread tension assembly Continue thread ing as you would for single needle sewing except where doubIe thread guides are provided Draw one thread through each side of the double thread guides and through each needle from front to back Pull several inches of thread through Thread bobbin and pick up bobbin thread as for single n...

Page 25: ... foot and needie plate The stitch width control must not be advanced beyond 2_ setting TURNING A CORNER To turn a square corner when stitching with a double needle stop stitching with the longer needle tip just piercing the fabric Raise the presser foot shift fabric half the turn lower presser foot and take one stitch Raise the presser foot again complete the turn and begin stitching in the new di...

Page 26: ... and are not absorbent Use a synthetic thread Use a fine needle as recommended in chart on page 5 Wind the bobbin in the usual way but do not pass thread between tension discs Guide thread by hand for a smoothly wound bobbin Choose the stitch leng_b that gives the most satisfactory seam Check thread tensions by sewing on a double thickness of the fabric Io be used Usually the upper thread tension ...

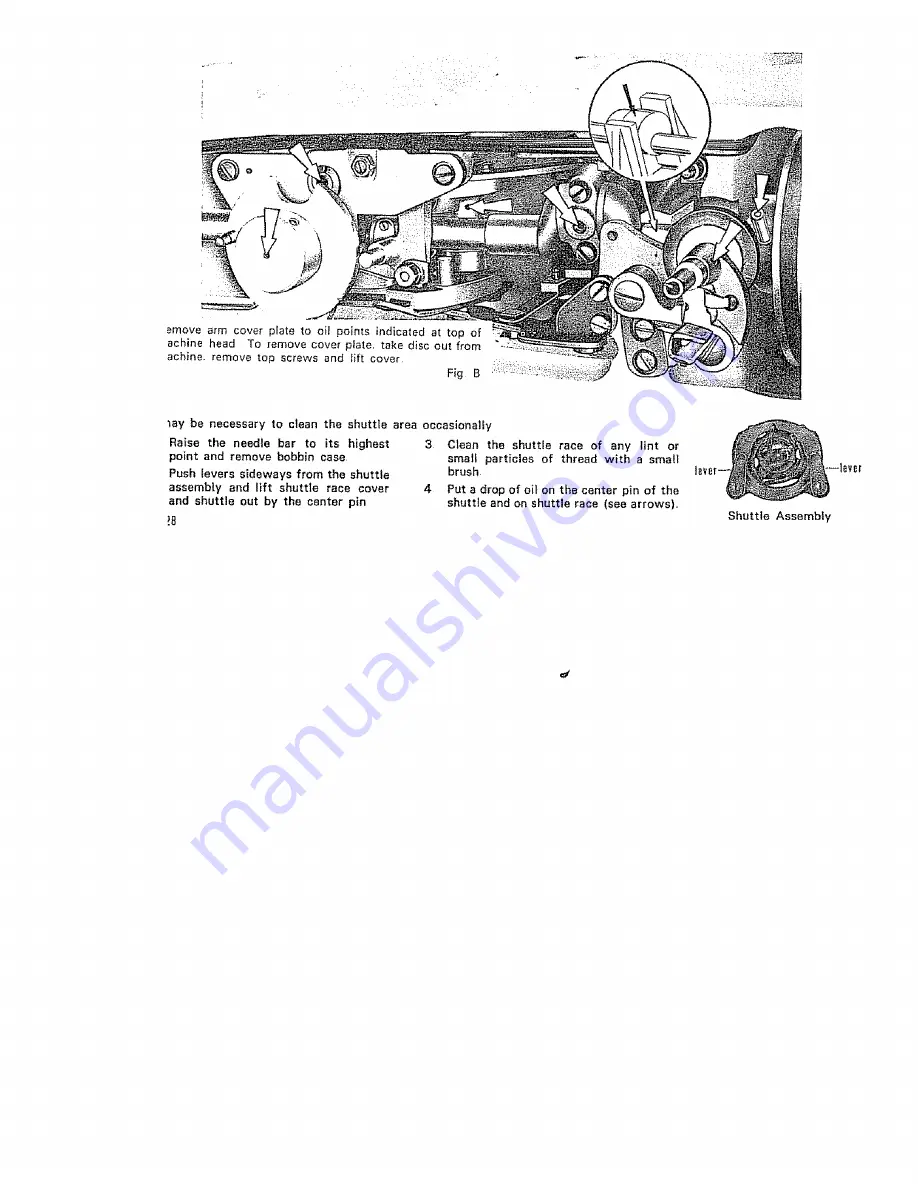
Page 27: ...cedure L _ Fig A CLEANING AND OILING Keep the moving parts free from dust and threads for quiet and efficient operation Cleaning should be done with a small brush When machine runs hard or makes excessive noise place a drop of KENMORE sewing machine oil at the points indicated in figs A B C Swing hinged face cover plate open to oit points indicated at end of machine head 27 J ...

Page 28: ...uttie area occasionally Raise the needle bar to its highest 3 Clean the shuttle race of any lint or point and remove bobbin case small particles of thread with a smatl Push levers sideways from the shuttle brush assembly and lift shuttle race cover 4 Put a drop of oil on the center pin of the and shuttle out by the center pin shuttle and on shuttle race see arrows _8 d Shuttle Assembly ...

Page 29: ...C Shulle Race Cover Shuttle Shuttle Race To reassemble hold shuttle by center pin and fit carefully into assembly opposite the shuttle driver Slip shuttle race cover into place Snap the levers into position Occasionally remove the needle plate and clean feed dog with a soft brush 29 ...

Page 30: ...d bobbin page 7 Do not pull fabric guide it gentry Choose correct size needle for thread and fabric page 5 Reset needle page 5 Reset presser foot page 15 Upper and lower threads not Draw both threads back under presser foot page 10 hing of drawn back under presser foot bread Feed dog down Raise feed dog page 15 kering Incorrect thread tension s Light pressure on presser foot Using two different si...

Page 31: ...ure on presser foot Threads knotted under fabric Choose correct size needle for thread and fabric page 5 Insert new needle page 5 Reset needle page 5 Loosen upper thread tension page 12 Increase pressure on presser foot page 10 Start to stitch at a medium speed Rethread machine page 9 Loosen upper thread tension page 12 Choose correct size needle fo thread and fabde page 5 Insert new needle page 5...

Page 32: ...PARTS LiST All parts listed here may be ordered through your nearest Sears or Simpsons Sears retail store catalog sales office or mall order house 10 16 17 tB 32 ...

Page 33: ...Pattern disc 1A B 3 6862 Bobbin box with 10 bobbins 1102 Pattern disc 2A B 4 6510 Bobbin case t t03 Pattern disc 3A B 5 6797 Light bulb 1119 Pattern disc 4A B 6 3015 Large screw driver 1105 Pattern disc 5A 8 7 3016 Small screw driver _ 106 Pattern disc 6A B 8 6745 Double needle in ivory case 1107 Pattern disc 7A B 9 6741 11 Single needles _n yellow case t4 1222 Bobbin winder tension disc 6742 4 14...

Page 34: ...orming a trlangle Make a llne of stitching _ from ford a If seam is puckered both tensions are too tight b If the bottom thread lays on the fabric tighten upper thread tension and repeat test See page t2 Figure 3 c If the top thread lays on the fabric loosen upper thread tension and repeat test See page 12 Figure 2 Grasp the stitching and pull with a snap to make threads break a If both threads br...

Page 35: ...MEMO b ...

Page 36: ...SEWI_G _ACHtbJE SEARS ROEBUCK AND CO Chicago IL 60884 U S A and SI_flPSONS SEARS L_MITED Toronto Ontario Canada Printed in Japan Parl No 69503 II5 ...

Reviews: