background image

3

KENMORE ELECTRIC COOKTOP INSTALLATION INSTRUCTIONS

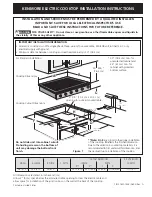
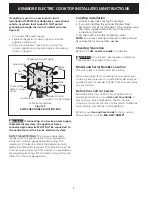
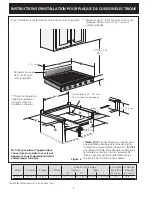
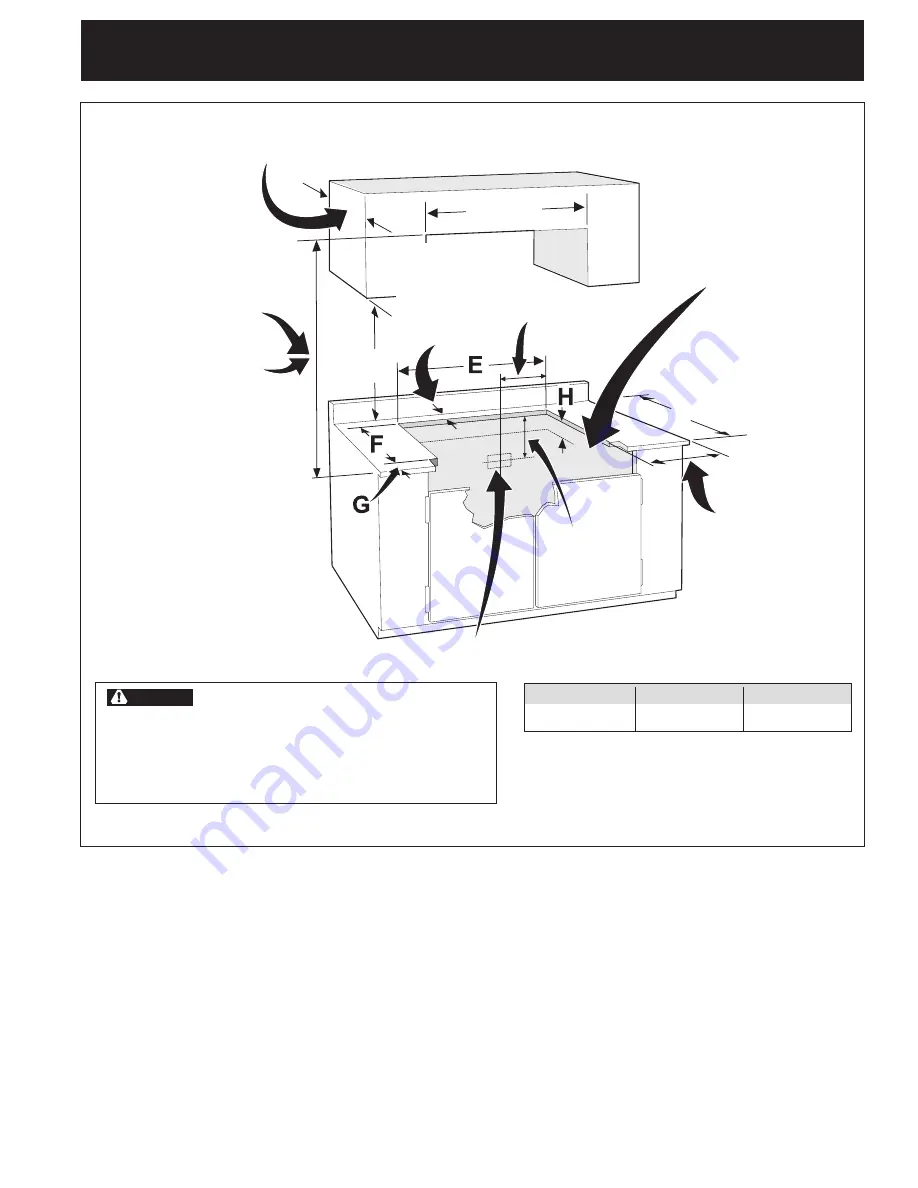
Figure 3 – COUNTERTOP CUTOUT OPENING
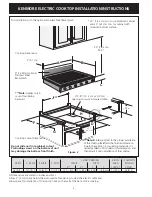
CAUTION

To eliminate the risk of burns or fire from

reaching over heated surfaces, cabinet storage space
located above the cooktop should be avoided. If cabinet
storage is provided, risk can be reduced by installing a
range hood that projects horizontally a minimum of 7"
(17.8 cm) beyond the bottom of the cabinets.

For dimensions 

E, F, G

 & 

H

, see Table on page 1.

Overhead Cabinet Should Not Exceed a
Maximum Depth of 13" (33 cm)

30" (76.2 cm) Min.
Clearance Between the
Top of the Cooking
Platform and the Bottom
of an Unprotected Wood
or Metal Cabinet

24" (61 cm) Min. when
Bottom of Wood or Metal
Cabinet is Protected by
Not Less Than 1/8" Flame
Retardant Millboard
Covered With Not Less
Than No. 28 MGS Sheet
Steel, 0.015" (0.4 mm)
Stainless Steel, 0.024"
(0.6 mm) Aluminum or
0.020" (0.5 mm) Copper

Approximate Location
of Junction Box

18"

(45.7 cm)

It is not recommended to use
drawer underneath cooktop.

Min. From Edge of

Cooktop to Nearest
Combustible Wall
(Either Side of Unit).

25" Min.

(63.5 cm Min.)

12"

(30.5 cm)

10"

( 25.4 cm)

L

 Min.

Recommended
Distance Between
Rear Edge of
Cutout  and Nearest
Combustible Surface
Above Countertop

36"(91.4 cm)

 Min.

MODEL

K

L

36" (91.4 cm)

7½" (19.1 cm)

1" (2.5 cm)

Summary of Contents for 36"

Page 1: ...ance between cooktop and overhead cabinetry is 30 76 2 cm WARNING Figure 1 P N 318201438 0603 Rev A A B C E F G H D Cooktop Dimensions 30 76 2 cm min for unprotected cabinet and 24 61 cm min for cabinet with protected bottom surface Cooktop Cutout Dimensions 30 Min 76 2 cm For Standard Installation 35 1 8 89 2 cm 1 2 5 cm 4 X 8 10 2 cm x 20 3 cm opening to route armoured cable 7 18 4 cm Note D E a...

Page 2: ...back of the cooktop Do not slide unit into cabinet cutout Protruding screws on the bottom of unit may damage the bottom front finish 30 76 2 cm min for unprotected cabinet and 24 61 cm min for cabinet with protected bottom surface Note D E are critical to the proper installation of the cooktop D reflects the finished dimension Due to the variation in countertop materials it is recommended to first...

Page 3: ...in Clearance Between the Top of the Cooking Platform and the Bottom of an Unprotected Wood or Metal Cabinet 24 61 cm Min when Bottom of Wood or Metal Cabinet is Protected by Not Less Than 1 8 Flame Retardant Millboard Covered With Not Less Than No 28 MGS Sheet Steel 0 015 0 4 mm Stainless Steel 0 024 0 6 mm Aluminum or 0 020 0 5 mm Copper Approximate Location of Junction Box 18 45 7 cm It is not r...

Page 4: ...ct the wire to the circuit panel at this time Electrical Requirements Observe all governing codes and local ordinances 1 A 3 wire or 4 wire single phase 120 240 or 120 208 Volt 60 Hz AC only electrical supply is required on a separate circuit fused on both sides of the line time delay fuse or circuit breaker is recommended DO NOT fuse neutral The fuse size must not exceed the circuit rating of the...

Page 5: ...manufacturer recommended procedure closely This appliance is manufactured with a white neutral power supply wire and a frame connected green or bare copper grounding wire DO NOT ground to a gas supply pipe DO NOT connect to electrical power supply until appliance is permanently grounded Connect the ground wire before turning on the power Figure 4 3 WIRE GROUNDED JUNCTION BOX Cable from Power Suppl...

Page 6: ...ing The current carrying capacity of the conductor is governed by the temperature rating of the insulation around the wire rather than the wire gauge alone Cooktop Installation 1 Visually inspect the cooktop for damage 2 If you are installing the optional Stainless Steel backsplash first fix it at the back of the cooktop using the screws supplied with the Kit and follow the instructions attached 3...

Page 7: ...t de 30 76 2 cm Figure 1 A B C E F G H D Minimum de 30 76 2 cm pour armoire non protégée Minimum de 24 61 cm pour surface protégée Ne glissez pas l appareil dans le comptoir Les vis qui dépassent sous l appareil pourraient endommanger l armoire Note D E sont des dimensions critiques pour une installation adéquate de la table de cuisson Assurez vous de respecter ces dimensions D reflète une dimensi...

Page 8: ...ate de la table de cuisson Assurez vous de respecter ces dimensions D reflète une dimension finale Étant donné la variation dans le matériel du comptoir il est recommandé de tailler un peu plus petit que cette dimension et l ajuster lors de l installation de l appareil Ouverture de 4 X8 10 2 cm x 20 3 cm pour l entrée de gaz Ne faites pas glisser l appareil dans l ouverture du comptoir Les vis qui...

Page 9: ...dable d un minimum de 0 015 0 4 mm d aluminium de 0 024 0 6 mm ou de cuivre de 0 020 0 5 mm Dégagement minimum de 30 76 2 cm entre le haut de la surface de cuisson et la base de l armoire en bois ou en métal non protégée L armoire supérieure ne doit pas excéder une profondeur maximale de 13 33 cm Emplacement approximatif de la boîte de jonction Minimum de K du rebord de la plaque de cuisson au mur...

Page 10: ...ou 120 208 Volts AC du panneau électrique à la plaque de cuisson Ne branchez pas encore le câble au panneau de circuits Exigences électriques Observez tous les règlements et les codes locaux applicables 1 Un câble électrique à 4 fils de 120 240 ou 120 208 Volts monophasé 60 Hz CA est requis sur un circuit séparé muni d un fusible sur chaque fil conducteur fusible temporisé ou disjoncteur recommand...

Page 11: ...uivant bien attentivement les directives recommandées par le fabricant Cet appareil est fabriqué avec un fil d alimentation neutre blanc et un fil dénudé en cuivre de mise à la terre connecté au châssis NE PAS utiliser un tuyau à gaz pour la mise à la terre NE PAS raccorder l appareil tant que sa mise à la terre n est pas complétée Raccordez les fils de mise à la terre avant de mettre l appareil s...

Page 12: ...st endommagée 2 Si vous installez le dosseret optionnel en acier inoxydable fixez le à l arrière de la table de cuisson à l aide des vis fournies et suivez les instructions fournies avec le dosseret Allez à l étape 3 si vous procédez à une installation standard c est à dire sans dosseret optionnel 3 Insérez la table de cuisson dans la découpe sur le dessus du comptoir NOTE N utilisez pas de pâte à...

Reviews: