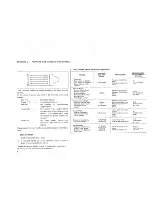
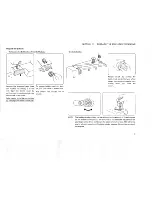
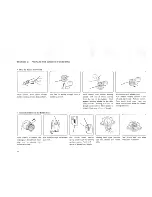
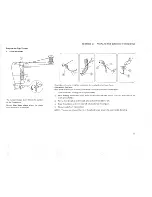
background image

Summary of Contents for 385.11607 Series

Page 1: ...OWNER S MANUAL S _ A RS SEWING MACHINE i_ i i ili iillii_ii i_ iii _ i i_ ...

Page 2: ...xpense for conditions beyond our contro Advice on the operation and care of your machine is always available at your nearest Sears Retail Store Please remember if you have questions about your machine or need parts and service always mention the model number and serial number when you inquire Kenmore Sewing Machine Record n space provided below the model number and serial number of this appliance ...

Page 3: ...opped into water Return the appliance to the nearest authorized dealer or service center for examination repmr electrical or mechanical adjustment 4 Never operate the appliance with any air opening blocked Keep ventilation openings of the sewing machine and foot controller free from accumulation of lint dust and loose cloth 5 Never drop or nsert any object into any opening 6 Do not use outdoors 7 ...

Page 4: ... Selector t 5 Stitch Length Control 16 Adjusting Stretch Stitch Balance Model 12614 only 36 Starting To Sew 37 3 LEARN THE STITCHES Straight Stitches t 8_22 o Straight Stitch 18 Use the Seam Guides 48 Turn a Square Corner d8 Topstitching 19 Left Needle Position 19 Sew in a Zipper 20_2 Use the Darning Plate 22 Darning 22 Zigzag Stitches 23_30 Basic Zigzag 23 Satin Stitch 24 Applique 25 Bar Tacking ...

Page 5: ... then your Kenmore goes anywhere can be stored any where Locate and Identify the Parts Take up Lever Bobbin Winding Tension Disc Upper Thread Guide Top Thread Tension Control Face Cover Plate Thread Cutter Needle Plate Shuttle Cover Extension Table Accessory storage box Thread spool pin 1 Pc For Model 385 11607 Thread Spoo Pins Bobbin Winding Spindle Stitch Length Control Reverse Stitch Control St...

Page 6: ...ctor Foot Control Needle Clamp Screw Presser Foot Carrying Handle Presser Foot Lever Free Arm _ Nomenclature Plate Identify the Accessories Bobbin Buttonhole opener Needle Large screw driver Darning p_ Lint brush Sliding buttonhole foot Zipperfoot Straight stitch foot Small screw driver Satin stitch foot ...

Page 7: ... ight 4 f Power switch _ Push the light and power switch to turn on the power and sewing light SAFETY FEATURE Your machine wil not operate unless the light power switch is turned on If you are interrupted or stop sewing turn off the light power switch to prevent injury to children Foot Control Use i Foot con ro The foot control regulates the speed at which you sew To increase speed gently press do...

Page 8: ...osition _Hig q High i _ position position up position Presser foot lever The Presser Foot Lever raises and lowers your presser foot You can raise it about 1 4 higher than the normal up position for easy removal of the presser foot or to help you place heavy fabrics under the presser foot Thread Cutter f cutter You don t need a pair of scissors to cut the thread after you finish sewing Just use the...

Page 9: ...sories are conveni To change the various presser ently located in the box feet raise the presser bar to its highest position by lifting the presser foot lever Loosen the presser foot thumb screw choose the proper foot insert from the bottom Tighten the screw using the large screw driver to make certain the foot is secure Choose the Needle and Thread To Change the Needle Flat side away from you o N...

Page 10: ...e Lace Organza Crepe Taffeta Voile Organdy Medium Weight Cotton Cotton Blend Percale Gingham Shantung Pique Seersucker Satin Knit Suitings Linen Wool Crepe Leather Medium Heavy Weight Corduroy Denim Wool Sailcloth Wool Flannel Gabardine Velvet Leather Heavy Weight Coating Upholstery Cotton Duck Heavy Twills Canvas Decorative top stitching on all types of fabric Stretch Fabric Polyester Double Knit...

Page 11: ...n case from shut tle pull open latch of bobbin case Pull bobbin case straight out of shuttle Wind the Bobbin Release clutch by turning the clutch knob inside the hand wheel toward you to stop the needle from moving while you wind the bobbin NOTE The bobbin winder stopper can be adjusted for the amount of thread needed on the bobbin example 1 2 full or full etc To make the adjustment use your large...

Page 12: ...ip off end of thread Wind thread unti winder stops Push bobbin winding spindle to the left and clip thread Remove bobbin Turn clutch knob away from you while holding hand wheel for normal sewing operation o Bnsert the Bobbin into the Bobbin Case f f Place bobbin in bobbin case Pull thread through slot of case making sure thread feeds clock as shown wise and is coming from bobbin as shown J Pull th...

Page 13: ...lever Place spool on spool pin as shown with thread coming from the back of the spool 1 2 3 4 5 NOTE J Draw thread into thread guide using both hands While holding thread near spool draw thread down into the tension area and then around the check spring holder Firmly draw thread up and through take up lever from right to left Draw thread down and slip it into left side needle bar thread guide Thre...

Page 14: ...th threads under and to the back of the presser foot leaving 4 to 6 inches of thread clear If you cannot pick up bobbin thread by following steps given above then check 1 Is needle threaded from front to back 2 Is thread tangled around needle 3 Are 3 to 4 inches of thread coming from the shuttle 4 Is thread from shuttle tangled 5 Is bobbin properly installed in the bobbin case 6 Is the machine thr...

Page 15: ...the higher the number the tighter the top th read Choose the Correct Tension The best tension will depend on the stiffness and thickness of the fabric the number of fabric ayers the type of stitch The top tnreaa is too oose Too side of fabric The too nreaa aDDears on the unaerside of the fabric L Tension is too loose The top thread shows through the bottom of the fabric The bottom side of the stit...

Page 16: ...ide of Fabric Reverse Stitch Control To reverse stitch hold down this control during sewi ng Release to sew forward again Bottom side of Fabric Too Tignt Corner of each ztgzag will Bull together or tne top side of fabrics 14 Bottom side of Fabric Too Loose The too thread will loop through bottom side of fabric and will be oulled almost together Bottom side of Fabric Just Right M nimize the amount ...

Page 17: ...ol not only determines the stitch you select but also regulates the stitch width for regular zigzag The different types of stitches are designated by color Straight Zigzag and Utility Stitches are red Stretch Stitches are brown Model 12614 only Buttonhole Settings are blue NOTE To avoid needle or fabric damage be sure your needle is up and out of fabric when adjusting this control 15 ...

Page 18: ... alter the buttonhole stitch density within the blue buttonhole range on the stitch length control U Stitch Length I i I m II 4 Stitch Length Control J To select Stretch Stitches set this control at T position In stretch stitch sewing Stitch Length Control should be in the detent position between S and L Tposition for most materials Depending upon the type of fabric used you may need to adjust thi...

Page 19: ...chine Holdon to threads during the sewing of the first 3 or 4 stitches of the seam 3 Test the machine stitch on a scrap of the fabric you plan to use The fabric should be double thickness Adjust the machine for the length of stitch and tension suitable to the fabric 4 Fabric should be placed under the presser foot with the bulk of the material to the left of the needle and the right edge of the ma...

Page 20: ...at it feeds naturally Do not force the fabric or try to pull it tight 18 J 7 At the end of the seam you may want to reverse to lock the stitch 8 Raise the presser foot and remove the fabric 9 Cut the threads Use the Seam Guides f Cornering Guide The seam guides on the needle plate are there to help you measure seam width The lines are 1 8 apart with the 5 8 and 7 8 lines marked Turn a Square Corne...

Page 21: ...its or blouses with one or two rows of topstitching around the outer edges of cuffs laoels or collars Here s How 1 2 3 I Lower the presser foot Keep the edge of the fabric next to the right edge of the presser foot Evenly guide the fabric along this edge to produce an even row of topstitching 3 8 from the edge Left Needle Position Stitch selector Model 12614 Model 11607 J Use Left Needle Position ...

Page 22: ... Model 116071 Stitch length control 2 Zipper foot To Sew 1 ZioDer teetn Ziooer tape Fold back the left seam allowance as shown 2 Turn under the right seam alow ance to form a 1 8 fold 3 Place the zipper teeth next to the 1 8 fold and pin in place 4 To sew the eft side of the zipper set the zipper foot on the left side of the needle 5 Lower the zipper foot o_ the right side at the bottom of the zip...

Page 23: ...sed to make cording for slip covers etc Cover a cord with a striD of bias fabric an0 sew as shown NOTE Use Low Bar Sewing Machine ZIPPER FOOT 6757 for invisible zipper and cording which can De obtained at any Sears retail store 11 To sew the right side of the zip per set the zlp_ er foot on the right side of the needle 12 Stitch across and below the bot tom of the zipper 13 Turn the corner and con...

Page 24: ...ine Stitch Stitch selector I I I Top thread tension control 1 to 4 No presser foot Model 12614 Model 11607 Stitch length control any number not necessary to adjust Darning plate Here s How 1 Put the darning plate on the needle plate see p 22 2 Remove presser foot and stretch fabric between embroidery hoops with hole centered 3 Draw the bobbin thread up through the fabric by holding the top thread ...

Page 25: ...ch for sewing buttons buttonholes hem ming overcasting mending and darn ing It can also be used to decorate with trims appliques and cut out work or as a decorative stitch iii ii i i i i i Here s How There are many ways to sew a zigzag stitch Consult the specific variations for detailed directions Satin Stitch p 24 Applique Work p 25 Bar Tacking p 25 Button Sewing p 26 Overcasting p 22 Three step ...

Page 26: ... stitch is a versatile and often used decorative stitch but t can also be used to overcast a raw edge for ex ample blankets linens tablecloths and napkins The Satin stitch is especially attractive in applique Close to 0 Stitch length Zigzag width Here s How Once your machine is set up to stitch you may want to experiment on a scrap of the fabric you are planning to use Too tight a satin stitch may...

Page 27: ...he outer edge of the applique When sewing corners lower the needle down into the fabric Raise the presser foot and pivot the fabric to the right or left SECTION 3 LEARN THE STITCHES Bar Tacking Set the Machine Stitch Top thread tension control 1 to 4 Stitch selector Model 12614 Model 11607 Stitch length control 0 5 to 1 Satin stitch foot J This stitch is similar to a very short satin stitch and is...

Page 28: ...n with the slot of the foot and place the left hole of the button just below the needle point 3 Lower the foot and turn the stitch selector to zigzag unti the needle point comes just above the right hole of the button 4 Sew about five stitches and raise needle i 5 Set the stitch selector at c_ again and sew a few stitches to lock thread J f J To strengthen the shank cut the threads leaving a 20 cm...

Page 29: ...ength control 1 to 2 Zigzag foot J Helpfu Hints Start overcasting about 1 8 inside the raw corner of your seam If you start right at the edge the fabric will bunch up and the stitches wil become tangled SECTION 3 LEARN THE STITCHES The Stitch and Its Uses This zigzag variation is very useful in garment construction and in finishing raw edges of any sewing project 27 ...

Page 30: ...urely repairing straight tears finishing seams 28 Seam Finishing Place the fabric under the presser foot so that the edge will be slightly inside the right hand side of the presser foot Guide the work so the right hand stitches fall at the edge of the fabric Mending Position the tear under the needle so that the stitching will catch both sides o f LaceWork Set the Machine Stitch Top thread tension...

Page 31: ...d hem is wider and will give and is used for knit and stretch fabrics 1 Finish the raw edge of your hem any way you desired See Overcasting p 27 2 Measure turn up your hem and pin NOTE For light weight fabrics you may needa double fold 3 Fold the material wrong side out on the edge to be stitched as shown leaving 1 4 of the finished hem edge showing 4 Place garment under presser foot in sucha mann...

Page 32: ...oped tucks on blouses and lingerie i _ _ i_ _ Here s How 1 For best effect set the stitch length as you desire you may need to tighten the top thread tension slightly allow the needle to just clear the folded edge of the fabric when it zigzags 2 If you sew rows of shell stitches space the rows 1 2 apart You can sew Shell Stitch o_ knits or soft silky wovens i_ any direction Box Stitching Set the M...

Page 33: ...eive a great deal of strain ie children s clothes The stretch stitch does not actually stretch as it is being sewn but is stitched in a forward and back motion sometimes called a reverse action stitch so that it will give when the fabric stretches instead of breaking This stitch can also be used for topstitching on all fabrics SECTION 3 LEARN THE STITCHES o f Rick Rack Stretch Model 12614 only Set...

Page 34: ...hing Set the Machine Stitch Stitch selector Top thread tension Stitch length control 1 to 4 control brown stretch stitch laosition t__J Zigzag foot Model 12614 only f Here s How J The Stitch and Its Uses This stitch can be used for sewing a seam with an overcast finish The seam is formed and finished in one operation It can be used when you are making swimwear ski pants and other garments that req...

Page 35: ...presser foot so that the stitches are made over the edge Or place your fabric to allow a 5 8 seam then trim seam allowance after NOTE When using stretch knit fabric use a blue stretch fabric needle which effectively prevents skipped stitches i f Elastic Stretch Stitch Model 12614 only Set the Machine Stitch Stitch selector Top thread tension Stitch length control 1 to 4 control brown stretch stitc...

Page 36: ...rap of fabric you plan to use to find the more suitable stitch length 34 1 a Carefully mark the buttonhole length on your garment b Change to the sliding buttonhole foot c nsert the garment under the foot with the buttonhole mark ing running toward you 3 F ne Coarse stitches stitches for light for neavy fabric fabrics 2 a Move the slider A toward you so that the top mark C on the slider meets the ...

Page 37: ... reach the back marking of the buttonhole c Stop sewing at the right stitch 6 a Set the stitch selector at I_l m b Sew 4 to 6 stitches c Stop sewing at the left stitch 7 Remove the fabric and cut the hole open with the buttonhole opener NOTE When sewing at the edge of fabric set sliding buttonhole foot as illustrated and sew n reverse 13_ _ _ _ _ m _ h LJ L_J U _ 35 ...

Page 38: ...gth set at 0 Thread knotted under fabric Thread caught in shuttle Machine Jamming Knocking Noise Lint in bobbin case or shuttle CORRECTION Choose correct size needle for thread and fabric Insert new needle Reset needle Loosen upper thread tension Start to stitch at a medium speed Rethread machine Loosen upper thread tension Choose correct size needle for thread and fabric Insert new needle Replace...

Page 39: ... two different sizes or kinds of thread Bent or bunt needle Loose presser foot Fabric very sheer or very soft Choose correct size needle for thread and fabric Rethread machine Tighten upper thread tension Do not pull fabric guide it gently Reset presser foot Rewind bobbin Replace needle plate or polish off burrs completely Do not pull fabric guide it gently Choose correct size needle for thread an...

Page 40: ...that your machine operates at its best you need to keep the essential parts clean at al times The feed dogs and shuttle race areas can attract dust and lint Your machine can become sluggish or knock loudly if a thread is caught Check and clean those areas about every three months under normal use If you sew frequently clean more often Clean the Feed Dogs Follow these directions f 1 Unplug the mach...

Page 41: ...an the shuttle race with a int brush 4 Put a drop of oil on the center pin of the shuttle and shuttle race Do not over oil Shuttle driver _ever heve _ __ Snut_ie 9ace _ _YS _t_ L Pointed I _ OII here __ _ShoUtetrle Race To Replace Shuttle Assembly 1 Position shuttle race as illustrated so that shuttle driver is forming half moon on the left side of the machine 2 Hold shuttle by center pin and posi...

Page 42: ...cess oil otherwise it may stain fabric Kenmore sewing machine oil is available at your nearest Sears retail store NOTE Unplug the machine before oiling Remove needle and put needle bar in full down position Oil behind the Face Cover Plate and under the Arm Cover Plate Oil the Underside Face cover plate Shuttle cover Open face cover plate and or remove arm in illustration Use only a drop of oil do ...

Page 43: ...14020 No 11 Single needles ORG 647814031 No 14 Single needles RED 647814042 No 16 Single needles PUR 647814053 No 18 Single needles GRN 6 801506008 Needle clamp with screw 7 648801108 Sliding buttonhole foot 8 650802014 Straight stitch foot 9 735503018 Standard zigzag foot 10 647807008 Satin stitch foot 11 593401008 Zipper foot 12 941800000 Concealed zipper foot 13 647112009 Thumb screw 14 7848050...

Page 44: ...8 41 N Needle 4 7_8 41 Needle clamp screw 4 7 41 Needle plate 3 38 Needle thread and fabric chart 8 O Oiling 40 Overcasting stitch 27 Overcast stretch stitching 32 Parts list 41 Performance problems chart 36_37 Pine leaf stretch stitching 33 Plug connector 4_5 Portable case 3 Power switch 5 Presser foot 4 Presser foot lever 4 6 Replacing bobbin case 9_10 Reverse stitch control 3 14 Rick rack stret...

Page 45: ...wing machine including electronic components motor wiring switch and 1 speed control li FULL 90 DAY WARRANTY ON ALL PARTS AND MECHANICAL ADJUSTMENTS For 90 days from the date of purchase Sears will free of charge replace any parts and provide mechanical service _ necessary for proper operation of the sewing machine except for normal maintenance _ WARRANTY SERVICE IS AVAILABLE BY RETURNING THE SEWI...

Page 46: ...ing Machine will be shown on your nomenclature plate on the back of your Sewing Machine See page 4 for location WHEN ORDERING REPAIR PARTS ALWAYS GIVE THE FOLLOWING INFORMATION PART NUMBER PART DESCRIPTION MODEL NUMBER NAME OF ITEM If the parts you need are not stocked locally your order will be electronically transmitted to a Sears Repair Parts Distribution Center for handling SEARS ROEBUCK AND C...

Reviews: