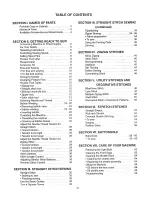
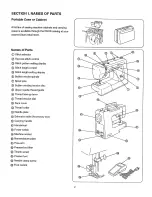
background image

Summary of Contents for 385.12314

Page 1: ...NE A COUDRE Model Modelo ModUle 385 12314 CAUTION Before using this sewing machine read this manual and follow all Safety Rules and Operating Instructions Safety Instructions Warranty Specifications Operation Care and Maintenance Troubleshooting Sears Roebuck and Co Hoffman Estates IL 60179 U S A t ...

Page 2: ...est Sears store or service center for examination repair electrical or mechanical adjustment 4 Never operate this sewing machine with any air opening blocked Keep ventilation openings of this sewing machine and foot controller free from accumulation of lint dust and loose cloth 5 Never drop or insert any object into any opening 6 Do not use outdoors 7 Do not operate where aerosol spray products ar...

Page 3: ...uste mec nico o el_ctrico 4 Nunca opere la m quina con cualquier salida de aire bloqueada Mantenga las aberturas de ventilaci6n de la m quina de coser y el pedal de control libre de acumulaci6n de pelusa polvo y residuos de tela 5 Nunca deje caer o introduzca objetos en ninguna abertura de la m quina 6 No la utilice en exteriores 7 No opere donde se utilizan aerosoles o sitios de administraci6n de...

Page 4: ...a machine au magasin Sears le plus proche pour une v_rification une r_paration un r_gtage _tectrique ou m_canique 4 N utilisez jamais une machine dent les ouvertures de ventilation sent obstru_es Maintenez les condiuts d a_ration libres de toute accumulation de charpie de poussi_re et de fibres de tissu 5 Ne laissez tomber et n introduisez aucun objet dans les ouvertures de la machine 6 N utilisez...

Page 5: ...BRE TODAS LAS PARTES Y AJUSTES MECANICOS Durante 90 dfas desde le fecha de la compra Sears ofrece fibre de cesto reemplazar cualquiera parte y proveer el servicio mecanico necesario pare a aprcpiada operaci6n de ta m quina de coser excepto para mantenimiento _orma El servicio de garantia se puede obtener enviando la m quina de coser al centro departamento de Servicios Sears mas cercano en los Esta...

Page 6: ...o de puntadas tntegradas Ojales Dimensiones de la m _quina Peso Especificaci6n M s de 730 _pm 4 mm M_xima 5 mm M_ xima 34 14 Funci6n de ojaf incorporado de 4 pasos 390 mm 15 4 de ancho x 155 mm 6 1 de profundidad x 290 mm 11 4 de altura 62kg 13 5 fbs Description Vitesse de couture Maximum Longueur du point Largeur du point Ensemble de points points de couture points int_gr_s Boutonniere Dimensions...

Page 7: ...nsion is too loose 28 Stitch Selector 30 Stitch Length Control 30 Adjusting Stretch Stitch Balance 30 Reverse Stitch Control 30 SECTION i 1 STRAIGHT STITCH SEWING Straight Stitch 32 Starting to sew 32 Finishing sewing 32 Use the Seam Guides 32 Turn a Square Corner 32 SECTION II1 STRAIGHT STITCH SEWING continued Topstitching 34 Zipper Sewing 34 36 Fabric preparation 34 To sew 36 Using the Darning P...

Page 8: ...ector de patron 31 Control de la longitud de puntada 31 Equilibrio de los patrenes distorsionados 31 Control de puntada reversa 31 SECCION IlL COSTURA DE PUNTADA RECTA continuaci6n Para terminar la costura 33 Use de las gufas de costura 33 Para girar en esquinas de nguto recto 33 Costura a la vista 35 Costura de cremalleras 35 37 PreparaciOn de la tela 35 Para coser 37 Use de a tapa zurcidora 39 Z...

Page 9: ...ecte 29 Si la tension est trop 6levee 29 Si la tension est trop faible 29 S_lecteur de point 3l R_glage de la fongueur du point 3t Comment r6gier l _quifibre d un motif extensible 3l Bouton de marche artiste 3 PARTIE III COUTURE AU POINT DROIT suite Utilisat on de guides de couture 33 Couture d un angle droit 33 SurpiqQre 35 La couture des fermetures glissi6re 35 37 Pr_paracion du tissu 3_ La cout...

Page 10: ...ing display _ Stitch length control _ Stitch length setting display _ Bobbin winder spindle O Spool pins _ Bobbin winding tension disc _ Upper needle thread guide _ Thread take up lever _ Thread tension dial Q Face cover _ Thread cutter _ Needle plate _ Extension table Accessory box _ Carrying handle 0 Handwheel _ Power switch C_ Machine socket Nomenclature plate _ Free arm Presser foot lifter _ T...

Page 11: ...6n del hiIo superior _ Cubierta frontal Cortahilos _ Placa de aguja _ Estuche de accesorios Ampliaci6n m6vil de la superficie de costura _ Asa de transporte _ Volanta _ Interruptorde corriente _ Enchufe de la m_quina Placa de identificaci6n _ Brazo libra Palanca de elevaci6n del prensatelas Tornillo del soporte de prensatelas _ Prensatelas _ Tornillo de sujeci6n de la aguja Pedalde control S61ecte...

Page 12: ...600 993011800 801506008 648801108 650802014 735503018 647807008 593401008 941800000 647112009 784805004 000009803 647808009 802424004 820832005 647803004 741814003 200012104 214872O11 200104104 200103103 941620000 200262101 735801008 ShutUa hook Bobbin case 10 x Bobbin Bobbin winder rubber ring Assorted needle set 5 x No 11 stretch fabric needte BLUE 5 x No 11 needle ORANGE 5 x No 14 needle RED 5 ...

Page 13: ...nsatelas de doble arraste Prensatelas pare aiforzas Prensatetas recogedar Prensatelas pare fruncidos Enhabrador de aguja Tapa de Zurcido Estos artfculos no se proveen con la m_quina pete pueden ser ordenados con lee instrucciones arriba descritas Accessoires disponibles routesces pi_ces peuvent _tre commandoes dans un magasin ou un centre de r_paration Sears JOIGNEZ TOUJOURS A VOTRE COMMANDE LES R...

Page 14: ... off the power switch and unplug from the power supply When leaving the machine unattended When attaching or removing any parts When cleaning the machine Do not place anything on the foot control when not sewing Operating Instructions For appliances with a polarized plug one blade wider than the other To reduce the risk of electric shock this plug is intended to fit in a polarized outlet only one ...

Page 15: ...ur ta couture en courset ne touchez aucune des parties mobiles tortes que le levier releveur du ill le volant ou t aiguille Eteignez et d_branchez syst_matiquement la machine de la prise de courant Iorsque vous laissez la machine sans surveillance lorsque vous fixez ou retirez des parties d_tachables lorsque vous nettoyez Ia machine Ne placez rien sur la p_dale de contr61e sauf pendant I utilisati...

Page 16: ...The presser foot lifter raises and Rowersyour presser foot You can raise it about 1 4 O 6cm higher than the nor mal up position for easy removal of the presser foot or to help you place heavy fabric under the foot Thread Cutter _ Thread cutter You do not need a pair of scissors to cut threads after sewing Just use the built in thread cutter J Accessory Kit Standard accessories are located inside t...

Page 17: ...ormal para que le resulte m_s f eil colocar teias gruesas o come ayuda para quitar el prensate as Relbve pied presseur _ Relive pied presseur _ Position re eve_ normale _ Position releve_ maximum Le levier de relevage du pied presseur remonte et abaisse le pied presseur Vous pouvez Is remonter d environ O 6cm 1 4 plus haut que la position norma e pour retirer ph_s facilement le pied presseur ou po...

Page 18: ...t a new needle into the needle clamp _ with the flat side to the rear When inserting the needle into the needle clamp push it up as far as it goes Tighten the needle clamp screw O firmly by turning it clockwise To check for a good needle place the flat side of the needIe onto something flat needle plate gIass etc The gap between the needle and the flat surface should be consistent Never use a bent...

Page 19: ...ptee nunca agujas dobladas o con la punta en mat estado Las agujas dafadas suelen causer enganches y carreras rreparables en tejidos de punto sedas fines y de imitaci6n seda Eteignez la machine Faites monter f aiguille le plus haut possible en tournant le volant en sens antihoraire et abaissez te pied presseur Desserrez ta vis du pince l aiguilleC en la tournant en sens antihoraire Retirez aiguitl...

Page 20: ...or straight stitching with center needle position For Straight stitch page 32 Topstitching page 34 Straight stretch page 52 Sliding buttonhole foot Use this foot for manual buttonhole making It is marked to help you measure a buttonhole accurately For Buttonhole sewing page 58 60 f J Zipper foot This foot can be set to sew on each side of the zipper The edges of the foot guide the zipper and keep ...

Page 21: ...ales manualmente Est marcado para ayudade a medir exactamente los ojales Para Ojal incorporado p gina 59 61 Pied _ point droit Ce pied est uniquement recommand8 pour la couture points droits avec raiguille en position centrale Pour Point droit page 33 Surpiq_re page 35 Point droit extensible page 53 Pied _ boutonniere Utilisez ce pied pour la r_alisation de boutonnieres II porte des marques de rep...

Page 22: ...n caused by damaged needles_ Always purchase a good quality thread tt should be strong smooth and consistent in thickness WEIGHT Very Light Light FABRIC Chiffon Georgette Fine Lace Organdy Organdy Net Tulle Batiste Voile Lawn Pure Silk Crepe de Chine Sheer Crepe Chambray Handkerchief Linen Gingham Challis Percale Wool Crepe Peau de Sole Taffeta Satin Silk Surah Satin backed Crepe Qiana k Single Kn...

Page 23: ...ncia para comprebar que no est_n embotadas o despuntadas Les agujas dafiadas suelen causar enganches y carreras irreparabies en tejidos de punto sedas finas y de imitaci6n seda Adquiera siempre hilo de buena calidado Deber ser fuerte suave y de grosor uniforme PESO TIPO DE TELA T PO DE AGUJA Gasa Gasa delgada Encaje fine Organdi Maria Organdi Universal Muy ligera Tul Punta de bola Batista Gasa Lin...

Page 24: ...ricots los soles fines et les _toffes sembtables la sole sont d_finitifs et sont souvent provoquSs par des aiguilles ab_m_es Achetez toujours du fil de bonne qualit_ II dolt 6tre solide lisse et d _paisseur rOguliere f Diam_bre _ Poids Tissu Type d aiguilte d aiauille Tr_s l_ger Mousseline Cr_pe Georgette Dentelle fine Organdi Tulie UniverselIe g 65 Pointe bout rond 9 65 Batiste z_phyr linon pure ...

Page 25: ... blank page p_ gina blanca page blanche 17 ...

Page 26: ...u D Shuttle cover _ Bobbin case To remove the bobbin case _ from the shuttle pull open the latch of the bobbin case Pull the bobbin case straight out of the shuttle Bobbin winding Release the clutch by pulling out the handwhee This will stop lhe needle from moving while you wind the bobbin Drawthread from spool Guide the thread around the thread guide Thread through the hole in the bobbin from the...

Page 27: ...ortacaniltas para abrir Deje recto hacia afuera el portacanillas de la tanzadera Retirez le porte canette _ de fa navette en tirant le Ioquet de la canette vers vous Sortez le porte canette en le tirant tout droit de la navette Embobinado de la canilla Ubere el embrague jalando e volante y asf evitar que la aguja se mueva mientras devane la bobina Bobinage d une canette de fil Tirez le volant vers...

Page 28: ...atically Return the bobbin winder to its original position by moving the spindle to the left and cut the thread Push the handwheet to the left to engage crutch The machine does not function until the clutch is engaged NOTE Position of the bobbin winder stopper is adjustable for the required amount of thread on bobbin example 1 2 full or full etc Use a screwdriver and loosen the screw one turn or l...

Page 29: ...ette la position d origine en poussant I axe vers la gauche et coupez le fil Empuje el volante a la izquierda para la engranar el embrague La m_quina no coser_ hasta qua el embrague est_ engranado con la m_quina _ Pousser le volant vers t int_r eur La machine ne fonctiennera pas rant qua I embrayage n est pas engag_ NOTA El tope del devanador de canillas puede set ajustado a la cant dad de hilo qu...

Page 30: ...bobbin Draw the thread through the slot of lhe case Continue to draw the thread under the tension spring and through the opening Pull out about 4 lOcm of thread Holding the latch open position the bobbin case into the shuttle and release latch Case should lock into place when the latch is released J J 22 ...

Page 31: ... par Ia fente du porte canette Continue tirando del hilo debaio del resorte tensor y a tray s de la abertura Deje sobresalir aproximadamente lOem 4 de hilo Tirez le fit sous le ressort de tension et faites le passer par te trou 3qrez environ lOcm 4 de fil Con el ret_n abierto meta el portacaniflas en la lanzadera y tibere el ret6n Ouvrez le loquet pour engager le porte canette fond dans la navette...

Page 32: ...ck spring hotdero Firmly draw the thread up from right to left over the take up lever and down into the take up lever eye Slide the thread behind the needle bar thread guide on the left Thread the needle from front to back or use a needle threader Drawing up bobbin thread Raise the presser foot Hold the needle thread lightly with your left hand and turning the handwheel counterclockwise toward you...

Page 33: ...de la aguja Tenez le fil de raiguille et passez le sous le guide ill En retenant le fit pros de la bobine tirez le fil vers le has et de la droite vers Ia gauche autour du dispoeitif ressort lqrez ferrnement le fil vers le haut puis de adroite vers la gauche dans I oei let du levier releveur de fil Par ia gauche giissez le fil derri6re ie guide situ_ sur la barre d aiguilte Enfilez l aiguifle de I...

Page 34: ...ickness of the fabric number of fabric layers type of stitch J Tension is too tight 0 Needle thread Top thread _ Bobbin thread Bottom thread To loosen _ Right side Top side of fabric _ Wrong side Bottom side of fabric The bobbin thread shows through on the right side of the fabric and it feels bumpy Turn the dial to a lower tension setting num ber to loosen the needle thread tension J Tension is t...

Page 35: ...s ills erois_s entre los deux _paisseurs de tissu comme illustr_ gauche agrandi pour montrer lee d6tails r En regardant le dessus et le dessous de la couture vous remarquerez qu il n y apas d interruptiono Los points sent align6s et _gaux Lots du r_gtage de ta tension du fil de I aiguille plus le num4ro est grand plus le fil sere tendu Le r6sultat d_pend de la raideur et de I _paisseu du tissu du ...

Page 36: ...f fabric Minimize amount of needle thread visible on the wrong side bottom side of fabric without causing excessive puckering or causing bobbin thread to show on the right side top side of fabric Results vary with fabric thread and sewing condition Tension is too tight _ Right side Top side of fabric _ Wrong side Bottom side of fabric Corner of each zigzag pulls together on the right side of fabri...

Page 37: ...a o haciendo que el hilo de la eanil a se vea en la parte de arriba de la tela Los resultados pueden variar seg_n ta tela hilo y eondiciones de eostura Tension correcte C Endroit du tissu _ Envers du ttssu R_duisez la quantit_ de fil de t aiguitle visible sur renvers du tissu sans pour autant plisser excessivement le tissu et sans que le fil de la canette n apparaisse sur I endroit du tissu Les r6...

Page 38: ...setting To select a stretch stitch set the control at _ STRETCH NOTE When you select a stitch Red or Green or button hole Blue make sure that the stitch length control is NOT set at _r STRETCH Study the red green gold and blue zones on the stitch length control These are recommended zones of stitch length and are color coded to the stitches Adjusting Stretch Stitch Balance In stretch stitch sewing...

Page 39: ...den a los colores de las puntades Rdglage de la Iongueur du point _ Rep_re de reglage _ Reglage de Iongueur du point Plus le chiflre du r_glage est grand plus le point est long A 0 I avance est hullo Le bouton de r_glage de la longueur du point poss_de _galement une position de r_glage pour los points extensibles Pour coudre des points extensibles il suffit de r_gler ce s_tecteur sur fa position _...

Page 40: ... stitch control and sew several reverse stitches Raise the presser foot Remove the fabric draw the threads to the back and cut them with the thread cutter The threads are cut in a proper length for the next seam Use the Seam Guides C Cornering guide _ Guide lines in inches _ Guide lines in millimeters The seam guides on the needle plate are there to help you measure seam width The lines are 1 8 0 ...

Page 41: ... ture Abaissez te pied presseur at tirez les ills vers I arri_re Appuyez doucement sur ta p_dale de contr6 e Guidez le tissu le long de ta tigne de rep6re en laissant le tissu avancer naturellement Finition d une couture Pour arr_ter l extr_mit_ des coutures appuyez sur le bouton de marche artiste el piquez plusieurs points en arri_re Relevez le pied presseur Retirez le tissu tirez ies Ills vers l...

Page 42: ...pelsorcollar Lower thepresser footandkeeptheedge ofthefabricnexttotherightedgeofthepresser foot Evenly guidethefabricalongtheedgetoproduce anevenrowof topstitching 3 8 09cm fromtheedge Zipper Sewing O Stitch selector A Stitch length 2 O Needle thread tension 2 to 6 _ Presser foot Zipper foot Fabric preparation _ Right side of fabric End of opening _ Top edge of fabric 3 4 2 0mm Ptace right sides t...

Page 43: ...coutures d_coratives et des garder les bords plats et rigides Vous pouvez orner les en sembles et les blouses avec une ou deux surpiq_res autour des po gnets revers et cols Abaissez le pied presseur et gardez le bord du tissu pros du bord droit du pied Cousez a nsi pour faire une surpiq_re r_guli_re 09cm 3 8 du herd Costura de cremalleras 6 cierres _ Selector de patr6n A _ Control de la longitud 2...

Page 44: ...he top of the zipper Lower the needle slightly into the fabric raise the foot and remove the basting stitches along the zipper opening Open the zipper to move the sliderQbehind the zipper fool Lower the foot and stitch the remainder of the seam making sure the fold is even _ Slider _ Right side Top side of fabric Close the zipper and spread the fabric fiat with the right side top side of fabric _ ...

Page 45: ...issu auras du pli et du ruban de la fermeture _ r Piquez travers toutes les _paisseurs de tissu auras du pli Arr6tez vous juste avant que le pied atteigne e eurseur sur le ruban de la fermeture environ 5cm 2 du haut de la fermeture Piquez I_g_rement I aiguille dans le tissu remontez le pied et retirez les points de b ti qui ferment l ouverture Ouvrez la fermeture pour d_ placer le curseur _ derrie...

Page 46: ...ng plate holes the darning plate in the following ways Darning P38 Buttom Sewing P 44 J Darning D Stitch selector A or B _ Stitch length Any _ Needle thread tension 1 to 4 _ Darning plate Presser foot Removed Put the darning plate on the needle piate Place fabric with the hole in the center on an embroidery hoop Lower the presser bar and sew at a slow speed Move the fabric back and forth slow y un...

Page 47: ...epriser voir page 39 Coudre es boutons voir page 45 Zurcido _ Selector de patrSn A o B _ Control de la Iongitud Cua quier mJmero Q TensfSn dei hilo de la aguja 1 a 4 _ Los dientes del transporte Bajados Prensatelas Ningt n prensatelas Reprisage _ S_iecteur de point A ou B _ Longueur du point route _ Tension du fil sup6deur 1 4 Griffes d entrainement Descendues Pied presseur Pas de pied de biche Co...

Page 48: ...be used to decorate with trims appliques and cut work or as a decorative stitch TYPE LENGTH J J Satin Stitch 0 Stitch selector C Stitch length 05 to 1 _ Top thread tension 1 to 4 _ Presser foot Satin stitch foot TYPE LENGTH The satin stitch is often used to decorate and to overcast the raw edge of blankets linens tablecloths napkins etc It is also attractive in applique Once your machine is set up...

Page 49: ...int d_coratif Puntada en satfn _ Selector de patr6n C _ Control de la Iongitud 0 5 a 1 _ Tensi6n del hilo de la aguja 1 a 4 _ Prensatelas Prensatelas pare puntada decorativa Point de bourdon _ S_lecteur de point _ Longueur du point _ Tension du fil sup6rieur I_ Pied presseur C 05 1 1 4 Pied point de bourdon La puntada en satin es muy vers_til y frecuentemente utilizada como puntada decorativa y ta...

Page 50: ...ic with tailor s chalk_ Form each pattern with satin stitch adjusting stitch width 0 TYPE LENGTH Applique _ Stitch selector C Stitch length 0 5 to 1 Needle thread tension 1 to 4 _ Presser foot Satin stitch foot Baste applique pieces on the fabric or fuse the applique pieces with iron on fabric joiner Stitch around the applique making sure the needle falls along the raw edge of the applique f f 0 T...

Page 51: ...craie de tailleur Suivez chaque motif au point de bourdon en r6glant ia largeur du point Aplicaciones Appliques I_ Selector de patr6n C _ S_Iecteur de point C _ Control de la Iongitud 0 5 a 1 _ Longueur du point 0 5 1 I_ TensiOn de_ hilo de la aguja 1 a 4 _ Tension du fit sup_ riur 1 _ 4 Q Prensatelas Prensatelas para puntada _ Pied presseur Pied point de bourdon decorativa Bastee las piezas de ap...

Page 52: ...tor at B 2 Match the holes on a button with the horizontal slot of the zigzag foot and place the left hole of the button just below the needle point of B 3 Lower the foot and turn the stitch selector to zigzag until the needle point comes just above the right hole of the button 4 Sew about five stitches then raise the needle 5 Set the stitch at B again and sew a few stitches to lock the thread To ...

Page 53: ...s orificios det bot6n con la ranura horizontal del prensatelas y coloque el agujero izquierdo dee bot6n exactamente debajo de la punta de ta aguja B 3o Baje e prensatelas y gire el selector de puntada a la puntada zigzag hasta qua la punta de la aguja penetre en el agujero derecho del bot6n 4 Cose 5 puntadas aprox y levante la aguja 5 Ajuste nuevamente el selector de puntada en B y cose un par de ...

Page 54: ...titch length t to 3 _ Needle thread tension i to 4 _ Presser foot Zigzag foot O Lightweight fabric _ Heavyweight fabric _ Wrong side Bottom side of fabric On heavyweight fabrics that ravel the raw edge should be overcast first Then fold the hem as illustrated leaving 1 4 0 6cm of the hem edge showing Position the fabric on the machine so that the needle just pierces the folded part of the fabric w...

Page 55: ...zig zag Ourlet invisible O S61ecteur du point E ou G _ Largeur du point 1 3 _ Tension du fil sup_rieur 4 _ Pied presseur Pied zig zag _ Tetas ligeras _ Telas gruesas _ PaNe de abajo la tela En telas gruesas primero deber rematar el borde Despu6s pliegue el dobladillo de la forma indicada en ta ilustraci6n dejando de 0 6cm 1 4 del borde cosido a la vista Coloque la teta en la m quina de tal forma q...

Page 56: ...GTH J Multiple Zigzag Stitch O Stitch selector D _ Stitch length 0 5 to 1 Q Needle thread tension 1 to 4 _ Presser foot Zigzag foot This is used to finish seam allowance on synthetics and other fabrics that ten_ to pucker The stitch is also excellent for darning and mending tears Seam finishing Place fabric under the presser foot in such a manner that the edge is slightly inside the right hand sid...

Page 57: ... la4 Prensatelas pare zig zag Esta puntada de costura es usada para terminar el horde del exceso de tela del dobladiflo en telas sint6ticas y telas que tienden a fruncir esta puntada tambi6n es excelente pare hecer remiendos arreglar desgarros y zurcir rotes _ S61ecteur de point D _ Longueur du point 0 5 _ 1 Tension du fil sup6rieur 1 4 _ Pied presseur Pied zig zag On utilise ce point pour finir t...

Page 58: ...ed edge of the fabric at the zigzag stitches If you sew rows of shell stitches space the rows at least 5 8 15cm apart You can also sew shell stitches on knits or soft silky woven fabrics in any direction O TYPE LENGTH Decorative Stitch of Geometric Patterns Stitch selector H or I _ Stitch length Green zone _ Needle thread tension 1 to 4 _ Presser foot Satin stitch foot For a delicate appearance on...

Page 59: ... le tissu et piquez sur le biais Vous aurez peut 6tre besoin d augmenter I_g_rement la tension du fit sup_rieur Laissez I aiguille tomber juste en dehors du bord pli_ du tissu lors du zig zag Si vous cousez des rang_es de points coquille espacez les rang_es d au moins 15cm 5 8 Vous pouvez 8galement coudre des points coquiltes sur les tricots et les _toffes soyeuses dans toutes les di rections Punt...

Page 60: ... A Center needle position Otherwise the needle may strike the presser foot and possibly break ttl t I 1 TYPE I1 I LENGTH or o ou Use it to reinforce areas such as crotch and armhole seams as well as to eliminate puckering on knits and stretch fabrics Also use when constructing items requiring extra strength such as backpacks Rick rack Stretch _ Stitch selector _ Stitch length Needle thread tension...

Page 61: ...us que le s6lecteur de point est A Autrement I aiguille heurtera le pied et se cassera certainemento 0sela para reforzar reas coma braguetas pufos de camisa y tambi_n pare evitar deshilachamientos en telas de punto y telas el_sticas Use tambt_n esta puntada pare construir elementos que requieran refuerzos especialmente fuerte coma balsas y mochila Utilisez te pour renforcer les coutures d enlre ja...

Page 62: ...lace the fabric to allow a 5 8 6cm seam then trim seam allowance Raw or worn edges of older garments can be overcasted to prevent further raveling NOTE Use a 11 blue stretch needle which effectively prevents skipped stitching O TYPE LENGTH f J Serging _ Stitch selector _ Stitch length _ Needle thread tension _ Presser foot G Gold stretch stitch position 1 to4 Zigzag foot This stitch is ideal for I...

Page 63: ...de ski et autres v_tements extensibles POUR COUDRE Placez e bord brut du tissu _ gauche de aiguille comme iltustr_ Cousez de mani6re _ ce qua I saiguiile perce le tissu tout pros du bord ext_rieurr Ou encore placez le tissu en pr_ivoyant une ressource de 16cm 5 8 puis recoupez la ressource Les bords bruts ou effifoch6s des vieux v6tements peuvent 6tre surjet6s de cette mani6re pour _viter effiloch...

Page 64: ...seful and decorative It reinforces stretch and woven fabrics You can use it to sew spandex undergarments or decoratively hem elastic fabric You can also use this stitch in patchwork quilting 1 Sew this pattern on a seam that is already joined and pressed flat 2Butt two folded edges together and use this stitch to join them t 2 o o_ iJ w_u _e i J Ljj_ et a o o jm _ J 56 ...

Page 65: ...co o dobladiIlar decorativamente la tela el stica Puede usar tambi_n para acolchar telas en la labor de retazos 1 Cosa este patr6n en una costura que ya est unida y aplanada 2 Junte los dos bordes plegados y use esta puntada para unirlos Ce point est r_sistant utile et d_coratif tl peut renforcer l _toffe extensibte et tissue Vous pouvez vous servir de ce point pour coudre te sous v_tements en spa...

Page 66: ...r heavyweight fabrics NOTE Always check a buttonhole on a scrap of fabric to make sure the adjustment satisfies you I_ TYPE LENGTH 9 To sew Carefully mark the buttonhole length on the fabric Place the fabric under the foot with the buttonhole marking running toward you Move the slider A toward you so that the top mark C on the slider meets the start mark B Line up the markings on the foot with the...

Page 67: ...se tournez le bouton de longueur _ point vers 0 Points serr6s pour les tissus lins Point un point moins dense tournez le bouton de Iongueur du point vers 1 _ Points i ches pour los tissus ais REMARQUE Faites toujours une boutonni6re d essai sur une chute du tissu que vous utitisez pour vous assurer que les r6glages sent satisfaisants Pour coudre Marquez avec soin la longueur de la boutonniere sur ...

Page 68: ...ch the back marking of the buttonhole Stop sewing at a right stitch m Set the stitch selector at _ Sew four 4 to six 6 stitches Stop sewing at a left stitch F Remove the fabric and open a hole with a seam ripper buttonhole opener J J NOTE When sewing at the edge of the fabric set the sliding buttonhole foot as illustrated and sew in reverse _ _ _ __r_ 6o ...

Page 69: ...ez la couture avec l aiguitle droite Ajuste er seiector de puntadas a L_ Cosa de cuatro 4 a seis 6 puntadas Termine cosiendo con una puntada izqu erda m RSglez Ie s_lecteur sur L_ Cousez quatre 4 six 6 points Arr_tez la couture avec aiguiile gauche Saquela telay abra el agujero del ojal con un cortador o un abreojales Retirez fe t ssu et coupez fa fente avec le d6coud vite ouvre boutonniere NOTA C...

Page 70: ...ght Bulb CAUTION As the light bulb could be HOT protect your fingers when you handle it_ Unplug the machine and open the face cover While pushing the bulb up turn it counterclockwise to remove Put in a new bulb by pushing it up and turning it c ockwise_ Cleaning the Feed Dogs Unplug the machine and remove the presser foot and needle with a screwdriver Remove the needle plate with a screwdriver f I...

Page 71: ...del reloj Co oque la bombifla nueva empuj ndola y gir_ndola en ia misma direeci6n de fas agujas det reloj Remplacement de I ampoule ATTENTION L ampoulepeut6tre CHAUDE doneprot_gez yes doigts avantd y toucher D_branchez la machine et ouvrez le couvercle frontal Poussez i ampoule vers le haut et tournez la en sens antihoraire pour la retirer lnstaflez une nouvelle ampoule en ia poussant vers le haut...

Page 72: ... Clean the shuttle race 0 with a lint brush 4 Put a drop of oil on the center pin of the shuttle _ and shuttle race 3 _ Do not over oil Replacing shuttle assembly _ Levers _ Shuttle racecover Q Shuttle _ Shuttle race _ Center pin on the shuttle 0 Shuttle driver Pointed hook _b Oil here 1 Position shuttle race _ as illustrated so that the shuttle driver 0 is forming haft moon on the left side of th...

Page 73: ...ter de chaque cot _ los pattes de retenue du _ couvercle de la coursi_re enlevez ce dernier _ et retirez la navette _ 3 Nettoyez ta coursi_re raide d un pinceau charpie 4 Mettez une goutte d huite sur I axe commun de la navette _ et de la coursi_re _ Ne huilez jamais excessivement Coloque nuevamente e conjunto de la lanzadera _ Palanca _ Cubierta de corredera _ Corredera _ Corredera de lanzadera 1...

Page 74: ...ay stain fabric In case machine is not used for an extended time oil it before sewing NOTE Unplug the machine before oiling o Oil behind the face cover Open the face cover and oil points as indicated in illustration Oil shuttle area Open the shuttle cover by pulling down the embossed part on the left side of the cover 0il the point as indicated in the illustration P w 66 ...

Page 75: ...t demeur_e inutilis_e pendant une longue p_riode de temps alors huilezqa d abord avant de vous en servir Employez une huile de bonne qualit_ pour machine a coudre Une ou deux gouttes d huile suffisent a chaque endroit_Essuyez I excSs d huile sinon il y a dan ger de lacher les tissus REMARQUE Ddbranchez la machine coudre avant de la huiler Lubrifiez derriere le couvercte de facade Ouvrez la couverc...

Page 76: ... incorrectly inserted 2 The needle is bent or blunt 3 The needle and or threads are not suitable for the work being seWn 4 A blue needle is not being used for sewing stretch very fine fabrics and synthetics 5 The needle thread is not threaded properly 6 The wrong needle is used 1 The needle thread tension is too tight 2 The needle thread is not threaded properly 3 The needle is too heavy for the f...

Page 77: ...utilizando una aguja azut para ceser tejidos el sticos tejidos fines y telas sint6ticas 5 El hilo de ta aguja no est enhebrado correctamente 6 La aguja utilizada no es ia adecuada Frunce las costuras 1 La tensi6n det hilo de la aguja es excesiva 2 El hilo de la aguja no se ha enhebrado correctamente 3 El nL_mero de la aguja es demasiado grande para ia teia que se est_ cosiendo 4 La tongitud de pun...

Page 78: ...de la couture 6 L aiguille est trop fine pour le fissu employS 1 L aiguille n est pas installee correctement 2 L aiguilie est terdue ou dmouss_e 3 L aiguiHe et le fil ne cenviennent pas pour Eetissu 4 Vous n utilisez pas une aiguille bout bleu pour une couture extensibte un tissu tr_s fin ou synth_fique 5 Le fil de raiguifle n est pas enfiid correctement 6 Vous uti isez une mauvaise aiguille 1 La ...

Page 79: ...ement parts you need Call 6 am 11 pm CST 7 days a week PartsDirect 1 800 366 PART 1 8oo 366 7278 Para ordenar piezas con entrega a domicilio 1 800 659 7084 For the location of a Sears Service Center in your area Call 24 hours a day 7 days a week 1 800 488 1222 To purchase or inquire about a Sears Maintainance Agreement Call 7 am 5 p m CST Monday Saturday 1 800 827 6655 S EAR8 i lun UUlllllnl i Hom...

Reviews: