background image

17

17

Solutions to Common Dishwashing Problems

• 

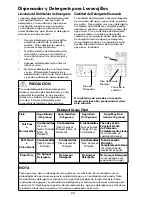
Check water hardness.  For extremely 
hard water, it may be necessary to install 
a water softener. (See Detergent Chart).

• 

Use Fresh Detergent.

• 

Make sure items are not blocking the 
spray arms, preventing them from 
rotating.

• 

Assure that dishware is not extending over 
the square area in the middle of the lower 
rack and so preventing the arm from 
telescoping up to spray into the upper 
rack.

Dishes not Dry

• 

Select heat dry option.

• 

Make sur

e the rinse aid dispenser is fi lled.

• 

Increase the discharge setting of rinse aid. 
(See Rinse Aid).

• 

Check the incoming water temperature.  
Be sure it is at least 120

o

F (49

o

C).

• 

Check for proper loading-avoid nesting 
items.

• 

Plastic items may need to be towel dried.


Glassware/Flatware Spotted or Cloudy

• 

Check water hardness.  For extremely 
hard water, it may be necessary to install 
a water softener. (See Detergent Chart).

• 

Water temperature may be low.  Avoid 
extremely low or high temperatures. (See 
Factors Aff ecting Performance.

• 

Avoid overloading and improper loading. 
(See Preparing and Loading Dishes).

Dishware Chipped

• 

Load with care and do not overload. (See 
Preparing and Loading Dishes).

• 

Place delicate items in top rack.

• 

Place glasses securely against pins and 
not over pins.

• 

Load items so they are secure and don’t 
jar loose when moving racks in and out.  
Move racks in and out slowly.

• 

Make sure tall glasses and stemware will 
clear top of tub when rack is pushed in.

• 

Fine antique china and crystal should be 
hand-washed.

• 

Cups with a concave bottom will collect 
water.  Load them at the far left and right 
of the upper rack so they will be held in a 
tilited position.

• 

Unload the lower rack fi rst.  During 
unloading any liquid left in depressed 
areas of mugs or other dishware in the 
upper rack may fall onto any dishware 
left in the lower rack.

Dishware Stained or Discolored

• 

Tea and coff ee can stain cups.  Remove 
the stains by hand washing in a solution 
of 1/2 cup (120 ml) bleach and one quart 
(1L) of warm water.  Rinse thoroughly.

• 

Iron deposits in water can cause a yellow 
or brown fi lm.  A special fi lter installed 
in the water supply line will correct this 
problem. (See Removing Spots and Film).

• 

Aluminum utensils can leave gray/black 
marks when they rub against other items.  
Load Properly.

• 

Certain high acid foods can cause 
discoloration of stainless steel and plastics 
if allowed to sit for a long period.  Use 
the Rinse Only cycle or rinse by hand if 
not operating dishwasher at once.

• 

Use fresh detergent.  Old detergent is 
ineff ective.

• 

Make sure rinse aid dispenser is fi lled.

• 

Check to see that the proper amount of 
detergent is being used for cycle selected. 
(See Detergent Dispenser).

• 

Home water pressure may be too low-it 
should be 20 to 120 pounds per square 
inch (psi).

Etching

• 

Using too much detergent especially in 
soft or softened water causes damage 
that looks like a fi lm but cannot be 
removed.

• 

Adjust the amount of detergent based 
on the water hardness. (Check Detergent 
Chart).

• 

Use the heat dry option and do not leave 
dishware in unit longer than necessary.

Detergent Left in Cups

• 

Detergent may be old.  Discard and use 
fresh detergent.

• 

Be sure the dish load doesn’t block spray 
from entering the detergent cup.

• 

Check to see if cycle has been completed.

• 

Make sure items do not prevent the 
detergent dispenser from opening.

Summary of Contents for 587.1233 Series

Page 1: ...87 1233 P N 6710008840RevB Artwork 6710008840Rev002 Sears Brands Management Corporation Hoffman Estates IL 60179 U S A www kenmore com www sears com Sears Canada Inc Toronto Ontario Canada M5B 2C3 www sears ca Kenmore Dishwasher Lavavajillas Color number numéro de color ...

Page 2: ...Common Dishwashing Problems 16 18 Service Numbers Back Cover Table of Contents 587 Safety Precautions Do not attempt to install or operate your unit until you have read the safety precautions in this manual Safety items throughout this manual are labeled with a Danger Warning or Caution based on the risk type Definitions This is the safety alert symbol It is used to alert you to potential personal...

Page 3: ... Disconnect electrical power to dishwasher before servicing Do not tamper with controls Do not let children abuse sit stand or play on door or racks of a dishwasher Keep young children and infants away from dishwasher when it is operating Under certain conditions hydrogen gas may be produced in a hot water system that has not been used for two weeks or more HYDROGEN GAS IS EXPLOSIVE If the hot wat...

Page 4: ... including discoloration or surface rust resulting from accident alteration abuse misuse or use for other than its intended purpose 7 Damage to or failure of this appliance including discoloration or surface rust caused by the use of detergents cleaners chemicals or utensils other than those recommended in all instructions supplied with the product 8 Damage to or failure of parts or systems result...

Page 5: ...5 5 Master Protection Agreements call 1 844 553 6667 Sears Canada at 1 800 469 4663 1 844 553 6667 ...

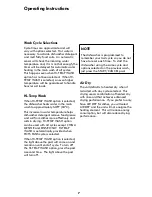
Page 6: ...water is hot Turn water off 8 To start press START CANCEL pad Your dishwasher cleans by spraying a mixture of hot water and detergent through the spray arms against soiled surfaces Each cycle begins by filling with water covering the filter area Water is then pumped through the filter and spray arms Soil particles go down the drain as the water is pumped out and replaced with clean water The numbe...

Page 7: ...MP WASH option is selected the dishwasher heats water in the main wash to approximately 1400 F 600 C This increase in water temperature helps dishwasher detergent remove food grease and soil from dishes more effectively and aids in drying HI TEMP WASH option can be used with all cycles except CHINA GENTLE and RINSE ONLY HI TEMP WASH is automatically provided when POTS PANS cycle is selected When H...

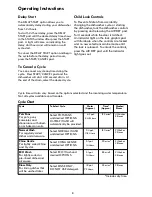
Page 8: ...ess the DELAY START pad until the desired delay time shows in the STATUS window after press the START pad A light will come on indicating the delay start hours and will remain on until cycle start To cancel the DELAY START option and begin the cycle before the delay period is over press the START CANCEL pad To Select Cycle Select POTS PANS and desired OPTIONS HI TEMP WASH will automatically be pro...

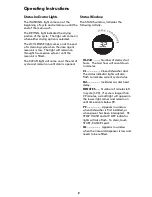
Page 9: ...CLEAN light will come on at the end of cycle and remain on until door is opened 1H 24H Number of delay start hours The Last hour will count down in minutes CL Close dishwasher door The status indicator lights will also flash to indicate current cycle status Hd Incidates a water heat delay MINUTES Number of minutes left in cycle 1 99 If cycle is longer than 99 minutes a small light will appear in t...

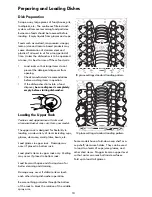
Page 10: ... empty before starting dishwasher Features and appearance of racks and silverware basket may vary from your model The upper rack is designed for flexibility in loading a wide variety of items including cups glasses stemware small plates bowls etc Load glasses in upper rack Damage may occur if placed in bottom rack Load plastic items in upper rack only Melting may occur if placed in bottom rack Loa...

Page 11: ...ket can be separated and placed in several locations in the bottom rack Load silverware in all sections or just one depending on your load Loading the Bottom Rack Features and appearance of racks and silverware basket may vary from your model The lower rack is best for plates saucers bowls and cookware Large items should be placed along the edge so they do not block the spray arm rotation For best...

Page 12: ...ot reach nested items Hold the center basket and onse small basket Slide the small basket back to release the tabs from the corresponding slots Pull the baskets apart To remove small basket Adding a Dish To add or remove items after wash cycle starts Unlatch door and wait a few seconds until wash action stops before opening Add the item and wait a few seconds to allow cold air to slowly expand ins...

Page 13: ... water filming or spotting Using too much detergent in soft water can cause etching a permanent surface damage that looks like a film on the dishware Your local water company water softener company or county extension agent can tell you the water hardness in your area Detergent Usage Chart Soft Water 0 3 grains Medium Hard Water 4 8 grains Hard Water 9 12 grains Very Hard Water Over 12 grains 2 te...

Page 14: ...shes rather than forming water droplets that cling and leave spots A dispenser located next to the detergent cup automatically releases a measured amount of rinse aid during the last rinse If spotting and poor drying are problems increase the amount of rinse aid dispensed by rotating the dial to a higher number The dial is located under the dispenser cap The indicator will be dark when full and wi...

Page 15: ... by removing the cover This is not part of your dishwasher and is not covered by warranty underneath Cleaning the Filter For optimum performance your dishwasher is equipped with a filter assembly featuring a main filter cup and fine filter as shown in the image above All food fragments are removed from the dishwasher as water passes through the filter assembly Each part of the assembly should be c...

Page 16: ...le 8 Check connections to make sure they do not leak Winterizing Cleaning the Spray Arm The spray arm may need to be cleaned to insure that there are no clogs to the spray arm jets and bearings due to hard water chemicals To remove spray arm simply hold the spray arm in place and turn the retaining nut clockwise and pull up on the spray arm lifting off the shaft To clean the spray arm use warm soa...

Page 17: ... at the far left and right of the upper rack so they will be held in a tilited position Unload the lower rack first During unloading any liquid left in depressed areas of mugs or other dishware in the upper rack may fall onto any dishware left in the lower rack Dishware Stained or Discolored Tea and coffee can stain cups Remove the stains by hand washing in a solution of 1 2 cup 120 ml bleach and ...

Page 18: ...n To remove buildup and film clean using the following instructions 1 Load clean dishes and glasses in normal manner Do not load any metal utensils or silverware 2 Do not add detergent 3 Select the NORMAL WASH cycle Close and latch door Press START CANCEL pad 4 Allow dishwasher to run until it starts the second water fill approximately 10 minutes The SENSING light will be off 5 Unlatch an dopen do...

Page 19: ...entro del Lavavajillas 587 Precauciones de seguridad No intente instalar ni operar su unidad hasta que no haya leído las precauciones de seguridad de este manual Los mensajes sobre seguridad de este manual se encuentran etiquetados como Peligro Advertencia o Atención según el tipo de riesgo Definiciones Éste es el símbolo de las alertas de seguridad Se usa para advertirle sobre posibles riesgos de...

Page 20: ...ntes de operar el lavavajillas Desconecte la corriente eléctrica al lavavajillas antes de darle servicio No manipule los controles No permita que los niños abusen se sienten se paren o jueguen en la puerta o los estantes del lavavajillas Mantenga a los niños pequeños y a los bebés lejos del lavavajillas cuando esté fncionando Quite la puerta al compartimiento qu se lava al quitar un viejo lavaplat...

Page 21: ...como resultado de accidentes abuso mal uso o un uso diferente de los fines previstos 7 Daños o fallas de este aparato incluyendo la decoloración o la superficie de la roya causada por el uso de detergentes productos de limpieza productos químicos o utensilios diferentes de los recomendados en las instrucciones provistas con el producto 8 Daños o fallas de piezas o sistemas como resultado de modifi...

Page 22: ...llas limpia los platos rociando una mezcla de agua caliente y detergente a través de los brazos rociadors sobre las superficices sucais Cada ciclo comienza con un drenaje previo A continuación el lavavajillas se llena con agua hasta cubrir el área de filtrado Seguidamente el agua se bombea a través del filtro y los brazos de rociado Las partículas de suciedad bajan por el desagüe uando el agua se ...

Page 23: ...á el rendimiento de secado Hi Temp Wash Lavado a alta temperatura Cuando se selecciona la opción Hi Temp Wash el lavaplatos calienta el agua en el ciclo principal hasta aproximadamente 1400 F 600 C El agua más caliente proporcionada por esta opción ayuda a activar el detergente del lavaplatos para limpiar la grasa y la suciedad de los platos La opción Hi Temp Wash puede ser usada durante cualquier...

Page 24: ...ega la siguiente información La luz WASHING lavado se enciende al prin cipio del ciclo y permanece encendida hasta el final del lavado principal La luz de DRYING secado indica la porción de secado del ciclo de La luz se enciende cu ando se selecciona cualquiera de las opciones de secado La luz LOW RINSE aclarado baja se enci ende al final de un ciclo de limpieza cuando el depósito de agente de enj...

Page 25: ...y productos a base de tomate pueden decolorar el acero inoxidable y plásticos si se dejan sucios por un largo período de tiempo A menos que el lavavajillas ha de funcionar a la vez es mejor enjuagar estos alimentos Bastidores de carga de manera que los artículos grandes no impiden que el dispensador de detergente se abra Compruebe recomendaciones del fabricante antes de lavar artículos Si el lavav...

Page 26: ...altos no impidan la rotación del brazo rociador Asegúrese mangos de las ollas no sobresalgan por la parte inferior de la rejilla y obstruyan la roation del brazo rociador 10 cubiertos patrón de carga normal 12 cubiertos patrón de carga normal Cargar de la Canasta de los Cubiertos Características en la apariencia de bastidores y canasta de cubiertos pueden variar de su modelo Cargue la canasta de c...

Page 27: ...ua no puede llegar a los objetos apilados Para Sacar la Canasta Pequeña Sostenga la canata del centro y una de las canata pequeñas Deslice la otra canata pequeña hacia atrás para soltar las lengüetas de las ranuras correspondientes Tire de las canastas para separarlas Agregando un plato Para añadir o eliminar elementos de comenzado el ciclo de lavado Desenganche la cerradura y espere unos segundos...

Page 28: ...ca permanente Su compañía local de aguas una empresa de suavizado de aguas o su agente de zona pueden informarle acerca de la dureza del agua en su localidad Si la cubierta está cerrada en la copa de lavado principal abrir presionando el cierre de la cubierta Cierre de la cubierta Taza de Prelavado Detergent Usage Chart Aqua Blanda 0 3 granos Aqua Semidura 4 8 granos Aqua Dura 9 12 granos Aqua Muy...

Page 29: ...uierda y saque Vierta el agente de enjuague líquido hasta que llegue al nivel indicado Reemplace la tapa No llene en exceso ya que esto puede causar demasiada espuma Limpie cualquier derrame con un trapo húmedo Este dispensador tiene capacidad para desde 35 hasta 140 lavadas dependiendo del ajuste Temperatura del agua Se necesita agua caliente para mejores resultados en el lavado secado de platos ...

Page 30: ...miento óptimo su lavaplatos se equipa de un montaje de filtro que ofrece un filtro principal una taza y el filtro fino según lo demostrado en el dibujo arriba todos los fragmentos del alimento se quitan del lavaplatos mientras que el agua pasa a través delmontaje de filtro Cada parte del conjunto debe limpiarse con frecuencia para asegurarse de que todos los fragmentos de alimentos son retirados d...

Page 31: ... recipiente Para restaurar el servicio 5 Vuelva a conectar el agua el desagüe y la corriente eléctrica 6 Abra la llave de agua y conecte la corriente 7 Llene los dos compartimentos del detergente y ponga a funcionar el lavavajillas en el ciclo Normal Wash 8 Conpruebe que las conexiones no tengan fugas Cuidado y Limpieza Limpieza del Brazo Rociador Se debe limpiar el brazo rociador para asegurarse ...

Page 32: ... en las zonas cóncavas de tazas y otros artículos de la vajilla podría caer sobre la vajilla colocada en la rejilla inferior Utilice detergente nuevo Asegúrese de que las piezas de la vajilla no se metan debajo de la rejilla inferior y bloqueen el giro del brazo rociador Vasos cubiertos manchados u opacos Compruebe la dureza del agua Para aguas extremadamente duras puede ser necesario instalar un ...

Page 33: ...illas no desagua correctamente Corrosión Si se usa demasiado detergente sobre todo en agua blanda o suavizada pueden producirse daños en la vajilla con aspecto de película qu no se puede eliminar A este suceso se le conoce por corrosión Regule la cantidad de detergente en función de la dureza del agua Consulte la Tabla de detergentes Utilice la opción de secado con calor y no deje la vajilla en el...

Page 34: ...l tapón removible del interior de la entrada del triturador de desperdicios Manchas en el interior de la tina Si se lavan grandes cantidades de platos manchados de tomate pueden aparecer manchas rosadas o anaranjadas Esta circunstancia no afecta al rendimiento y dichas manchas desaparecerán gradualmente con el tiempo Si se realiza un aclarado previo se reducirá la probabilidad de que aparezcan man...

Page 35: ...ros representantes de Sears sobre cualquiera de nuestros productos Piense en nosotros como en un manual parlante del usuario Protección contra fallas eléctricas contra daños debidos a fluctuaciones de la corriente eléctrica 250 al año para cubrir cualquier posible deterioro de alimentos que haya tenido que desechar debido a una falla mecánica de cualquiera de nuestros refrigeradores o congeladores...

Page 36: ...36 ...
Reviews: