background image

Summary of Contents for 7534

Page 1: ... Care Guide Gufa de uso y cuidada English Espafiol Model Modelos 790 7535 I enmore Elite PN 807190001 Rev A Sears Brands Management Corporation Hoffman Estates IL 60179 U S A www kenmore com www sears com ...

Page 2: ...echnician to clean or maintain this product 6 Damage to or failure of this product if it is not installed operated or maintained according to all instructions supplied with the product 7 Damage to or failure of this product resulting from accident abuse misuse or use for other than its intended purpose 8 Damage to or failure of this product caused by the use of detergents cleaners chemicals or ute...

Page 3: ...rns or other injury NEVER cover any slots holes or passages in the oven bottom or cover an entire oven rack with materials such as aluminum foil Aluminum foil linings may trap heat causing a fire hazard lf the information in this manual ed exactly a fire or explosion may result causing property damage _ersonal injury or death FOR YOUR SAFETY Do not store or use gasoline or other flammable vapors a...

Page 4: ...n window Do not heat unopened food containers Build up of pressure may cause container to burst and result in injury Wear proper apparel Loose fitting or hanging garments should never be worn while using this appliance Do not let clothing or other flammable materials come into contact with hot surfaces When heating fat or grease watch it closely Fat or grease may catch fire if it becomes too hot D...

Page 5: ...California to publish a list of substances known to cause cancer birth defects or other reproductive harms and requires businesses to warn customers of potential exposures to such substances Important Instructions for Using your Cooktop Use Proper Flame Size Adjust flame size so it does not extend beyond the edge of the utensil The use of undersized utensils will expose a portion of the burner fla...

Page 6: ...leaning any part ot the range be sure all controls are turned OFF and the range is cool Cleaning a hot range can cause burns Clean the range regularly to keep all parts free of grease that could catch fire Pay particular attention to the area around each burner element Do not allow grease to accumulate On models with stainless steel cooktops clean with warm soapy water using a clean sponge or clot...

Page 7: ...This appliance allows for conversion to Liquefied Petroleum L P Gas Conversion to L P Gas Personal injury or death from electrical shock may occur if the conversion to L P gas is not made by a qualified installer or electrician l_ _Any additions changes or conver sions required in order for this appliance to satisfactorily meet the application needs must be made by a qualified technician If L P co...

Page 8: ...ood cleaning agents or any other material to enter the gas orifice port opening On round style burners the burner cap lip Figure 1 should fit snug into the center of burner head and rest level Refer to Figure 2for correct and incorrect burner cap placement Once in place you may check the fit by gently sliding the burner cap from side to side Figure 3 to be sure it is centered and firmly seated Whe...

Page 9: ... some models Burner cap Burner Lap lip Burner head Installing burner grates Do not use the surface burners without the burner caps and burner grates properly installed Missing pieces or improper installation may lead to spills burns or damage to your range and cookware Make sure the burner grates are properly placed on the cooktop before using the surface burners The grates are designed to rest in...

Page 10: ...l influence the burner flame setting needed for best cooking results Cookware material types The most popular materials available are Aluminum Excellent heat conductor Some types of food will cause it to darken Anodized aluminum cookware resists staining pitting Copper Excellent heat conductor but discolors easily Stainless Slow heat conductor with uneven cooking results Is durable easy to clean a...

Page 11: ...ensil over 2 different surface cooking areas at the same time This can cause uneven heating results In the event of an electrical power outage the surface burners can be lit manually Use caution when lighting surface burners manually To light a surface burner hold a lit match to the burner head then slowly turn the surface control knob to Lite After burner lights push in and turn knob to desired s...

Page 12: ...ther flame adjustments as needed Figure 11 Burner at highest L setting and simmer R Do not place flammable items such as plastic salt and pepper shakers spoon holders or plastic wrappings on the cooktop when it is in use These items could melt or ignite Potholders towels or wooden spoons could catch fire if placed too close to the range cooktop Do not place aluminum foil or ANY material that can m...

Page 13: ...tric shock or fire Air circulation in the oven For best baking results allow 2 4 5 10 cm around the cookware for proper air circulation and be sure pans and cookware do not touch each other the oven door sides or back of the oven cavity Hot air must be able to circulate around the cookware in the oven for even heat to reach around the food Types of oven racks fiat handle oven rack ovenrack Figure ...

Page 14: ...Conv Roast Use to select Conv Roast function 20 Clock Use to set time of day 21 Accent Light Use to turn on Accent Light feature 22 Oven Lockout Use to lockout oven functions and door 23 Numeric Keypad Use to enter temperatures and times Minimum maximum control settings All of the features listed have minimum and maximum time and temperature settings that may be entered into the control An ENTRY a...

Page 15: ...s the minute timer will show in the display To view the informa tion of any other active oven function press the key once for the other function to view the status Add 1 Minute Use Add 1 Minute to set additional minutes to the timer Each press of the key will add 1 additional minute If Add 1 Minute is pressed when the timer is not active the timer will activate and begin counting down from 1 minut...

Page 16: ... Fahrenheit setting Figure 20 Celsius setting Setting silent or audible control mode Silent mode allows the oven control to operate without audible tones The control may be programmed for silent operation and later returned to operating with all the normal audible tones To set for silent or audible mode 1 Press and hold Delay Start for 6 seconds The current setting will appear in the display 2 Pre...

Page 17: ...ven for continuous baking See Changing between continuous bake setting or 12 Hour Energy Saving feature for detailed information Setting Bake Use the bake feature whenever the recipe calls for baking at normal temperatures A reminder tone will indicate when the set bake temperature is reached and to place the food in the oven Bake may be set for any oven temperature between 170 F 77 C to 550 F 288...

Page 18: ...or will reduce the temperature in the oven Setting Delay Start Delay Start sets a delayed starting time to oven cooking or cleaning functions Prior to setting a delay start be sure the time of day is set correctly _FOOD POISONING HAZARD Do not let food sit for more than one hour before or after cooking Doing so can result in food poisoning or sickness Foods that can easily spoil such as milk eggs ...

Page 19: ...llow the remainder of the recipe s instructions using the minimum recommended cook time For best results when using a single oven rack place rack in position 3 or 4 Figure 29 When using 2 oven racks place in positions 3 5 When using 3 oven racks place in positions 2 4 6 use offset rack only in position 6 To set Conv Bake with a default oven set temperature of 350 F 1 Press Conv Bake 2 Press To can...

Page 20: ...t function When using Conv Convert function Cook Time reductions may vary depending on the oven set temperature The convection fan will begin rotating once Conv Bake Conv Roast or Conv Convert has been activated If the oven door is opened when any convection function is active the convection fan will stop rotating until the oven door is closed Selling Conv Roast The Conv Roast function combines a ...

Page 21: ...and turn the oven OFF If the fire continues use a fire extin guisher DO NOT put water or flour on the fire Flour may be explosive Figure 31 Broil pan and insert L Broil rack positions R Always use pot holders or oven mitts when using the oven When cooking the oven interior exterior oven racks and cooktop will become very hot which can cause burns Important note Always arrange oven racks when oven ...

Page 22: ...r best results when baking cakes or cookies using 2 oven racks place cookware on rack in positions 3 and 5 6 if using the offset oven rack For best results when baking cakes or cookies using a single oven rack place offset oven rack in positions 3 or 4 Meat Probe When cooking meat such as roasts hams or poultry use the meat probe function to check the internal temperature without any guesswork For...

Page 23: ... accept any change 8 The oven control will provide 3 beeps when the internal target temperature is reached By default the oven will automatically change to a Warm Hold setting The Warm Hold function will maintain the oven temperature at 170 F 77 C Instructions for changing how the oven reacts after reaching the internal target temperature may be found later in this section 9 Press STOP to cancel c...

Page 24: ...left uncovered so browning can occur Cook times will vary depending on the weight fat content bone the shape of the roast Use the recipe s recommended food temperature and a food thermometer to determine when the food is done Preheating the oven will not be necessary when using the Slow Cook feature Add any cream or cheese sauces during the last hour of cooking FOOD POISONING HAZARD Do not let foo...

Page 25: ...cooking using Cook Time Delay Start may also be added Recipe Recall Use the Recipe Recall feature to record and recall your favorite baking recipe settings This feature stores and recalls different recipe settings using Bake Conv Bake and Conv Roast Recipe Recall may be programmed for any baking temperature between 170 F 77 C to 550 F 288 C To store a Bake recipe The recipe in this example is for ...

Page 26: ...ht until an acceptance tone sounds about 6 seconds 2 The default brightness setting of 100 will appear in the display Figure 38 3 Using the numeric keys enter any digit from 0 to 100 to change the brightness level Entering 0 Figure 39 will effectively turn the Accent light OFF until the brightness level is adjusted to a higher level 4 Press to save the desired brightness setting START Figure 38 Ac...

Page 27: ...elf Clean DO NOT USE oven thermometers such as those found in grocery stores to check the temperature settings inside your oven These oven thermometers may vary as much as 20 to 40 F degrees from actual temperatures The oven temperature adjustment may be made if your oven control has been set to display C Celsius tempera tures Minimum and maximum settings for Celsius is plus or minus 19 C Restorin...

Page 28: ...ear in the display indicating the oven is properly set for the Sabbath feature Important note It is not advised to attempt to activate any other oven function except Bake while the Sabbath feature is active ONLY the following keys will function correctly when the Sabbath feature is active 0 9 number keys Bake START and ALL OTHER KEYS should not be used onC ine STOP Sabbath feature is active You ma...

Page 29: ...multaneously to turn the Sabbath feature off SF will disappear from the display and the oven may be used with all normal functions Proof Bread Warmer Drawer The warmer drawer has a Proof Bread feature that may be used to prepare bread dough The recommended length of time to keep fresh or thawed bread dough in the warmer drawer is about 45 60 minutes Times may vary depending on the dough Be sure ho...

Page 30: ...ng so can result in food poisoning or sickness Foods that can easily spoil such as milk eggs fish meat or poultry should be chilled in the refrigerator first Even when chilled they should not stand in the oven for more than 1 hour before cooking begins and should be removed promptly when finished cooking Storage in or on appliance_flammable materials should not be stored in an oven warmer drawer n...

Page 31: ...46 Warmer drawer indicator light To set warmer drawer 1 Arrange the warmer drawer rack if needed in the warmer drawer and place the cooked food or dishes in the warmer drawer Close warmer drawer 2 Press 3 Press Hi Lo key to toggle to the desired temperature setting Release when the desired temperature setting is displayed by the indicator lights Figure 47 4 Once warming is finished press _ to turn...

Page 32: ...om the appliance To replace the warmer drawer 1 Pull the bearing glides to the front of the outer compart ment glide channels until they snap into place Figure 50 2 Carefully line up both sides of the warmer drawer glide rails to the outer compartment glide channels located inside the empty warmer drawer compartment Figure 49 3 While holding the warmer drawer level and square using the warmer draw...

Page 33: ... Remove ALL items from the oven and cooktop including cookware utensils and ANY ALUMINUM FOIL Aluminum foil will not withstand high temperatures from a self clean cycle and will melt DO NOT use oven cleaners or oven protective coatings in or around any part of the oven interior Clean any soil from the oven frame the door liner outside the oven door gasket and the small area at the front center of ...

Page 34: ... time that was programmed you must allow about 1 additional hour for the oven to cool before you will be able to open the oven door The Self Clean function will not operate whenever a radiant surface element is ON or the oven lockout is active Setting Delay Start Self Clean To start a delay Self Clean with default clean time of 3 hours and a start time of 9 00 o clock 1 Be sure the clock is set wi...

Page 35: ... Set the minute timer for 10 minutes to allow for a cool down period Do not attempt to wipe out the oven before a 10 minute cool down period 10 11 12 An alert will sound when the timer is finished Press Timer m Set Off to stop the timer and press _o_ to return to the clock Stand to the side of the range out of the way of escaping vapor when opening the oven door Wipe oven cavity and bottom Do not ...

Page 36: ...l cleaners or any other types of cleaners containing any abrasive chlorides chlorine or ammonia It is recommended to use mild dish soap and water or a 50 50 solution of water and vinegar Porcelain enamel broiler pan and insert available by mail order Door liner and body parts Gentle scouring with a soapy scouring pad will remove most spots Rinse with a 1 1 solution of clear water and ammonia If ne...

Page 37: ...orcelain Do not clean burner caps in the dishwasher Do not operate surface burners without burner caps properly in place See IMPORTANT notes below ignition port i i slots Figure 58 Cooktop burner head To clean the surface burner heads For proper gas flow it may be necessary to clean the burner head and slots To clean first use a clean DAMP cloth to soak up any spills Remove any food from between t...

Page 38: ...aluminum cooking utensils or allow aluminum foil to touch the surface burners under ANY circumstances Aluminum utensils The melting point of aluminum is much lower than that of other metals Care must be taken when aluminum pots or pans are sued on the cooktop If aluminum pans are allowed to boil dry when using the cooktop the cookware may be damaged or destroyed Replacing the oven light Be sure th...

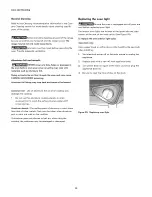
Page 39: ...Figure 62 2 Holding the oven door at the same angle as the removal position See Figure 62 seat the hook of the hinge arm over the roller pins located on each side of the oven door frame See Figure 63 The hook of the hinge arms must be fully seated onto the roller pins 3 Fully open the oven door horizontal with floor See Figure 60 4 Push the door hinge locks up toward and into the oven frame on bot...

Page 40: ... opened too frequently Allow oven to preheat to desired temperature before placing food in oven Choose pan sizes that permit 2 to 4 of air space 5 1 cm to 10 2 cm on all sides when placed in the oven Use a medium weight baking sheet Allow oven to preheat to the selected temperature before placing food in the oven Use proper rack position for baking needs Set oven temperature 25 F 13 C lower than r...

Page 41: ...de easily cavity before starting a self clean cycle Clean using a mild abrasive cleaner following manufacturer s instructions Rinse with clean water dry and replace in oven Oven smokes excessively when Incorrect setting Follow broiling instructions in Setting Broil on page 21 broiling Oven control panel beeps and displays any F or E code error Soil not completely removed after self clean Meat too ...

Page 42: ...bilidad de su nuevo producto El acuerdo incluye Io siguiente Piezas y mano de obra necesarias para contribuir a mantener el funcionamiento adecuado de los productos utilizados en condiciones normales de uso no s61o en case de defectos de los productos Nuestra cobertura va mucho m_s all que la garantia del producto No se aplican deducibles ni exclusiones por fallas del funcionamiento es decir verda...

Page 43: ... of KCD IP LLC in the United States or Sears Brands LLC in other countries Marca Registrada TMMarca de Fabfica de KCD IP LLC en Estados Unidos o Sears Brands LLC in otros paises MCMarque de commerce MDMarque ddpos_e de Sears Brands LLC ...

Reviews: