background image

Summary of Contents for 7756 - Elite 30 in. Gas Range

Page 1: ...E L I T E an e gas Models Modelos 790 7756 color number nOmero de color _ _ iii www sears com Sears Roebuck and Co Hoffman Estates IL 60179 U S A pin 316901002 0905 ...

Page 2: ...s and scratches on a ceramic glass cooktop resulting from failure to maintain it properly according to all instructions supplied with the product 3 Expendable items that can wear out from normal use including but not limited to filters belts light bulbs and bags 4 A service technician to instruct the user in correct product installation operation or maintenance 5 A service technician to clean or m...

Page 3: ...lectrical Code ANSI NFPA No 70 1atest edition or in Canada CSA Standard C22 1 Canadian Electrical Code Part 1 and local code requirements Install only per installation instructions provided in the literature package for this range Ask your Sears dealer to recommend a qualified technician and an authorized Sears repair service Know how to disconnect the power to the range at the circuit breaker or ...

Page 4: ...ANT INSTRUCTIONS FOR USING YOUR OVEN Use Care When Opening Oven Door or Warmer Drawer Stand to the side of the range when opening the door of a hot oven Let hot air or steam escape before you remove or replace food in the oven Keep Oven Vent Ducts Unobstructed The oven vent is located below the backguard Touching the surfaces in this area when the oven is operating may cause severe burns Also do n...

Page 5: ... substances known to the state to cause cancer birth defects or other reproductive harm and requires businesses to warn customers of potential exposure to such substances Gas Conversion IMPORTANT NOTICE This appliance is factory pre set to operate on L P Liquefied Petroleum Gas ONLY Do not attempt to convert this appliance to Natural Gas Personal injury or death from electrical shock may occur if ...

Page 6: ... para prolongar la durabilidad de su nuevo producto El acuerdo incluye Io siguiente Piezas y mano de obra necesarias para contribuir a mantener el funcionamiento adecuado de los productos utilizados en condiciones normales de uso no s61oen caso de defectos de los productos Nuestra cobertura va mucho mas alia que la garantia del producto No se aplican deducibles ni exclusiones por fallas del funcio...

Page 7: ...s with Shields 15 Self Cleaning Oven interior 16 Convection Bake Fan Cover 17 Adjustable Porcelain Coated Oven Racks 18 Large 1 piece Oven Door Handle styles colors may vary with model 19 Full width Oven Door styles colors vary with model 20 Warmer Drawer with Handle Warmer Drawer Rack 21 5 000 BTU Simmer Burner LP 22 8 000 BTU Center Burner LP 23 9 500 BTU Burner LP 24 14 200 BTU Power Burner LP ...

Page 8: ...chicken or fish 6 5 or 4 Cookies cakes pies biscuits 3 or 4 Muffins Frozen pies angel food cake 1 or 2 yeast bread casseroles small cuts of meat or poultry Turkey roast or ham 1 or 2 Types of Oven Racks Flat Handle Oven Rack Fig 3 Your range may be equipped with one or more of the oven rack types shown a Porcelain coated Flat Handle Oven Rack Fig 3 or a Porcelain coated Flat Oven Half Rack Fig 4 T...

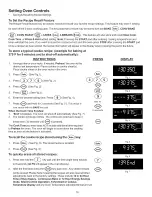
Page 9: ...und the food Fig 1 Fig 2 Before Setting Surface Controls Control Locations of the Gas Surface _i Burners For models with a Deep Well Cooktop See Fig 3 Ther SIMMER Burner is best used for simmering delicate sauces etc This burner is located at the right rear burner position on the cooktop The Standard burners can be used for most surface cooking needs These burners are located at the left front and...

Page 10: ...l thicken sauces gravies steaming iii Always select cookware that is suitable for the amount and type of food being prepared Select a burner and flame size appropriate to the pan Never allow flames to extend beyond the outer edge of the pan Fig 2 Double Burner some models The versatile Double ring burner offers a complete range of gas surface settings from the same burner location At the lowest se...

Page 11: ...distribution Fig 1 Setting Warmer Drawer Controls Arranging Warmer Drawer Racks Using the Warmer Drawer Arranging Warmer Warm Ready TM Drawer Rack Positions The rack can be used in two ways In the upward position Fig 2 to allow low profile food items to be placed both under and on top of the rack for example rolls or biscuits on top of the rack and a casserole dish underneath In the downward posit...

Page 12: ...ting the Bread Proofing feature in ON See Fig 5 bread dough preparation instructions on this page To return to standard Warmer Drawer settings touch pad at least once Note For best results preheat the Warmer Drawer before adding the food or bread dough An empty drawer will preheat in approximately 15 minutes When the food or dough is ready for removal touch the Q pad once to turn the Warmer Drawer...

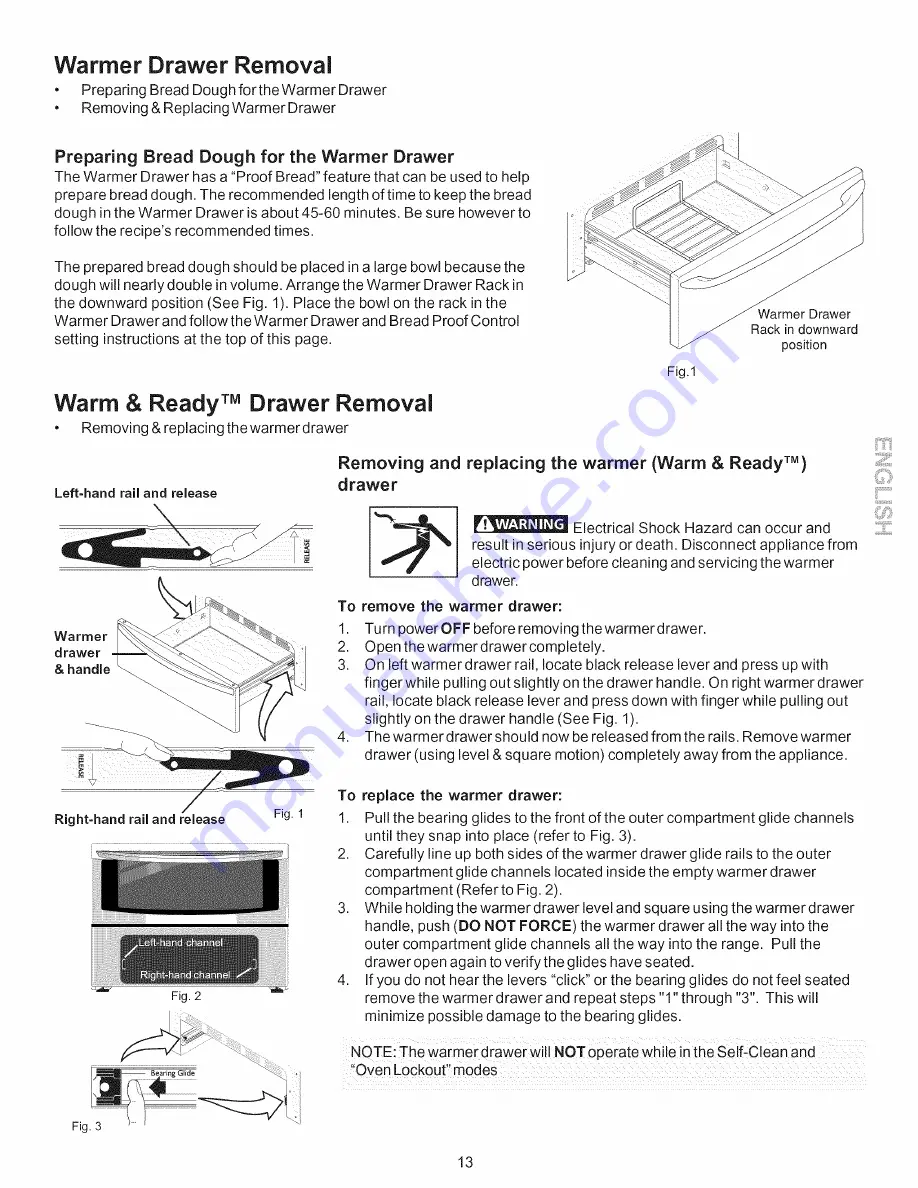
Page 13: ...en the warmer drawer completely 3 On left warmer drawer rail locate black release lever and press up with finger while pulling out slightly on the drawer handle On right warmer drawer rail locate black release lever and press down with finger while pulling out slightly on the drawer handle See Fig 1 4 The warmer drawer should now be released from the rails Remove warmer drawer using level square m...

Page 14: ...ight ON Use to select Use to pre BREADS Use cooking select Add and OFF the Convection condition the these keys to process 1 Minute Bake feature oven select the feature feature temperature that best fits your food item some models CLOCK Use to set the time of day STOP Use to cancel any oven mode previously entered except the time of day and minute timer Press STOP to stop cooking STOP also controls...

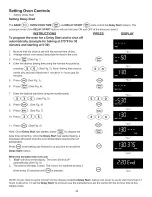
Page 15: ...reject the change 4 Reset the correct time as described in To set the clock above Please note that if the 24 hour time of day mode was chosen the clock will now display time from 00 00 through 23 59 hours Setting Silent Control Operation _for6seconds Fig 4 Fig 6 The DELAY START _tYy and FLEX CLEAN C_a_ pads control the Silent Control operation feature The Silent Control v v operation feature allow...

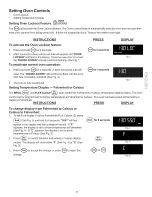
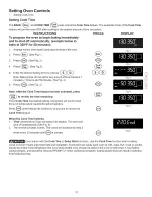
Page 16: ...ndicates the control is set for the Continuous Bake feature to accept the change See Fig 4 display 3 Press will return to time of day or press Q to reject the change Setting Timer PRESS DISPLAY _for6seconds Fig 1 Fig 2 Fig 4 The TIMER _o_f_ pad controls the Timer feature The Timer serves as an extra reminder in the kitchen that will beep when the set time has run out The Timer will not START or ST...

Page 17: ...2 2 The oven is fully operational Q for 3 seconds Fig 1 Fig 2 Setting Temperature Display m Fahrenheit or Celsius The BROIL _roil_ and FLEX CLEAN _ pads control the Fahrenheit or Celsius temperature display modes The oven control can be programmed to display temperatures in Fahrenheit or Celsius The oven has been preset at the factory to display in Fahrenheit INSTRUCTIONS PRESS DISPLAY To change d...

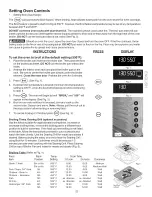
Page 18: ...s See Fig 2 5 Press d b See Fig 3 v 6 Enter the desired baking time Press _9_ See Fig 4 7 Press G_ and hold for 3 seconds See Fig 5 This recipe is now stored with the BAKE key pad When the Cook Time finishes 1 End will display The oven will shut off automatically See Fig 7 2 The control will beep 3 times The control will continue to beep 3 times every 30 seconds until O is pressed The Cook Time yo...

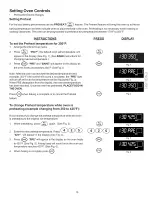
Page 19: ...ote After the oven has reached the desired temperature this example 350 F the control will sound a long beep the PRE light will turn off and oven set temperature will be displayed Fig 3 When PRE disappears from the display the oven set temperature has been reached Once the oven has preheated PLACE FOOD IN THE OVEN Press _ when baking is complete or to cancel the Preheat feature PRESS DISPLAY Fig 1...

Page 20: ...AT _ feature for instructions The oven can be programmed to bake at any temperature from 170 F to 550 F The sample shown below is for 350 F INSTRUCTIONS PRESS DISPLAY To set the Bake Temperature to 350 F 1 Arrange interioroven racks and placefood in oven Press ___ 350 will automatically appear in the display 2 See Fig 1 3 Press _ _ A long beep will sound once the oven set temperature reaches 350 F...

Page 21: ...ress to review the time remaining Once Cook Time has started baking a long beep will sound when the oven temperature reaches the set temperature Press O when baking has finished or at any time to cancel the Cook Time feature When the Cook Time finishes 1 End and the time of day will show in the display The oven will shut off automatically See Fig 6 2 The control will beep 3 times The control will ...

Page 22: ...y See Fig 4 Fig 1 Fig 2 7 Enter the desired start time using the number pads See Fig 5 See Fig 6 8 Press 9 Press _ See Fig 7 10 Press A 11 Press _ _ See Fig 8 Note Once Delay Start has started press _TCi D to display the v bake time remaining Once the Delay Start has started baking a long beep will sound when the oven temperature reaches the set temperature Press O when baking has finished or at a...

Page 23: ...temperature setting is 400 F press the desired temperature before continuing to step 5 5 Press _ The oven will begin to broil BROIL and 550 will appear in the display See Fig 2 6 Broil on one side until food is browned turn and cook on the second side Season and serve Note Always pull the rack out to the stop position before turning or removing food 7 To cancel broiling or if finished press O See ...

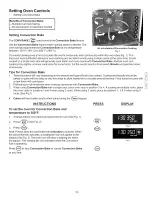
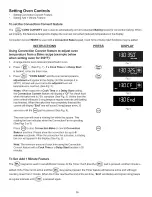
Page 24: ...vection Roast at any time Please allow the convection fan up to 6 minutes to activate When the convection fan activates a rotating fan icon will appear in the display See Fig 2 Note The Cakes or Breads features may be programmed like the example provided above it is recommended to follow the recipe instuctions with the food items package The convection fan will not turn on with the Cakes or Breads...

Page 25: ... on the amount and type of food to be cooked Cookies and biscuits should be baked on pans with no sides or very low sides to allow heated air to circulate around the food Food baked on pans with a dark finish will cook faster 2 Preheating is not necessary when cooking casseroles with Convection Bake 3 When using Convection Bake with a single rack place oven rack in position 3 or 4 If cooking on mu...

Page 26: ... bake time is 75 complete See Fig 3 At this time the oven control will sound 3 long beeps at regular intervals until baking has finished When the bake time has completely finished the control will display End and will sound 3 long beeps every 30 Q pad is pressed See Fig 4 seconds until the PRESS DISPLAY Fig 1 Fig 2 Fig 3 Fig 4 The oven icon will show a rotating fan within the square This rotating ...

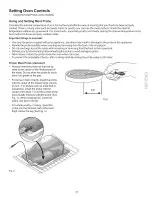
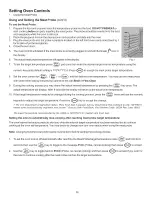
Page 27: ...e cable when inserting or removing from the food or the receptacle Defrost yourfood completely before inserting the probe to avoid damaging probe Never leave or store the probe inside the oven when not in use To prevent the possibility of burns after cooking carefully unplug the probe using a pot holder Proper Meat Probe placement Always insert the probe so that the tip rests in the center of the ...

Page 28: ...ey once The actual temperature will display After 8 seconds the display will return to the actual oven temperature 10 If the target temperature needs to be changed during the cooking process press the _d_e twice and use the numeric keypads to adjust the target temperature Press the _ key to accept the change 7 _ The U S Department of Agriculture states Rare fresh beef is popular but you should kno...

Page 29: ...t open the oven door often or leave the door open when checking foods If the oven heat escapes often the Slow Cook time may need to extended Cover the foods to keep them moist or use a loose or vented type cover to allow foods to turn crisp or brown Roasts may be left uncovered so browning can occur Cook times will vary depending on the weight fat content bone the shape of the roast Use the recipe...

Page 30: ...NS PRESS DISPLAY To Program the Oven for 350 F Begin Baking Immediately and activate the Sabbath feature 1 Be sure that the clock is set with the correct time of day 2 Arrange the oven racks and place the food in the oven 3 Press _Sak_ 350 F will appear in the display See Fig 1 4 Press _ The oven will turn ON and begin heating See Fig 2 5 If a Cook Time or Delay Start is needed then enter the time...

Page 31: ...list of models with the Sabbath feature please visit the web at http www star k org Setting the Warm Hold TM Feature The _ w_or_ _ pad turns ON the Warm Hold feature and will maintain an oven temperature of 170 F The Warm Hold feature will keep oven baked foods warm for serving up to 3 hours after cooking has finished After 3 hours the Warm Hold feature will shut the oven OFF automatically The War...

Page 32: ... DO NOT use oven cleaners or oven protective coatings in or around any part of the Self Cleaning oven DO NOT clean the oven door gasket The woven material of the oven door gasket is essential for a good seal Care should be taken not to rub damage or remove the gasket DO NOT use any cleaning materials on the oven door gasket Doing so could cause damage Remove the broiler pan and insert all utensils...

Page 33: ...3 00 hours will show in the 2 display See Fig 1 2 4 hours of Self Cleaning time may be choosen by pressing any amount of time from _ _ _ 2 hours through 4 hours in one minute increments You may also skip the time entry and accept the default cleaning time of 3 hours by pressing the START key pad See Step 3 3 Press _T _ The DOOR LOCKED icon will flash CLEAN and the letters CLn will remain on in the...

Page 34: ...KED icon is no longer displayed the oven door Fig 8 can then be opened See Fig 8 iMPORTANT NOTES when using the Self Clean feature 1 The Self Clean feature will not operate whenever a radiant surface remains ON if equipped 2 A Self Clean cycle cannot be started if Oven Lockout feature is active 3 If a Self Cleaning Cycle has started but not finished and a power failure occurs the appliance may be ...

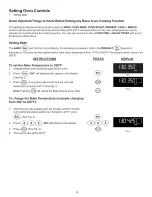
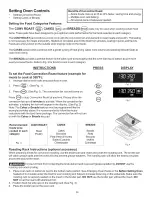
Page 35: ...e 30 F _ Fig 2 the desired The temperature may be increased as much as 35 F 19 C 3 Press _ to accept the temperature change and the display return to the time of day See Fig 3 Press Q to reject will the change if necessary To adjust the oven temperature lower 1 Press _ for 6 seconds See Fig 4 2 To decrease the temperature use the number pads to enter the desired change Example 30 F and then press ...

Page 36: ...s from the surface as bluish stains may occur during heating that cannot be removed Porcelain enamel broiler pan insert door liner body parts interior Warmer Drawer area Gentle scouring with a soapy scouring pad will remove most spots Rinse with a 1 1 solution of clear water and ammonia If necessary cover difficult spots with an ammonia soaked paper towel for 30 to 40 minutes Rinse with clean wate...

Page 37: ...ven Door 1 Firmly grasp both sides of oven door along the door sides Do not use the oven door handle See Fig 3 2 Holding the oven door at the same angle as the removal position seat the hook of the hinge arm over the roller pins located on each side of the oven door frame See Fig 4 The hook of the hinge arms must be fully seated onto the roller pins 3 Fully open the oven door horizontal with floor...

Page 38: ...urner grates burner caps and surface burner drip pans if equipped To clean the burner head ignition ports Each burner head has a small ignition port located as shown in Fig 1 Should you experience ignition problems it may be that this port hole is partially blocked with soil With the burner head in place use a small wire gauge needle or the end of a paper clip to clear the ignition port To clean t...

Page 39: ... 2 Fig 3 Double burner assembly 1 Inner burner head 2 Burner skirt 3 Outer burner head 4 Brass distribution block Burner base iii Changing Oven Light s The oven lights automatically turn ON when the door is opened The oven lights may also be manually operated by pressing the d O _ pad The oven light bulbs are located at the rear of the oven and are covered with a glass shield held by a wire holder...

Page 40: ...rs OFF use a small gauge wire or needle to clean ports See Cleaning the Cooktop Burner Caps Burner Heads Grates in the General Care Cleaning section for complete instructions Range power cord is disconnected from outlet electric ignition models only Be sure cord is securely plugged into the outlet Electrical power outage electric ignition models only Burners can be lit manually See Setting Surface...

Page 41: ...e set temperature before placing food in the oven Try adjusting the recipe s recommended temperature or baking time If you feel the oven is cooking too hot or cool see Adjusting Your Oven Temperature Controls are not set properly Follow instructions in Self Cleaning section Self Cleaning cycle was interrupted Stop time must be set 2 to 4 hours past the start time Follow steps under Stopping or Int...

Page 42: ...ed Trademark Trademark SM Service Mark of Sears Brands LLC Marca Registrada TM Marca de Fabrica SM Marca de Servicio de Sears Brands LLC MD MCMarque de commerce Marque d_pos_e de Sears Brands LLC Sears Brands LLC ...

Reviews: