background image

6

Master Protection Agreements

Congratulations on making a smart purchase. Your new
Kenmore

® 

product is designed and manufactured for years of

dependable operation. But like all products, it may require
preventive maintenance or repair from time to time. That’s when
having a Master Protection Agreement can save you money
and aggravation.

The Master Protection Agreement also helps extend the life of
your new product. Here’s what the Agreement* includes:

;

Parts and labor 

needed to help keep products operating

properly 

under normal use

, not just defects. Our coverage

goes 

well beyond the product warranty. 

No deductibles,

no functional failure excluded from coverage – 

real

protection.

;

Expert service 

by a force of more than 

10,000 authorized

Sears service technicians

, which means someone you

can trust will be working on your product.

;

Unlimited service calls and nationwide service, 

as

often as you want us, whenever you want us.

;

«No-lemon» guarantee 

– replacement of your covered

product if four or more product failures occur within twelve
months.

;

Product replacement 

if your covered product can’t be

fixed.

;

Annual Preventive Maintenance Check 

at your request –

no extra charge.

;

Fast help by phone 

– we call it 

Rapid Resolution 

phone support from a Sears representative on all products.
Think of us as a «talking owner’s manual».

;

Power surge protection 

against electrical damage due to

power fluctuations.

;

$250 Food Loss Protection 

annually for any food

spoilage that is the result of mechanical failure of any
covered refrigerator or freezer.

;

Rental reimbursement 

if repair of your covered product

takes longer than promised.

;

10% discount 

off the regular price of any non-covered

repair service and related installed parts.

Once you purchase the Agreement, a simple phone call is all
that it takes for you to schedule service. You can call anytime
day or night, or schedule a service appointment online.

The Master Protection Agreement is a risk free purchase. If you
cancel for any reason during the product warranty period, we
will provide a full refund. Or, a prorated refund anytime after the
product warranty period expires. Purchase your Master
Protection Agreement today!

Some limitations and exclusions apply. For prices and
additional information in the U.S.A. call 1-800-827-6655.

* Coverage in Canada varies on some items. For full details
call Sears Canada at 1-800-361-6665.

Sears Installation Service

For Sears professional installation of home appliances, garage
door openers, water heaters, and other major home items, in
the U.S.A. or Canada call 

1-800-4-MY-HOME

®

.

PROTECTION AGREEMENTS

Acuerdos maestros de protección

Enhorabuena por haber hecho una compra inteligente. Su nuevo producto
Kenmore

® 

está diseñado y fabricado para brindarle años de funcionamiento

fiable. Pero, como cualquier producto, puede necesitar mantenimiento
preventivo o reparaciones periódicas. Es por eso que tener un Acuerdo maestro
de protección podría ahorrarle dinero y molestias.

El Acuerdo maestro de protección también sirve para prolongar la durabilidad
de su nuevo producto. El acuerdo* incluye lo siguiente:

;

Piezas y mano de obra 

necesarias para contribuir a mantener el

funcionamiento adecuado de los productos 

utilizados en condiciones

normales de uso

, no sólo en caso de defectos de los productos. Nuestra

cobertura va 

mucho más allá que la garantía del producto. 

No se

aplican deducibles ni exclusiones por fallas del funcionamiento: es decir,

verdadera protección.

;

Servicio técnico por expertos 

(más de 

10000 técnicos autorizados de

Sears

), lo cual significa que quien repare o realice el mantenimiento de su

producto será un profesional de confianza.

;

Servicio técnico a escala nacional y número ilimitado de llamadas de
solicitud de servicio técnico: 

se puede poner en contacto con nosotros

cuantas veces lo desee y cuando lo desee.

;

Garantía «sin sorpresas»:

 se reemplaza el producto cubierto por el

acuerdo si ocurren cuatro o más fallas del producto en un periodo de 12
meses.

;

Reemplazo del producto: 

en caso de que no se pueda reparar el

producto cubierto por el acuerdo.

;

Revisión anual preventiva de mantenimiento del producto: 

puede

solicitarla en cualquier momento, sin costo alguno.

;

Rápida asistencia telefónica

, la cual denominamos 

Solución rápida: 

es

decir, asistencia telefónica a través de cualquiera de nuestros
representantes de Sears, sobre cualquiera de nuestros productos. Piense
en nosotros como en un «manual parlante del usuario».

;

Protección contra fallas eléctricas, 

contra daños debidos a fluctuaciones

de la corriente eléctrica.

;

$250 al año para cubrir cualquier posible deterioro de alimentos

 que

haya tenido que desechar debido a una falla mecánica de cualquiera de
nuestros refrigeradores o congeladores cubiertos por este acuerdo.

;

Devolución de gastos de alquiler de electrodomésticos 

si la reparación

de su producto asegurado toma más que el tiempo prometido.

;

10% de descuento 

aplicable tanto a los costos del servicio de reparación,

como de las piezas instaladas relacionadas que no hayan quedado
cubiertos por este acuerdo.

Una vez que haya realizado el pago de este acuerdo, bastará una simple
llamada telefónica para concertar una visita de servicio. Puede llamar a
cualquier hora del día o de la noche, o bien concertar una visita de servicio por
Internet.

La adquisición del Acuerdo maestro de protección es una inversión exenta de
riesgos. Si por cualquier motivo decide cancelar dicho acuerdo durante el
periodo de garantía del producto, le haremos un reintegro total del valor. O bien
un importe proporcional si cancela el acuerdo en cualquier otro momento
posterior al vencimiento del periodo de garantía del producto. ¡Adquiera hoy
mismo su Acuerdo maestro de protección!

Algunas limitaciones y exclusiones podrían aplicarse. Para solicitar
precios e información adicional, llame al 1-800-827-6655 (en los EE.UU.).

* La cobertura en Canadá varía en el caso de algunos artículos. Para
obtener detalles completos al respecto, llame al 1-800-361-6665 de Sears
de Canadá.

Servicio de instalación de Sears

Para solicitar la instalación por profesionales de Sears de electrodomésticos,
abridores de puertas de garaje, calentadores de agua y otros artículos de uso
prioritario en el hogar, 

llame al 1-800-4-MY-HOME

 en los EE.UU. o Canadá.

Summary of Contents for 790.4658 Series

Page 1: ...5 5 5 5 5 Color number número de color Electric Range Slide in models Use Care Guide Estufa eléctrica Modelos deslizables Manual de uso y cuidado ENGLISH ESPAÑOL Sears Roebuck and Co Hoffman Estates IL 60179 U S A P N 318203800 Rev D 0712 www sears com ...

Page 2: ...ppliance is ever used for other than private family purposes This warranty covers only defects in material and workmanship Sears will NOT pay for 1 Cracks in a ceramic glass cooktop that are not a result of thermal shock 2 Stains and scratches on a ceramic glass cooktop resulting from accident or improper operation or maintenance 3 Expendable items that can wear out from normal use including but n...

Page 3: ...injuries and also cause damage to the range Do not allow children to climb or play around the range The weight of a child on an open door may cause the range to tip resulting in serious burns or other injury An open drawer when hot may cause burns Do not use the oven or warmer drawer if equipped for storage Do not store items of interest to children in the cabinets above a range Children climbing ...

Page 4: ...isk of burns ignition of flammable materials and spillage due to unintentional contact with the utensil Never leave surface burners unattended at high heat settings Boilovers cause smoking and greasy accu mulations that may ignite or a pan that has boiled dry may melt Protective liners Do not use aluminum foil to line oven bottom or any other part of the appliance Only use aluminum foil as recomme...

Page 5: ...light bulb IMPORTANT INSTRUCTIONS FOR CLEAN ING YOUR RANGE Clean the range regularly to keep all parts free of grease that could catch fire Exhaust fan ventilation hoods and grease filters should be kept clean Do not allow grease to accumulate on hood or filter Greasy deposits in the fan could catch fire When you are flaming food under the hood turn the fan on Refer to the hood manufacturer s inst...

Page 6: ...r la durabilidad de su nuevo producto El acuerdo incluye lo siguiente Piezas y mano de obra necesarias para contribuir a mantener el funcionamiento adecuado de los productos utilizados en condiciones normales de uso no sólo en caso de defectos de los productos Nuestra cobertura va mucho más allá que la garantía del producto No se aplican deducibles ni exclusiones por fallas del funcionamiento es d...

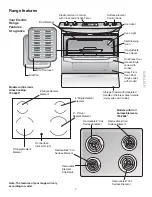
Page 7: ...ert Storage Drawer with Integrated Handle or Stainless Steel Handle style varies with model Note The features of your range will vary according to model OvenVent Removable 6 Coil Surface Element Removable 8 Coil Surface Element Removable Element Drip Bowls Removable 8 Coil Surface Element Removable 6 Coil Surface Element Models with Ceramic GlassCooktop 790 4659 6 9 Dual Radiant Element Models wit...

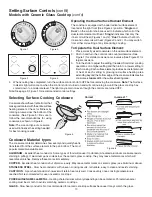
Page 8: ...he Radiant Surface Elements The element temperature rises gradually and evenly As the temperature rises the element will glow red To maintain the selected setting the element will cycle on and off The heating element retains enough heat to provide a uniform and consistent heat during the off cycle For efficient cooking turn off the element several minutes before cooking is complete This will allow...

Page 9: ...he indicator light has turned off Do not place plastic items such as salt andpeppershakers spoon holders or plastic wrappings on top of the range when it is in use These items could melt or ignite Potholders towels or wooden spoons could catch fire if placed too close to the surface elements Operating Single Radiant Surface Elements The cooktop has single radiant surface elements at 3 locations th...

Page 10: ... using cookware as shown in Figure 6 Note The size and type of cookware used will influence the setting needed for best cooking results 4 When cooking has completed turn the surface control knob to OFF before removing the cookware Note The Surface Indicator light will come on when the control knob is turned on and will continue to glow until the glass cooktop has cooled down to a moderate level Th...

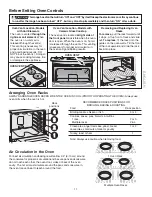
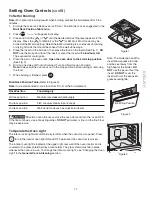
Page 11: ... around the food Air Circulation in the Oven 1 Oven Rack Multiple Oven Racks Oven Vent Location Models with Coil Elements The oven is vented through the right rear coil element When the oven is on warm air is released through the vent s This venting is necessary for proper air circulation in the oven and good baking results DO NOT block the vent s Doing so may cause cooking failures fire or damage...

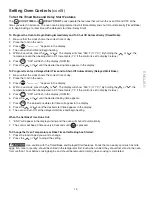
Page 12: ...ht to show which feature is in use CLOCK SET PAD Used to set the time of day STOP CLEAR PAD Used to clear any function previously entered except the time of day and minute timer Press STOP CLEAR to stop cooking Also the STOP CLEAR pad is used to activate oven door lockout setting TIMER SET OFF PAD Used to set or cancel the minute timer The minute timer does not start or stop cooking Also TIMER SET...

Page 13: ... will beep 3 times It will then continue to beep 3 times every 60 seconds until Timer Set Off is pressed Note The indicator light located above the Timer Set Off pad will glow while the minute timer is active Note The minute timer does not start or stop cooking It serves as an extra timer in the kitchen that will beep when the set time has run out The minute timer can be used alone or during any o...

Page 14: ...ammed to override this feature for continuous baking To set control for continuous baking 1 Press and hold Timer Set Off down for 5 seconds until tone is heard hr will appear in display for continuous cooking The current time of day will return to the display 2 To cancel the Continuous Bake function press Timer Set Off and hold for 5 seconds until tone is heard 12hr will appear in display indicati...

Page 15: ... increments 1 C if the control is set to display Celsius 6 Press Cook Time 0 00 will flash in the display HR MIN 7 Press the or until the desired baking time appears in the display To Program Oven for a Delayed Start Time and to Shut Off Automatically Delayed Start Bake 1 Be sure that the clock shows the correct time of day 2 Place the food in the oven 3 Press Bake Bake appears in the display 4 Wi...

Page 16: ... frequently Corrections Allow oven to preheat to the selected temperature before placing food in oven Choose pan sizes that will permit 2 to 4 5 1 cm to 10 2 cm of air space on all sides when placed in the oven Use a medium weight aluminum baking sheet Allow oven to preheat to the selected temperature before placing food in the oven Use proper rack position for baking needs Set oven temperature 25...

Page 17: ...ss STOP Clear Broil Rack Position Table Refer to Figure 3 Note It is recommended to cook food from 3 to 5 of the broil element RackPosition Foodcategory 3rd rack position Medium rare steaks hamburgers 2nd rack position Fish medium steaks pork chops 2nd rack position Well done foods such as chicken lobster Should an oven fire occur close the oven door and turn the oven OFF If the fire continues use...

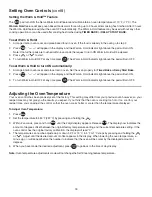
Page 18: ...arm Hold OFF at any time press STOP Clear The Warm Hold indicator light above the pad will turn OFF Adjusting the Oven Temperature Your oven control has been precisely set at the factory This setting may differ from your previous oven however so your recipe times may not give you the results you expect If you think that the oven is cooking too hot or too cool for your recipe times you can adjust t...

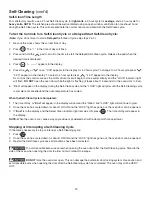
Page 19: ...do not have to be removed If they are not removed during the Self Clean cycle their color will turn slightly blue and the finish will be dull If left in after the cycle is complete and the oven has cooled rub the sides of the oven racks with wax paper or a cloth containing a small amount of salad oil this will make the racks glide easier into the rack position Remove any excessive spillovers in th...

Page 20: ... seconds for the oven door to lock 6 CLn will appear in the display during the Self Clean cycle and the LOCK light will glow until the Self Cleaning cycle is complete or cancelled and the oven temperature has cooled When the Self Clean Cycle is Completed 1 The time of day or End will appear in the display window and the Clean and LOCK light will continue to glow 2 Once the oven has cooled down for...

Page 21: ...ts with an ammonia soaked paper towel for 30 to 40 minutes Rinse with clean water and a damp cloth and then scrub with a soap filled scouring pad Rinse and wipe dry with a clean cloth Remove all cleaners or the porcelain may become damaged during future heating DO NOT use spray oven cleaners on the cooktop Remove racks See Removing and Replacing Oven Racks under Before Setting Oven Controls Use a ...

Page 22: ...g cream leaves a protective coating which helps in preventing scratches and abrasions For sugary spillovers Sugary spills can chemically damage your cooktop surface Therefore you must begin cleaning the spills while the cooktop is still hot Use caution when following the steps below 1 Turn off all surface units and remove all pans immediately 2 Put on an oven mitt wipe up carefully or move hot spi...

Page 23: ...e anything metal or glass across the cooktop Do not use your cooktop as a cutting board or work surface in the kitchen Do not cook foods directly on the cooktop surface without a pan Do not drop heavy or hard objects on the glass cooktop because they may cause it to crack Cleaning Recommendations for the Ceramic Glass Cooktop Before cleaning the cooktop be sure the controls are turned to OFF and t...

Page 24: ... the door flat with the inside of the door facing down To Remove Oven Door 1 Open the door to the fully opened position 2 Pull up the lock located on both hinge supports and engage it in the hinge lever hooks Figure 1 You may have to apply a little downward pressure on the door to pull the locks fully over the hinge lever hooks 3 Grab the door by the sides and pull the bottom of the door up and to...

Page 25: ...are COOL before replacing the oven light bulb Do not turn the oven light on during a self cleaning cycle High temperature will reduce lamp life On some models an interior oven light will turn on automatically when the oven is opened The oven light may be turned on when the door is closed by using the oven light switch located on the Electronic Oven control The oven light bulb is covered with a gla...

Page 26: ...panswereused Besuretousepropercookware Useonlyflatbottom evenlybalancedmediumorheavyweightcookware Heavyandmediumweightpansheatevenly Because lightweight pans heat unevenly foods may burn easily Lightweight or warped pans were used Be sure to use proper cookware Use only flat bottom evenly balanced medium or heavyweight cookware Heavy and medium weight pans heat evenly Because lightweight pans hea...

Page 27: ...preheat to the set temperature before placing food in the oven Try adjusting the recipes recommended temperature or baking time If you feel the oven is too hot or cool see Adjusting the Oven Temperature section in this Use and Care Guide A cooling fan may automatically turn on and off to cool internal parts It is normal and the fan may continue to run after the range has been turned OFF but may al...

Page 28: ... that you need to do it yourself For Sears professional installation of home appliances and items like garage door openers and water heaters 1 800 4 MY HOME 1 800 469 4663 Call anytime day or night U S A and Canada www sears com www sears ca Our Home For repair of carry in items like vacuums lawn equipment and electronics call anytime for the location of your nearest Sears Parts Repair Service Cen...

Reviews: