16
Before Setting Oven Controls
Glide Racks
The fully-extendable Glide Rack is an extendable rack that
makes food preparation easier. It has glide tracks that allow the
rack to be pulled away from the oven without rubbing the sides
of the oven wall.
Removing and Replacing the Oven Glide Racks
To remove the oven Glide Rack:
Always use pot holders or oven mitts when using
the oven. When cooking, the oven interior and exterior, as well
as the oven racks, will become very hot which can cause burns.
Always remove/replace the oven racks before
turning on the oven (when the oven is cool).
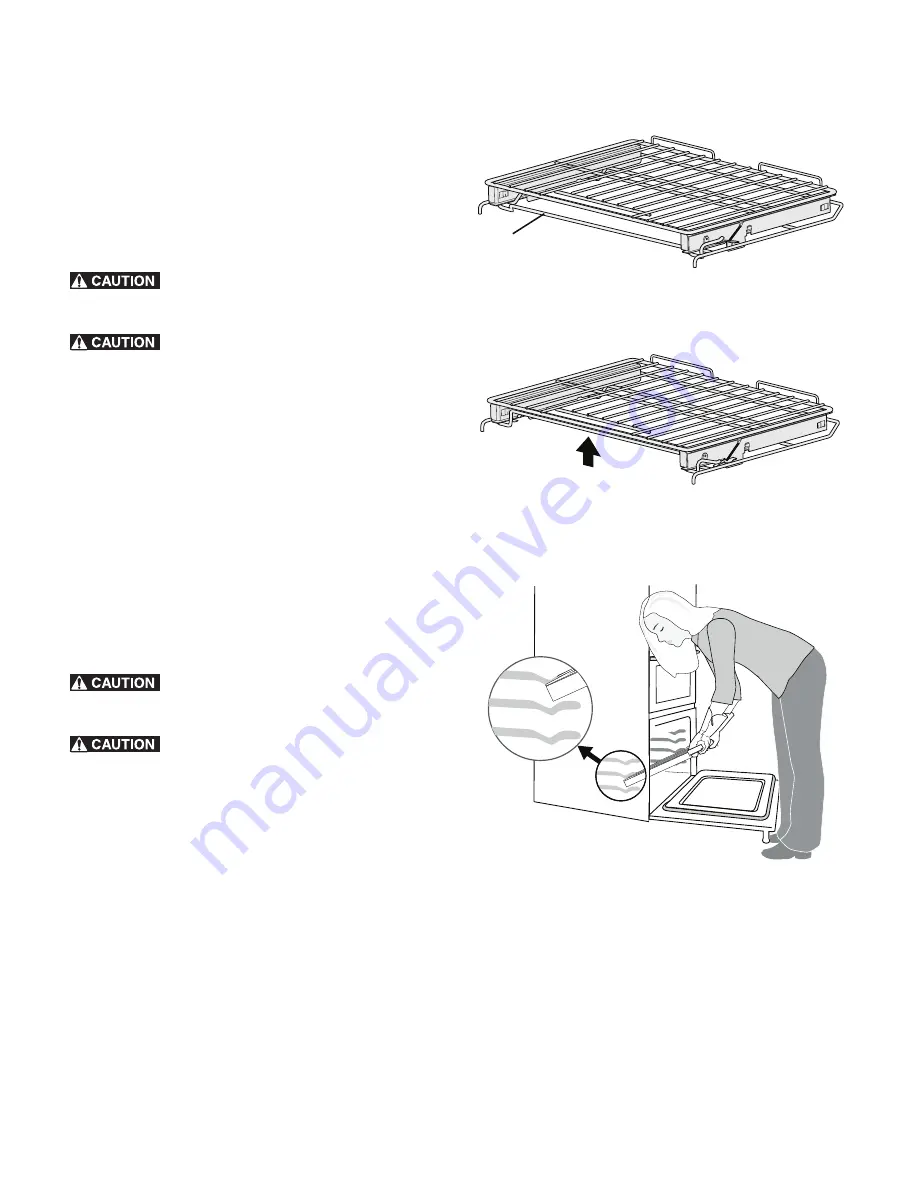
1.
Lift up on the release lever located across the lower front of
the rack, as shown in
.
2. While holding up the release lever (
), pull the
Glide Rack out of the oven until the stop position is reached,
use two hands if necessary.
3. Using both hands, grasp the upper and lower portions of the
Glide Rack (
4. Lift up the front of the rack slightly and continue to pull the
rack away from the oven.
5. Be sure to grasp both upper and lower rack portions
together when removing or handling the Glide Rack. The
rack portions move independently and are difficult to
handle unless held together.
To replace the Glide Rack:
Always use pot holders or oven mitts when using
the oven. When cooking, the oven interior and exterior, as well
as the oven racks, will become very hot which can cause burns.
Always remove/replace the oven racks before
turning on the oven (when the oven is cool).
1.
Grasp both upper and lower portions of the Glide Rack
(
).
2. Lift and hold the rack level between the oven cavity walls.
3. Tilt the front of the rack upward slightly and slide the rack
completely into position. Some force may be necessary to
make sure the oven rack has snapped into place.
Important: The Glide Rack is porcelain enameled and may be
left in the oven to be cleaned during the self-clean cycle. After
the cycle, or anytime the gliding is rough, the Glide Rack
extension tracks should be treated with graphite lubrication.
Important notes:
To prevent possible damage to the oven, do not attempt to close
the oven door until all the oven racks are fully positioned inside
the oven cavity.
For instructions on how to best clean these oven racks, see
on
Figure 20: Extendable Glide Rack with release lever in locked
position
Figure 21: Extendable Glide Rack with release lever in unlocked
position
Figure 22: Removing and replacing the oven Glide Rack
Release lever
Summary of Contents for 790.9258
Page 45: ......


