background image

4

ENGLISH

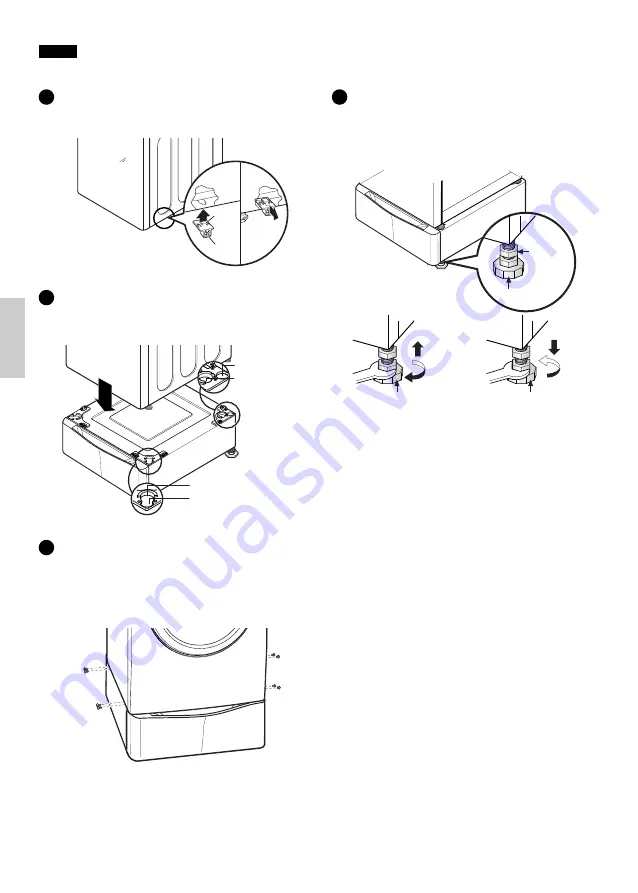
DRYER INSTALLATION

T-clip

Retainer

for washer
for dryer

for dryer

for washer

5

Insert the T-clip of the 4 retainers into the dryer base
as shown. Press up on the back of the clip and pull
outward to lock into place.

6

Position dryer on top of the pedestal.

NOTE: 

Because of the weight of the dryer, two or more

people may be needed.

NOTE: 

If dryer was previously installed, uninstall it as

follows:

7

Make sure the holes on the pedestal align with the
holes in the appliance, then install 4 screws at each
corner to securely attach the appliance to the
pedestal.

NOTE: 

If the screws are not installed properly, noise

and vibration may result. 

8

Move the dryer to the desired location.

NOTE: 

The appliance and pedestal assembly must be

placed on a solid and level floor for proper operation.
Adjust the legs of the pedestal using the wrench
supplied.  Tighten the lock nuts with the wrench.

A. Uninstalling an electric dryer:

1) Unplug the power supply cord,
2) Pull the dryer away from the wall enough to loosen

the vent clamp. Loosen the clamp and carefully
remove the exhaust vent from the dryer exhaust
outlet.

B. Uninstalling a gas dryer:

1) Unplug power supply cord.
2) Turn off the gas supply.
3) Pull the dryer away from the wall enough to loosen

the vent clamp. Loosen the clamp and carefully
remove the exhaust vent from the dryer exhaust
outlet.

(See page 3 for washer instructions.)

Lock
nut

Adjustable

feet

Adjustable

feet

Adjustable

feet

Higher

Lower

Summary of Contents for 796.51043 Series

Page 1: ...it Piédestal Notice d installation Pour Machine à laver et Sèche linge Models Modelos Modèles 796 5104 3 color number número de color numéro de couleur MFL67454003 Sears Brands Management Corporation Hoffman Estates IL 60179 Sears Canada Inc Toronto Ontario Canada M5B 2B8 www sears com www sears ca FRANÇAIS ESPAÑOL ENGLISH ...

Page 2: ...eeded to install and move the appliance and pedestal assembly Do not allow children to play on the drawer Do not step on the handle A stacked washer dryer pair should never be mounted on a pedestal PEDESTAL INSTALLATION 1 Remove pedestal installation hardware and instructions from the shipping carton 2 Before installing the pedestal clean the area where the laundry will be located Make sure the fl...

Page 3: ...egs of the appliance and pedestal by turning with a wrench Then tighten the lock nut against the base of the pedestal with the wrench while holding the leg to make sure it does not turn NOTE Diagonal Check Once the pedestal feet are adjusted rock the washer very firmly in a diagonal direction If one direction moves more than the other readjust the front feet until both directions are even NOTE To ...

Page 4: ...d vibration may result 8 Move the dryer to the desired location NOTE The appliance and pedestal assembly must be placed on a solid and level floor for proper operation Adjust the legs of the pedestal using the wrench supplied Tighten the lock nuts with the wrench A Uninstalling an electric dryer 1 Unplug the power supply cord 2 Pull the dryer away from the wall enough to loosen the vent clamp Loos...

Page 5: ...r than its intended purpose 6 Damage to or failure of this product caused by the use of detergents cleaners chemicals or utensils other than those recommended in all instructions supplied with the product 7 Damage to or failure of parts or systems resulting from unauthorized modifications made to this product Disclaimer of implied warranties limitation of remedies Customer s sole and exclusive rem...

Page 6: ...vo Se podrían necesitar dos o más personas para instalar y mover el conjunto de electrodoméstico y pedestal Evite que los niños jueguen sobre el cajón No pise el asa Nunca se deberá colocar una columna de lavadora secadora sobre un pedestal INSTALACIÓN DEL PEDESTAL 1 Retire el pedestal los materiales de instalación y las instrucciones de la caja de embalaje 2 Antes de instalar el pedestal limpie l...

Page 7: ...rrectamente Ajuste las patas del electrodoméstico y del pedestal con ayuda de una llave A continuación utilice la llave para apretar la tuerca de bloqueo contra la base del pedestal mientras sujeta la pata para que no gire NOTA comprobación diagonal Una vez que las patas del pedestal estén ajustadas balancee la lavadora en diagonal Si la lavadora se mueve más en una dirección que en otra vuelva a ...

Page 8: ...s y ruidos 8 Desplace la secadora hasta la ubicación deseada NOTA NOTA el conjunto de electrodoméstico y pedestal deberá colocarse en un suelo sólido y nivelado para que funcione correctamente Ajuste los pies de nivelación del pedestal utilizando la llave incluida Apriete las tuercas de apriete con la llave A Desinstalar una secadora eléctrica 1 Desenchufe el cable de corriente 2 Retire la secador...

Page 9: ... Daños o fallas de este producto provocados por el uso de detergentes limpiadores químicos o utensilios diferentes de los recomendados en todas las instrucciones suministradas con el producto 7 Daños o fallas de piezas o sistemas como resultado de modificaciones sin autorización hechas a este producto Descargo de responsabilidad de garantías implícitas limitación de acciones legales Las únicas y e...

Page 10: ...tallation ATTENTION Danger Poids excessif Au moins deux personnes sont nécessaires pour l installation et la mise en place de la machine et du piédestal Interdire aux enfants de jouer sur le caisson Ne pas monter sur la poignée Ne jamais monter une machine à laver surmontée d un sèche linge sur un piédestal INSTALLATION DU PIÉDESTAL 1 Retirez le piédestal le matériel d installation et les instruct...

Page 11: ... appareil et du piédestal en les serrant avec une clé Ensuite serrez les contre écrous contre la base du piédestal avec une clé tout en tenant le pied pour s assurer qu il ne tourne pas REMARQUE Vérification Diagonale Une fois terminé le réglage des pieds de nivellement du piédestal secouez très fermement la machine à laver en diagonale Si la machine bouge davantage dans une direction que sans l a...

Page 12: ...sèche linge vibrera et fera du bruit 8 Déplacez l appareil vers l endroit souhaité REMARQUE Pour qu il fonctionne correctement le sèche linge doit être placé sur un plancher solide et de niveau Réglez la position des pieds à l aide de la clé de service fournie Serrez les écrous de blocage avec la clé A Désinstallation d un sèche linge électrique 1 Débranchez le câble d alimentation électrique 2 Dé...

Page 13: ...ou une utilisation dans un but autre que le but prévu par le fabricant 6 Tout dégât ou panne de la machine causé par l utilisation de lessives de produits nettoyants de produits chimiques ou d accessoires autres que ceux recommandés dans les instructions fournies avec la machine 7 Tout dégât ou panne de pièces ou de systèmes causés par des modifications non autorisées apportées à cette machine Cla...

Page 14: ... Modelos 796 5104 3 Net weight 57 3 lb 26 kg 26 4 67 0cm 18 4 46 7cm 3 7 7cm 29 73 7cm 13 6 34 5cm Specifications are subject to change by manufacturer Las especificaciones son sujetas a cambio por el fabricante ...

Page 15: ...15 MEMO ...

Page 16: ...P No MFL67454003 ...

Reviews: