background image

Summary of Contents for 796.6152 Series

Page 1: ...are Guide Manual de Uso y Cuidado English Espa_oi Model Modelo 796 6152 796 7152 I e ore Elite P N MFL62512883 Sears Brand Management Corporation Hoffman Estates IL 60179 U S A www kenmore com www sears com ...

Page 2: ...or needed to help keep products operating properly under normal use not just defects Our coverage goes well beyond the product warranty No deductible no functional failure excluded from coverage real protection Expert service by a force of more than 10 000 authorized Sears service technicians which means someone you can trust will be working on your product Unlimited service calls and nationwide s...

Page 3: ... insfaff a clothes dryer with flexible plastic venting materials ff a flexlble metal fall type duct is insfaffed it must be of a specific type identified by the appffance manufacturer as sultable for use with clothes dryers Flexlble venting materlals are known to caffapse be easily crushed and trap llnt These conditions wiff obstruct clothes dryer airflow and increase the risk of fire Do nat store...

Page 4: ...yer where it will be exposed to the weather Always check the inside of the dryer for foreign objects Clean the lint filter before or after each load CALiFORNiA SAFE DRINKING WATER AND TOXIC ENFORCEMENT ACT This act requires the Governor of California to publish a tist of substances known to the state to cause cancer birth defects or other reproductive harm and requires businesses to warn customers...

Page 5: ... can cause product deformation smoke and fire Remove all protective vinyl film from the product Failure to do so can cause product deformation smoke and fire Exhaust Ducfing Gas dryers MUST be exhausted to the outside Failure to follow these instructions can result in fire or death The dryer exhaust system must be exhausted to the outside of the dwelllng if the dryer is not exhausted outdoors some...

Page 6: ...ged into a properly grounded outlet For personal safety this dryer must be properly grounded Faiture to do so can result in electrical shock or injury Refer to the installation instructions in this manual for specific electrical requirements for your model Failure to follow these instructions can create an electrical shock hazard and or a flre hazard This dryer must be plugged into a properly grou...

Page 7: ...TH DRUM LIGHT The ultra large stainless steel drum offers superior durability The drum light can be turned on during a cycle by using the DRUM LIGHT button on the controt panel The light also comes on when the door is opened if the controt is ON EASY ACCESS REVERSIBLE DOOR The wide opening see through glass door provides easy access for loading and unloading Door swing can be reversed to adjust fo...

Page 8: ...age place the dryer at least 18 inches 45 7cm above the floor Properly ground the dryer to conform with all governing codes and ordinances To reduce the risk of electric shock do not install the dryer in damp or wet locations IMPORTANT If you are installing your dryer in a manufactured or mobile home please refer to the Special Electrical Requirements for Mobile or Manufactured Homes section CLEAR...

Page 9: ... connection between the gas supply and the dryer purge remaining air until the odor of gas is detected Failure to do so can result in fire explosion or death DO NOT use an open flame to inspect for gas leaks Use a noncorrosive leak detection fluid Failure to do so can result in fire explosion or death Use only a new AGA or CSA certified gas supply llne with fiexlble sfalnless steel connectors Fail...

Page 10: ...yer Remove the shipping cap from the gas fitting at the back of the dryer Be careful not to damage the threads of the gas connector when removing the shipping cap _Connect the dryer to your laundry room s gas supply using a new flexible stainless steel connector with a 3 8 inches NPT fitting NOTE DO NOT use old connectors _Securely tighten all connections between the dryer and your laundry room s ...

Page 11: ...nnected to the equipment grounding termlnal or lead on the dryer Failure to do so can result in fire explosion or death The dryer has its own terminal block that must be connected to a separate 240 VAC 60 Hertz single phase circuit fused at 30 amperes the circuit must be fused on both sides of the llne ELECTRICAL SERVICE FOR THE DRYER SHOULD BE OF THE MAXIMUM RATE VOLTAGE LISTED ON THE NAMEPLATE D...

Page 12: ...ire _1 Transfer the dryer s ground wire from behind the green ground screw to the center screw of the terminal block Attach the two hot leads of the power cord to the outer terminal block screws t_t Attach the white neutral wire to the center screw of the terminal block Attach the power cord ground wire to the green ground screw TIGHTEN ALL SCREWS SECURELY Reinstall the terminal block access cover...

Page 13: ... below to see if your duct is too long if it is too long have the duct routed to another location that is within the venting guidelines DO NOT USE PLASTIC OR FOIL VENTING The transition duct from your dryer to the wall must be rigid or semi rigid metal ducting if your old transition duct is plastic or foil REPLACE iT with semi rigid metal ducting Using the DUCT LENGTH CHART below _j_ Find your ven...

Page 14: ...ailure and or result in fire or death IMPORTANT Failure to exhaust the dryer per the guidelines included within these instructions may result in unsatisfactory dryer performance All venting and ductwark beyond the exterior of the dryer is the responsibility of the consumer Product failure as a result of improper venting is not covered by the manufacturer s warranty Connecting the Dryer Vent _l Ver...

Page 15: ...e final location Place a level across the top of the dryer All four leveling feet must rest solidly on the floor Gently push on the top corners of the dryer to make sure that the dryer does not rock from corner to corner Use a wrench to turn the leveling feet Turn the leveling foot clockwise to raise the dryer turn the foot counterclockwise to lower the dryer Using a level adjust the feet until th...

Page 16: ...ges to the screws securing door frame Remove the two plastic cover caps on the side opposite the hinges Reinstall the hinges and cover caps on the opposite sides from which they were removed fmm_ fmm_ i _ i m m J _ m m J DWith hinges cover caps new the and in the locations remount the inner door frame onto the outer door frame with the screws removed in step 3 m_ O Reinstall the door with the scre...

Page 17: ...cycle Press the START PAUSE to start the dryer Open the dryer door and check that the air inside is warm after three minutes NOTE If all air is not purged from the gas line the gas igniter may turn off before the main burner ignites If this happens the igniter will reattempt gas ignition until all the air is purged from the gas line Checking Venting Vent duct should be checked for lint buildup and...

Page 18: ...ling To pause the cycle at any time open the dryer door or press START PAUSE To resume the cycle where it was stopped press START PAUSE again NOTE If the dryer has been stopped for more than four minutes the dryer wilt turn off automatically and all settings will be lost O O OPTION BUTTONS These buttons allow you to select cycle options Some of the option buttons have secondary functions The contr...

Page 19: ...MODIFIERS Default settings for the selected cycle can now be changed if desired using the Temp and Dry Level buttons NOTE Not all options or modifiers are available on all cycles Temperature can only be adjusted on Timed Dry cycles Dry Level is only available on Auto Dry cycles A different chime wilt sound and the LED will not illuminate if the selection is not allowed OPTIONS E I S o oSHod J hmo ...

Page 20: ...tons denims Comforteb bedding children s clothing etc 1 5 garments Comforters shirts trousers etc Do not use this cycle for delicate fabrics Workout wear Only normal cotton towe fabric type Max 3 Ib Lingerie sheets blouses Adjustable Modifiers Adjustable Adjustable Adjustable Adjustable Adjustable Adjustable Adjustable Options NOTE To protect your garments not every dry level or option is availabl...

Page 21: ...ge the time available option default setting Express Dry Touch Up Air Dry Rack Dry I Timed Dry For small loads with short drying times For removing light wrinkles For items that require heat free drying such as plastics or rubber Wool sweaters sill lingerie For loads that require a speciflc dry time Adjustable Adjustable Air only low Modifiers Max 99 Max 99 Max 99 Max 99 Options SANITIZE CYCLE The...

Page 22: ...es Flammable objects such as lighters or matches could ignite causing a fire Failure to do so can result in fire explosion or death Never dry clothes that have been exposed to oil gasoline or other flammable substances Washing clothes will not completely remove oil residues Failure to obey this warning can result in fire explosion or death Loading Tips Combine large and small items in the same loa...

Page 23: ...djustments In AUTO DRY cycles the time remaining will be estimated and may change during the cycle depending on the condition of the load In TIMED DRY the time displayed win be the actual time remaining CHECK FILTER LIGHT The CHECK FILTER light win bNnk before each load as a reminder to check the lint filter Always clean the lint filter before every cycle _ CYCLE STATUS iNDiCATORS This portion of ...

Page 24: ...EL Sets the level of dryness for the selected AUTO DRY cycle Press the DRY LEVEL button repeatedly to scroll through available settings Use this button to adjust the dryness of the articles in the load to your preference This option is not available with TIMED DRY cycles The dryer will automatically adjust the cycle time Selecting EXTRA DRY will increase the cycle time and dry level while DAMP DRY...

Page 25: ...cle To save a MY CYCLE Press the POWER button to turn on the dryer To recall a MY CYCLE Press the POWER button to turn on the dryer Pressthe MY CYCLEbutton The stored settings will display Press the START PAUSE button to start the cycle NOTE MY CYCLE can be adjusted the same as any other cycle However once any other button is pressed the LED will turn off indicating that the settings are no longer...

Page 26: ...RT PAUSE button to start the cycle IMPORTANT NOTES ABOUT STEAM FUNCTIONS Steam may not be clearly visible during the steam functions This is normal Do not use Steam Refresh with items such as wool wool blankets leather jackets silk wet clothes lingerie foam products or electric blankets For best results toad articles of similar size and fabric type Do not overload If the home s exhaust system is r...

Page 27: ...feeder may not have enough water and the ADD WATER light will illuminate Refill the feeder and restart the cycle Only use water Do not fill the steam feeder with other liquids rinse agents or detergents Before moving the dryer make sure that the steam feeder is empty Do not use distilled water the water level sensor in the steam generator will not work Be careful not to spill water when filling an...

Page 28: ...cleansers they can scratch or damage the surface Cleaning Around and Under the Dryer Vacuum lint and dust from around the dryer and underneath it regularly ALWAYS make sure the lint filter is clean before every cycle The CHECK FILTER light on the control panel will blink before every cycle to remind you NOTE NEVER operate the dryer without the lint filter To remove lint between cycles Open the dry...

Page 29: ...eements There are services available for cleaning maintaining the external venting Sears provides this service via Sears Carpet Upholstery and Duct Cleaning Call 1 800 661 6594 to schedule duct cleaning service from Sears if it is available in your area CHECK VENT Operation The CHECK VENT system uses components already in the dryer By monitoring these components over the course of several cycles t...

Page 30: ...e to turn on then troubleshooting must be done without using Kenmore Connect HOLD the mouthpiece of your phone over the POWER button when instructed to do so by the call center no more than one inch from but not touching the machine NOTE Do not press any other buttons or turn the cycle selector knob PUSH and hold the TEMP button while continuing to hold your phone to the POWER button LISTEN for th...

Page 31: ...er s rating plate Reset circuit breaker or replace fuse Do not increase fuse capacity If the problem is a circuit overload have it corrected by a qualified electrician Reset circuit breaker or replace fuse Do not increase fuse capacity If the problem is a circuit overload have it corrected by a qualified electrician NOTE Due to the design of electric dryers it is possible for a circuit problem to ...

Page 32: ...r before every load With the lint removed hold the filter up to a light to see if it is dirty or clogged If it looks dirty foltow the cleaning instructions on With some loads that produce high amounts of lint such as new bath towels it may be necessary to pause the cycle and clean the filter during the cycle Reset circuit breaker or replace fuse Do not increase fuse capacity If the problem is a ci...

Page 33: ...horoughly before washing and drying clothes Use a fabric softener or the STATIC SHIELD option if equipped to reduce static electricity Be sure to follow the manufacturer s instructions Over drying a toad of laundry can cause a buildup of static electricity Adjust settings and use a shorter drying time or use AUTO DRY cycles Select a LESS DRY setting on AUTO DRY cycles if necessary These fabrics ar...

Page 34: ...d purpose 6 Damage to or failure of this product caused by the use of detergents cleansers chemicals or utensils other than those recommended in all instructions supplied with the product 7 Damage to or failure of parts or systems resulting from unauthorized modifications made to this product Disclaimer of implled warranties limitation of remedies Customer s sole and exclusive remedy under this li...

Page 35: ...no de obra necesarJo para mantener los productos en funcJonamJento bajo uso normal no 0nJcamente los defectos de fabrJcaci6n Nuestra cobertura es muy superior a la garant a del producto No hay ninguna aver a funcional deducible que se excluya de la cobertura se trata de una protecci6n real Servicio experto Ilevado a cabo por un personal de m6s de 10 000 t6cnicos de servicio expertos de Sears Io qu...

Page 36: ...teriales lesiones personales o muerte No instale la see dora de ropa con materlales de ventilaci6n de pl_stlco flexible Si se instal un conducto met_fico flexible de flpo I_mlna de metal debe set del tlpo concreto especlflcado pot el fabrlcante del par to como adecuado par us rio con secadoras Se sabe que los materlales de ventilaci6n flexlbles se colapsan se pueden aplastar con facilldad art pan ...

Page 37: ... del filtro antes de cada carga LEY EJECUTWA SOBRE LA SEGURIDAD DEL AGUA POTABLE Y LOS AGENTES TOXICOS DE CALiFORNiA Esta ley requiere que el gobernador de California publique una lista de sustancias que se sabe que producen c6ncer defectos cong6nitos o cualquier otra lesi6n reproductiva y obliga alas empresas a advertir a los clientes sobre la posible exposici6n a tales sustancias Los electrodom_...

Page 38: ...producto Si no se cumple con esta advertencia se puede provocar una deformaci6n humo o un incendio Quite la pelicula de vlnllo protectora del producto Si no se cumple con esta advertencia se puede provocar una deformaci6n humo o un incendio Venfilaci6n conductos Las secadoras de gas DEBEN tener un conducto de ventllaci6n al exterior Si no se siguen estas instrucciones se podr6 producir incendio o ...

Page 39: ... cumple esta advertencia se podr6n producir descargas el6ctricas o lesiones Consulte las instrucclones de instalaci6n de este manual para obtener los requlsltos el_cfrlcos especJficos de su modelo Si no se siguen estas instrucciones se podr6n producir descargas el6ctricas y o riesgo de incendio Esta secadora debe enchufarse a una toma de corrlente conectada a tlerra adecuadamente Si la secadora no...

Page 40: ...d ultra grande proporciona una durabilidad superior La iluminaci6n del tambor se puede encender durante un ciclo pulsando el bot6n DRUM LIGHT situado en el panel de control La luz tambi6n se enciende al abrir la puerta si el control est6 activado PUERTA REVERSIBLE DE F _CIL ACCESO La puerta de cristal transparente de amplia apertura facilita el acceso para realizar la carga y descarga El giro de a...

Page 41: ...amente a tierra la secadora cumpliendo todas las normativas y ordenanzas Para reducir el riesgo de descarga el6ctrica no instale la secadora en espacios hgmedos ni mojados IMPORTANTE Siva a instalar su secadora en una vivienda prefabricada o m6vil consulte la secci6n Requisitos el_ctricos especiales para viviendas m6viles o prefabricadas DISTANCIAS DE SEPARACI6N La mayoria de las instalaciones req...

Page 42: ...ucir una explosi6n incendio o muerte NO utillce una llama ablerta para buscar fucjas de gas Ufillce un Iiquldo de detecci6n de fucjas no corroslvo Si no se cumple con esto se podr6 producir una explosi6n incendio o muerte Utifice 6nlcamente una toma de sumlnlstro de gas cerfiflcada AGA o CSA con conectores de acero inoxldable flexible Si no se cumple con esto se podr6 producir una explosi6n incend...

Page 43: ...n de transporte del adaptador de gas situado en la parte posterior de la secadora AsegOrese de no da_ar las roscas del conector de gas al retirar el tap6n de transporte Conecte la secadora al suministro de del lavadero gas utilizando un conector de acero inoxidable flexible con un adaptador NPT de 3 8pulgadas NOTA NO utilice conectores viejos OApriete firmemente todas las conexiones entre la secad...

Page 44: ...ecadora Si no se cumple con esto se podr6 producir una explosi6n incendio o muerte La secadora dlspone de un bloque de termlnales propio que debe conectarse a un clrculto monof6slco independlente de 240 V de CA y 60 Hz con fusible de 30 A El clrculto debe dlsponer de fuslbles en ambos extremos de la ffnea EL SERViCIO ELECTPJCO PARA LA SECADORA DEBE SER DEL M _XIMO VOLTAJE NOM NAL INDICADO EN LA PL...

Page 45: ... dos cables acfivos del cable de alimentaci6n a los tornillos del bloque de terminales exteriores O Fije el cable neutro blanco al tornillo central del bloque de terminales Fije el hilo de conexi6n a tierra del cable de alimentaci6n al tornillo de fierra verde APRIETE FIRMEMENTE TODOS LOS TORNILLOS Vuelva a colocar la tapa de acceso al bloque de terminales La puesfa a fierra a tray s del conductor...

Page 46: ...uente los codos Utilice el cuadro que aparece a continuaci6n para comprobar si su conducto es demasiado largo Si Io es redir jalo de forma que cumpla las directrices de ventilaci6n NO UTILICE CONDUCTOS DE VENTiLACI6N DE PL _STICO O L_ MINA MET _LICA EI conducto de paso desde su secadora a la pared debe ser rfgido o semirrfgido Si su viejo conducto de paso es de pl6stico o de 16mina met61ica SUSTIT...

Page 47: ... deficiente fallos del producto y o podr a producir incendios o riesgo de muerte IMPORTANTE Si no se venfila la secadora segOn las directrices incluidas en estas instrucciones el rendimiento de la unidad podr a no ser satisfactorio Toda la venfilaci6n y conductos externos a la propia secadora son responsabilidad del consumidor Los fallos en el producto como consecuenda de una venfilaci6n inadecuad...

Page 48: ... su un sobre la parte superior de la secadora Los cuatro pies de nivelaci6n deben apoyarse firmemente sobre el suelo Presione ligeramente las esquinas superiores de la secadora para asegurarse de que no existe desequilibrio entre elias Pies de niveiaci6n Use una inglesa para girar pies llave los de nJvelaci6n Gire el pie de nivelaci6n en sentido horario para elevar la secadora y gfrelo en sentido ...

Page 49: ...tro tornillos fijan las bisagras a la que estructura de la puerta Retire las dos cubiertas de pl6stico del lado opuesto alas bisagras Vuelva a colocar las bisagras y las cubiertas de pl6stico en los lados opuestos a su posici6n inicial fmm_ fmm_ i o 4 _mm J _ mm J DUna colocadas las las cubiertas de bisagras VeZ y pl6stico en la nueva posici6n monte de nuevo el panel interior de la puerta en la es...

Page 50: ... Abra la puerta de la secadora y compruebe que el aire del interior est6 templado despu6s de tres minutos NOTA Si no se purga todo eJ aire procedente de Ja toma de gas el generador de chispas de gas podria apagarse antes de encender el quemador principal Si esto ocurre el generador de chispas volver6 a intentar encender el gas hasta que se purgue todo el aire procedente de la toma de gas Cornproba...

Page 51: ...o en cualquier momento abra la puerta de la secadora o presione el bot6n START PAUSE Para reanudar eJ ciclo desde el punto en que se detuvo presione de nuevo el bot6n START PAUSE NOTA Si la secadora permanece detenida durante mc_sde cuatro minutos se apagar autom4ticamente y se perder n todos los ajustes realizados BOTONES DE OPCI6N Los botones de opci6n le permitir_n seleccionar las opciones util...

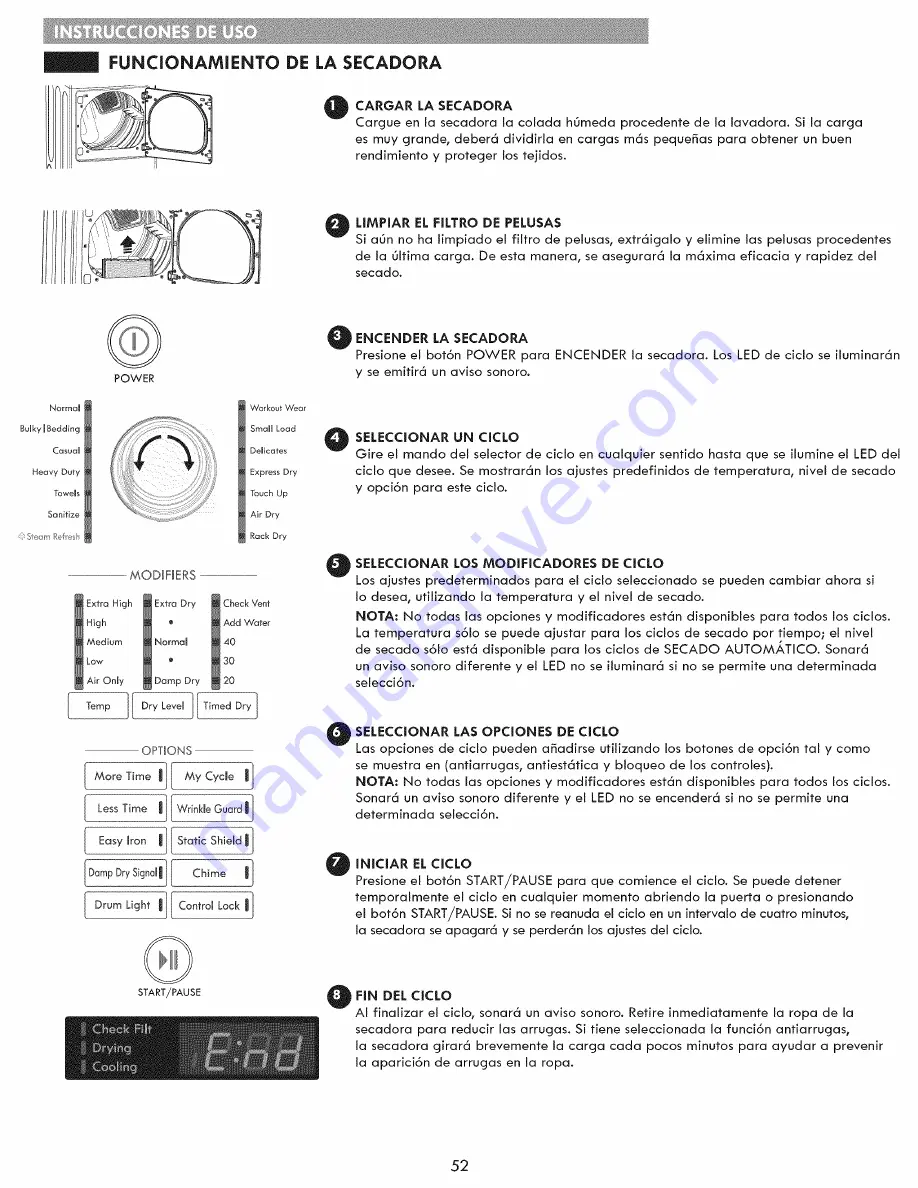
Page 52: ... de secado NOTA No todas las opciones y modificadores est6n disponibles para todos los ciclos La temperatura s61o se puede ajustar para los ciclos de secado por fiempo el nivel de secado s61o est6 disponible para los ciclos de SECADO AUTOMA TICO Sonar6 un aviso sonoro diferente y el LED no se iluminar6 si no se permite una determinada selecci6n OPTIONS MoreTime MyCycme J J Damp DrySignal_ Chime J ...

Page 53: ...s Toallas camisas sdbanas tejanos coladas mixtas Colchas ropa de cama ropa de niBos etc Colchas camisas pan talones 1 5 prendas NO utilice para tejidos delicados Ropa de ejercicio 61o tejidos normales y de algod6n toallas 3 libras m4ximo Ropa interior s banas blusas Ajustable Modificadores Ajustable Ajustable Ajustable Ajustable Adjustable Adjustable Adjustable Opciones BIOTA Para proteger sus pre...

Page 54: ...empo cambie a mayor veJocidad opci6n disponible ajuste predeterminado I Para cargas peque_as Secado r6pido con tiempos de secado breves Ajustable Modificadores Opciones M6x 99 o Para eliminar peque_as Mucha suciedad arrugas Ajustable M6x 99 Para prendas que Secado con aire deben secarse sin calor como pl6sticos o goma M6x 99 Secado en rejilla Su6teres de lana la seda Ja ropa interior Air only low ...

Page 55: ...una explosi6n incendio o muerte No seque nunca prendas que hayan estado expuestas a aceite gasoNna o cuaiquier otra sustancia inflamable El lavado de las prendas no eNminar6 completamente la presencia de residuos de aceite Si no sigue esta advertencia pueden ocasionarse incendios explosiones o incluso peligro de muerte Consejos 0tiles para cargar la secadora Mezcle prendas grandes y peque_as en la...

Page 56: ...los de secado autom6tico se estimar6 el tiempo restante y es posible que cambie durante el ci lo en funci6n de las condiciones de la carga En el secado manual se mostrar6 exactamente el tiempo que falta para que finalice el ciclo INDICADOR DEL FILTRO DE PELUSAS El indicador CHECK FILTER parpadear6 antes de cada carga para recordarle que compruebe el filtro de pelusas Limpie siempre el filtro de pe...

Page 57: ...RY LEVEL para desplazarse entre los ajustes disponibles Utilice este bot6n para ajustar el tipo de secado que prefiera para las prendas de la carga Esta opci6n no est4 disponible para los ciclos de secado manual La secadora ajustar6 autom6ticamente el tiempo de duraci6n del ciclo Seleccionar EXTRA DRY o MORE DRY muy seco o m sseco incrementard el tiempo de duraci6n del ciclo mientras LESS DRY o DA...

Page 58: ...rdado Para guardar un cklo personalkado Presione el bot6n POWER para encender la secadora O ire el mando selector de cido para seleccionar el cido que desee Presione el bot6n de MODIFICADOR DE CICLO cambiar para el ajuste deseado O Presione el bot6n de OPCION DE CICLO las para agregar opciones deseadas Mantenga presionado el bot6n MY CYCLE Para recuperar un cklo personalkado Presione el bot6n POWE...

Page 59: ...claramente visible durante las funcJones de vapor Esto es normal No use la funci6n REFRESCADO CON VAPOR con prendas de iana cobijas de iana chaquetas de cuero seda ropa hOmeda ienceria productos de cjoma espuma o mantas ei_ctricas Para mejores resuitados coloque prendas con un tamaSo y tipo de tejido simiiares No coloque ropa en exceso Si ei sistema de ventiiaci6n de ia vivienda est6 obstruido dis...

Page 60: ...llmentador de vapor no tenga agua suflclente y se ilumlne el indlcador ADD WATER Llene el allmentador y relnlcle el clclo Use Onicamente agua No liene el alimentador de vapor con otros iiquidos0 enjuagues ni detergentes Antes de mover ia secadora aseg0rese de que ei alimentador de vapor est8 vacio No utiiice agua destiiada pues ei sensor de nivei de agua en ei cjenerador de vapor no funcionar6 Ten...

Page 61: ...ora O Tire hacia arriba del filtro de pelusas Elimine los restos de pelusa del filtro con los dedos Limpieza exhaustiva peri6dica Con el paso del tiempo cierto tipo de suavizantes pueden acumularse en el filtro de pelusas Estas acumulaciones pueden restringir el flujo de aire a trav6s del filtro reduciendo la eficiencia de la secadora y alargando los tiempos de secado Sitras retirar la pelusa el f...

Page 62: ...adora se considera parte de su vivienda y no est6 cubierta por la garanffa del producto ni por los contratos de protecci6n Hay servicios disponibles para realizar la limpieza o el mantenimiento de la ventilaci6n externa Sears ofrece este servicio mediante Sears Carpet Upholstery and Duct Cleaning Llame al 1 800 661 6594 para solicitar el servicio de manteni miento de conductos de Sears si est6 dis...

Page 63: ...izar Kenmore Connect 1 I f i MANTENGA el micr6fono del tel6fono sabre el bot6n de ENCENDIDO cuando el centro de Ilamadas se Io solicite a no m6s de 2 5 cm pero sin tatar la m6quina NOTA No pulse nlng_n otto bot6n nl glre el rnando del selector de clclo MANTENGA PULSADO el bot6n de TEMP mientras sigue su etando el tel6fono sabre el bot6n POWER ESPERE A ESCUCHAR tres pitidos Tras escuchar los tres p...

Page 64: ...exceslva en las prendas tras el secado Compruebe que el enchufe est6 conectado firmemente a una toma de pared con conexi6n de conexi6n a tierra que coincida con la placa de especificaciones de la secadora Reinicie el disyuntor o sustituya el fusible No aumente la capacidad del fusible Si el problema es una sobrecarga del circuito haga que Io solucione un electricista cualificado Reinicie el disyun...

Page 65: ...as cargas pueden requerir un ajuste del NIVEL DE SECADO para secarse correctamente Elimine las pelusas del filtro antes de cada carga Tras eliminar la pelusa sujete el filtro al trasluz para comprobar si est_ sucio u obstruido Si parece sucio siga las instrucciones de limpieza proporcionadas Con ciertas cargas que generan grandes cantidades de pelusa como unas toallas de ba_o nuevas podria ser nec...

Page 66: ...o se ha utilizado suavizante o se ha usado de forma incorrecta Las prendas se han secado durante demasiado tiempo secado excesivo Se estc_n secando prendas sint_ticas de planchado permanente o de mezcla sint_tica Elimine las pelusas del filtro antes de cada carga Tras eliminar la pelusa sujete el filtro al trasluz para comprobar si estc_sucio u obstruido Si parece sucio siga las instruccionesde li...

Page 67: ...laramente visible Esto se considera normal Compruebe el compartimento del alimentador de vapor 1 AsegOrese de que el alimentador de vapor est6 Ileno de agua hasta la I nea de nivel M_ X 2 AsegOrese de que el alimentador de vapor est6 asentado correctamente y que su compartimento est_ cerrado por completo 3 Encienda y apague la secadora a continuaci6n reinicie el ciclo de vapor NO UTILICE AGUA DEST...

Page 68: ...e_ado 6 Da_os o aver as en caso de utilizar detergentes limpiadores sustancias qu micas o utensilios distintos a los recomendados en las instrucciones incluidas con el producto 7 Da_os o aver as en las piezas o sistemas provocados por modificaciones del producto no autorizadas Cl_usula de exenci6n de responsabilldad o garanffas impffcltas llmltaci6n de recursos El 6nico y exclusivo recurso del cli...

Page 69: ...69 ...

Page 70: ...70 ...

Page 71: ...71 ...

Page 72: ... and water heaters 1 800 4 MY HOME 1 800 469 4663 Call anytime day or night U S A and Canada 1 800 827 6655 U S A 1 800 361 6665 Canada Para pedir servicio de reparaci6n Au Canada pour service en fran ais a domicilio y para ordenar piezas 1 800 LE FOYER Mc 1 888 S U H OGAR 1 800 533 6937 1 888 784 6427 www sears ca www sea rs com _ii i i_ iiiiiiiiiiiiiiiiiiiiiii Registered Trademark TMTrademark of...

Reviews: