background image

Kenmore

®

Electric Range

Cuisinière Électrique

* = color number, numéro de color

Use & Care Guide

Guide d’utilisation et d’entretien

English / Français

Model/Modèles: 970C5037*

P/N 316902149 Rev A

Sears Canada Inc.,
Toronto, Ontario, Canada, M5B 2C3

www.sears.ca

Summary of Contents for 970C5037

Page 1: ...e Cuisinière Électrique color number numéro de color Use Care Guide Guide d utilisation et d entretien English Français Model Modèles 970C5037 P N 316902149 Rev A Sears Canada Inc Toronto Ontario Canada M5B 2C3 www sears ca ...

Page 2: ...upplied with the product 3 Expendable items that can wear out from normal use including but not limited to filters belts light bulbs and bags 4 A service technician to instruct the user in correct product installation operation or maintenance 5 A service technician to clean or maintain this product 6 Damage to or failure of this product if it is not installed operated or maintained according to al...

Page 3: ...r brands Call 1 800 4 MY HOME TM MAJOR APPLIANCES And a whole lot more We have access to over 1 million parts and accessories REFRIGERATORS Water Air Filters Ice Maker Stainless Steel Water Line Thermometers Environmentally Friendly Appliance Cleaners VACUUMS Bags Belts Hoses Wands Brushes Nozzles Filters LAWN GARDEN Tune up Kits Oil Fuel Stabilizers Filters Blades Belts Spark Plugs Shear Bolts Sh...

Page 4: ...ification plate See Figure 1 for serial plate location Model No __________________________ Serial No ___________________________ Date of Purchase _____________________ Save sales receipt for future reference To locate the serial plate open storage drawer some models or warmer drawer some models The serial plate is attached to the lower right oven frame 2500 10 Figure 1 Serial plate location ...

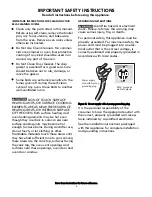
Page 5: ... never be allowed to sit or stand on any part of the appliance including the storage drawer lower broiler drawer warmer drawer or lower double oven Do not store items of interest to children in the cabinets above a range or on the backguard of the range Children climbing on the range to reach items could be seriously injured Indicates a potentially hazardous situation which if not avoided may resu...

Page 6: ...cement Act requires the governor of California to publish a list of substances known to cause cancer birth defects or other reproductive harms and it requires busi nesses to warn customers of potential exposures to such substances Read and follow the below instructions and precautions for unpacking installing and servicing your appliance Remove all tape and packaging before using the range Destroy...

Page 7: ...near the oven vent These items can melt or ignite Placement of Oven Racks Always place oven racks in desired location while oven is cool If rack must be moved while oven in hot use extreme caution and do not let potholder contact hot heating element in oven Use potholders and grasp the rack with both hands to reposition Remove all bakeware and utensils before moving the rack Do not use a broiler p...

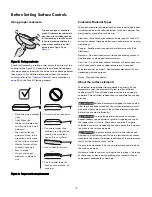
Page 8: ... will occur if the hot covers are touched Damage may also be done to the cooktop IMPORTANT INSTRUCTIONS ON COOKTOPS WITH COIL ELEMENTS Protective liners Do not use aluminum foil to line surface unit drip bowls or reflector pans Only use aluminum foil as recommended in this manual Improper installation of these liners may result in risk of electric shock or fire Make sure reflector pans or drip bow...

Page 9: ...ven though they are dark in color Areas near surface cooking units may become hot enough to cause burns During and after use do not touch or let clothing or other flammable materials touch these areas until they have had sufficient time to cool Among these areas are the cook top surfaces facing the cook top the oven vent openings and surfaces near these openings oven door and oven door window GROU...

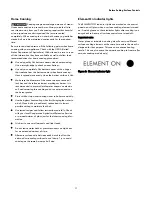
Page 10: ... they have been turned off The surface element may still be hot and burns may occur if the surface element is touched before it has cooled sufficiently Do not place plastic items such as salt and pepper shakers spoon holders or plastic wrappings on top of the range when it is in use These items could melt or ignite Potholders towels or wooden spoons could catch fire if placed too close to the surf...

Page 11: ...ass cooktops and to center canners on the burner grates Start with hot tap water to bring water to boil more quickly Use the highest heat seating when first bringing the water to a boil Once boiling is achieved reduce heat to lowest possible setting to maintain that boil Use tested recipes and follow instructions carefully Check with your local Cooperative Agricultural Extension Service or a manuf...

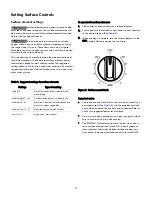
Page 12: ... in and turn the surface control knob in either direction to the desired setting See Figure 6 3 When cooking is complete turn the surface element to the OFF position before removing the cookware Important notes The surface control knobs do not have to be set exactly on a particular spot See Figure 6 Use the graphics provided as a guide and adjust the control knob as needed Refer to Table 1 for sug...

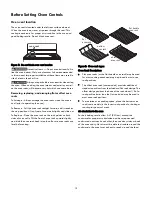
Page 13: ...k guides on both sides of oven walls Tilt the front of oven rack upward slightly and slide the oven rack back into place Be sure oven racks are level before using Oven Rack Descriptions Flat oven racks or the flat handle oven rack may be used for most cooking needs and may be placed in most oven rack positions The offset oven rack some models provides additional stepdown positions from the standar...

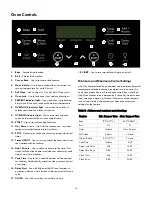
Page 14: ...s not affect any cook time or start time functions 15 Cook Time Use to set a specific amount of time needed for cooking Automatically cancels cooking process at end of set time 16 Delay Start Use with Bake and Self Clean functions to program a delayed start bake or delayed start self clean cycle 17 CLOCK Use with arrow keys to set time of day 18 LIGHT Use to turn internal oven light on and off Min...

Page 15: ...ever the OVEN LOCK indicator light is flashing If a control key is pressed when the OVEN LOCK is active Loc will appear in the display as a reminder that the oven keys are inactive when the OVEN LOCK feature is active Silent or audible control mode The appliance may be set for silent or audible operation If the silent mode is selected most of the sounds associated with setting the controls will be...

Page 16: ... minutes until 1 hour remains When less than 1 hour remains the display will count down in minutes and seconds Once the timer has less than 1 minute remaining only seconds will display If the timer is active when oven cooking the minute timer will show in the display by default To view information of any other active oven function press the key once for the active function to view status Setting B...

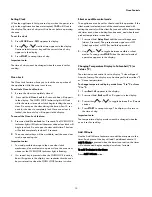
Page 17: ...egin baking immediately and to shut off automatically 1 Be sure that the clock displays the correct time of day Arrange oven racks and close oven door 2 Press Bake 350 appears in display 3 Within 15 seconds press or The display will show the default oven temperature of 350 F 177 C By pressing or the temperature may be adjusted in 5 F increments 1 C Press START to accept 4 Press Cook Time 00 will a...

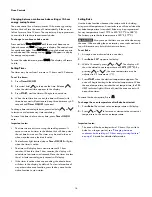
Page 18: ...ay 4 Within 15 seconds press or The display will show the default oven temperature of 350 F 177 C By pressing or the oven temperature may be adjusted in 5 F increments 1 C When desired tempera ture is reached press START to accept 5 Press Cook Time 00 will appear in display 6 Press the or to set the desired cook time Then press START to accept 7 Press Delay Start The time of day will appear in the...

Page 19: ...ke has been activated If the oven door is opened when Convec Bake is active the convection fan will stop rotating until the oven door is closed When using Convec Bake cook time reductions may vary depending on the amount and type of food being cooked Suggestions for Convec Bake For optimum cooking results it is recommended to preheat the oven when baking foods such as cookies biscuits and breads R...

Page 20: ...close the oven door and turn the oven off If the fire continues use a fire extin guisher Do not put water or flour on fire Flour may be explo sive Important notes Always arrange oven racks when the oven is cool For best results when broiling use a broil pan with broil pan insert designed to drain the fat from the food and help avoid spatter and reduce smoking To purchase them call Sears at 1 800 4...

Page 21: ...rovided near the electric outlet located on top of the backguard panel If needed press the circuit breaker switch to reset On some models a night light feature is included The night light switch will be located on the backguard panel Adjusting oven temperature The appliance has been factory calibrated and tested to ensure an accurate baking temperature known as the User Preference Offset UPO For t...

Page 22: ... cleaners or oven protective coatings in or around any part of the oven interior Clean any soil from the oven frame the door liner outside the oven door gasket and the small area at the front center of the oven bottom See Figure 16 These areas heat sufficiently to burn soil on Clean using soap and water prior to starting Self Clean Remove any excessive spills Any spills on the oven bottom should b...

Page 23: ...ut 1 hour and the OVEN LOCK indicator light has turned off the oven door may be opened 3 When the oven interior has completely cooled wipe away any residue or powdered ash with a damp cloth or paper towel Delayed Start Self Clean To start Delay Start Self Clean 1 Be sure the oven is empty and all oven racks are removed Remove all items from the cooktop Be sure oven door is completely closed 2 Be s...

Page 24: ... to allow for a cool down period Do not attempt to wipe out the oven before a 10 minute cool down period 10 An alert will sound when the timer is finished Press Timer ON Off to stop the timer 11 Stand to the side of the range out of the way of escaping vapor when opening the oven door 12 Wipe oven cavity and bottom Do not clean oven door gas ket See Figure 18 To stop the steam cleaning cycle at an...

Page 25: ...ive scouring pad Rinse and wipe dry with a clean cloth Do not allow food spills with high sugar or acid content milk tomatoes sauerkraut fruit juices or pie filling to remain on the surface they may cause a dull spot even after cleaning Oven interior For oven interior remove excessive spillovers from oven cavity bottom before starting Self Clean Clean any soils from oven frame and door liner outsi...

Page 26: ...sing the cooktop not only will the utensil be damaged or destroyed but it may fuse to break or mark the ceramic glass surface permanently damaging the cooktop surface Surface elements and drip bowls To remove the surface elements and drip bowls Surface elements may appear to have cooled after they have been turned off The surface elements may still be hot and burns may occur if touched before they...

Page 27: ...securely in place before turning on any of the surface burners When lowering the lift up range cooktop grasp the sides with fingertips only Be careful not to pinch fingers Do not drop or bend the cooktop when raising or lowering This may permanently damage the cooktop surface To raise and lower the cooktop 1 Remove all items from cooktop and set aside 2 Grasp the sides of the cooktop and then lift...

Page 28: ...rame See Figure 25 To replace oven door 1 Firmly grasp both sides of oven door along the door sides Do not use the oven door handle See Figure 24 2 Holding the oven door at the same angle as the removal position seat the hook of the hinge arm over the roller pins located on each side of the oven door frame See Figure 25 The hook of the hinge arms must be fully seated onto the roller pins 3 Fully o...

Page 29: ...d temperature before placing food in the oven Use proper rack position for baking needs Set oven temperature 25 F 13 C lower than recommended Cakes not done in center Oven too hot Incorrect pan size Pan not centered in oven Set oven temperature 25 F 13 C lower than recommended Use pan size suggested in recipe Use proper rack position and place pan so there is 5 1 cm to 10 2 cm 2 to 4 of space on a...

Page 30: ...pet interferes with appliance Provide sufficient space so appliance can be lifted over carpet Entire appliance does not operate Make sure power cord is plugged properly into outlet Electrical power outage Check house lights to be sure Call your local electric company for service outage information Service wiring is not complete Call 1 800 4 MY HOME for assistance See back cover Oven portion of app...

Page 31: ...view the Self Clean instructions in Oven Controls chapter on page 22 Soil not completely removed after Self Clean Self Clean was interrupted Review the Self Clean instructions in Oven Controls chapter on page 22 Excessive spillovers on oven bottom Remove before starting Self Clean Failure to clean soil from the oven frame the door liner outside the oven door gasket and the small area at the front ...

Page 32: ...424712 10 20 08 SR Printed in the U S A 02488 ...

Reviews: